Archive for July, 2010

Save Money-Auto Oil Changes & Servicing

Auto Oil ChangesYou may be tempted to perform your own Auto Oil Changes on your car or truck to save a few dollars. All we can say here is to make sure you know what you are doing before you make the attempt. Practice safe working conditions. Use the right tools, use the right oil, replace the oil filter each time, and dispose of the old oil properly.

We will cover each of these items in more detail. However, unless you are prepared to follow safe working conditions, do not attempt this.  Too many people have been hurt, even killed by their cars and trucks while doing their own maintenance to save a few dollars. It is just not worth it if you do not know what you are doing and hurt yourself badly. If your car is not supported by stationary jacks and also prevented from rolling, you could get crushed by your own car.

Auto Oil Changes – Canada

Auto Oil changes in Canada routinely cost from $35 to over $50 depending on the make and model of car. I just had the oil changed in my car at the dealer and it cost $53. However I had a free coupon for the oil change, otherwise, I would never have gone back to the dealer for an oil change.  There are other locations to have your oil changes such as Mr. Lube which are cheaper but still over $40 in price. At these prices, it can be worth it to change your own oil. However, in the United States, our experience has been much lower prices. They are in the range of $20 to $30, sometimes with a free car wash thrown in!

Safe Working Conditions

This is the most important section. If you screw this up it could be your life you lose! With most vehicles, they need to be jacked up sufficiently to allow you to slide underneath. You need to be able to undo the oil pan plug to remove the oil from the oil pan.

This is the dangerous part. If you need to jack up the auto in any way, always add safety support in the form of safety jacks. This is to protect you if the main jack gives way, you have additional support for the car. Make sure the parking brake is on and the car is in gear in the case of a standard and in park in the case of an automatic. You do not want the car rolling while you are under it. Also, place a block in front and behind the rear tires as an additional precaution.

Once you are confident that the car is well supported, gather all of the tools that you will need and make sure that everything is in readiness. You want to minimize the time you spend under the car or truck. Some trucks will not need to be raised, since there is enough space between the ground and the oil pan for you to get underneath.

One final item, remove the keys from the ignition and do not allow anyone in the vehicle while you are working on it or underneath it. You do not want any accidents caused by someone playing and accidentally releasing the parking brake etc. Absolutely no one should be in the vehicle while you are working on it.

Use the Right Tools

The tools are pretty simple. A socket wrench to remove the oil plug, a pan to catch the oil, a container to place the used oil in, a new oil filter, and the tool you need to remove it. Finally, a funnel to use to pour the clean oil into the engine. Don’t try to make do with inferior wrenches. You will likely strip the oil plug.  Never allow the oil to drain onto the ground or onto your garage floor. This makes a terrible mess and it is not good for the environment as well.

Disposing of the oil should also be completed properly. Take the used oil to a dealer that accepts old oil or take it to your community disposal site for paints and oils. This is by far the best way. They will make sure that it is disposed of properly.

Auto Oil Changes – Use the Right Oil

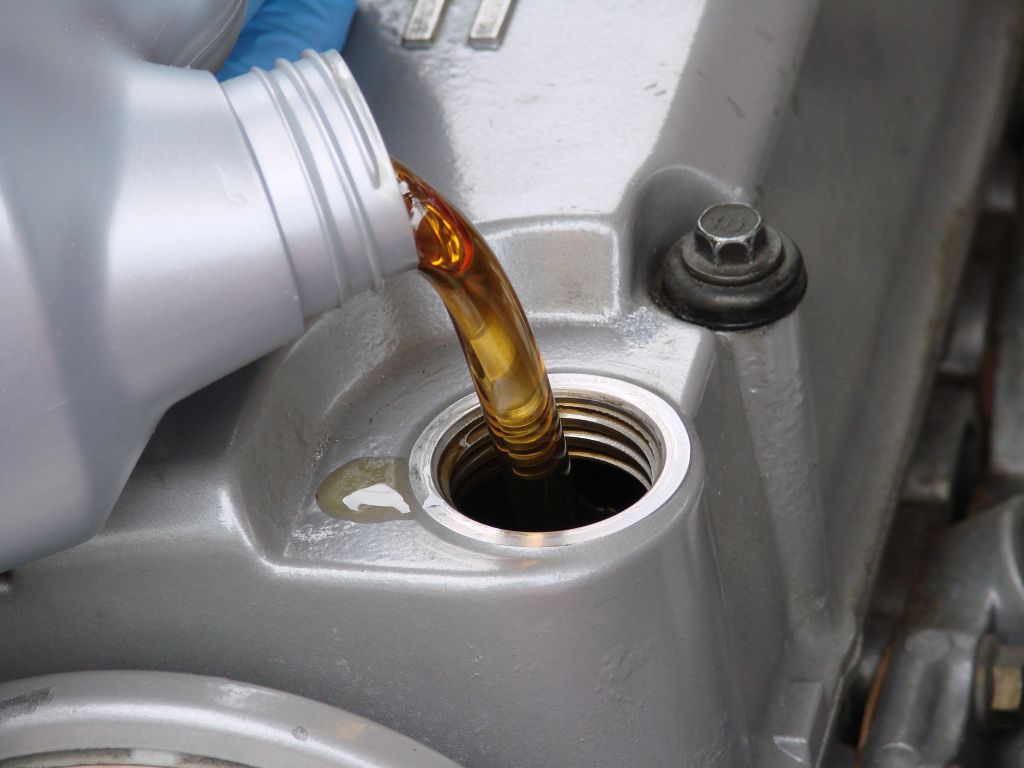
Most engines in most climates use 5 W 30 oil, however, there are many types available as well as synthetic oils that.  As a minimum, review your user’s manual for the recommended oil that you should use in your engine. If you have any doubts or want to try something different such as synthetic oil, consult your dealer for the recommended oil that can be used. It is just not worth it to save a few dollars using cheaper oil. Repairs to your engine can be in the thousands of dollars!

Replace the Oil Filter

Always replace the oil filter each time you change the oil. The oil filter is supposed to capture impurities that might find their way into the oil. You do not want them staying where they could reenter the engine oil circulation system. Empty the engine oil first and then remove the oil filter being careful to not allow the oil in the oil filter to drip in the engine or onto the floor.

Always replace the oil filter with a recommended brand. This way you will know that you have a good quality oil filter. Sometimes you may find others that are cheaper, however, just make sure it is recommended for your car and accepted by your dealer. This is one of the few times we will recommend spending more money on a quality product. The risk and cost of ruining your engine is just too great and too expensive!

Dispose the Old Oil Properly

We are all into conservation and the green movement and so we should. Take your used oil to a recognized facility that will accept it and dispose of it properly. Every community has a facility like this these days, although they may be at specific times of the year. Some dealers will accept used oil, especially if you purchase the oil filter and oil from them. You should really talk t them first and not just drop it off. After all they have to pay a fee to dispose of the oil and it is not fair to them to just drop it off.

We hope that this post is a benefit to many people and helps you save a few dollars. However, do not try to save a few dollars if you are not also going to practice safe work conditions. Don’t risk your life or a major accident to save a few dollars. Comments on the post greatly appreciated.

For ideas about maintenance, around your home, click here.


Wifi & Your Data Plan

Wifi Your Data PlanI recently acquired an IPOD Touch. I am amazed just how many WiFi sites that are available and are free to access! In case you are not aware an Ipod Touch can pretty much do everything an iPhone can do. Except make phone calls on the cellular networks provided by the phone companies. This is how you Wifi Your Data Plan.

They can connect via WiFi and browse the internet, do your email, Facebook and a thousand other applications, same as the iPhone. If you really want to make phone calls, you can use Skype to make calls. They are free when it is a computer to computer call and you pay a nominal fee when the calls are made to non Skype users.

What is really neat is that all of this data, phone calls, email , net surfing , Youtube videos etc is free as long as you are using a WiFi connection. Wifi Your Data Plan and save thousands of dollars.

This is the real advantage of an iPod Touch and as it turns out any smart phone that can also use WiFi. I also have an iPhone from work which does all of the things an iPhone is supposed to do over the cellular voice and data network. It is a 3G model so it is one of the later ones so it has all of the features that you need in a smart phone. I especially like the touch screen and large size that you have to work with viewing emails and web sites.  It is much more intuitive to use although it does have several limitations.

Major Advantage

For example, you cannot connect other devices other than ear phones, and there is no USB interface. Even without that it is a great little tool to use and I much prefer it to a BlackBerry device.

The real advantage of the iPhone in my mind is that you can program it to take advantage of free WiFi connections when there is a WiFi network around. It will use this free network instead of using the carriers data network and costing you a bundle for all of the data you are downloading.

Movies take a lot of data transfer and you can use up your plan quickly, and then are forced to pay very expensive rates for all of the extra gigabits of data that you download.

I do not know if other smart phones do this as well. I hope so. Maybe anyone reading this blog can let us know if this can be done by other smart phones. Most offices now have their own wifi networks.

Of course they are password protected, however if you have an iPhone provided by your place of work, or you have your own, you can sign into the network and use the free WiFi instead of using up your data plan.

Wifi Your Data Plan – Starbucks Announces Free WiFi

If you do not already know this, many coffee shops offer free WiFi to entice their customers to come in and stay awhile. Starbucks had this crazy scheme were you had to have a Starbucks card. Also have a balance of at least $5 on the card. If you maintain this balance you can have 2 hours of free WiFi every day. However you have to log in to your account to be authenticated.

Starting in July, apparently, WiFi will be free and unlimited as well to compete with the other coffee shops in the area. So program your iPhone to take advantage of these free sites. For most sites all you need to do is log in once. The iPhone will remember this for as long as you own the phone.

This is an absolutely great way to minimize your data bill with your carrier. Also you can use skype at these locations to make free calls to other Skype users. More savings for the user!

Other locations Offering Free WiFi

McDonald’s across the US offer free WiFi. They have not copied this in Canada as of yet. Many coffee shops offer free WiFi, including Second Cup, Bridgehead, non chain shops and lots of small mom and pop shops also offer free WiFi. The major chain in Canada that currently does NOT offer free WiFi is Tim Hortons.

I guess they feel that they have a large enough client base that they do not need to offer WiFi at their donuts shops. As of Sept 2012, they began rolling out WiFi to their donut shops.

Wifi Your Data Plan – WiFi at Home

Add a wireless modem at home and you can use your iPhone to browse the internet and any other apps you might want to enjoy. Make sure your home WiFi is password protected. Program your iPhone or iPod Touch to access this connection for surfing and playing games etc.

WiFi at home also makes it much more convenient for your users with laptops or other wireless devices. Most cable and dsl providers now offer WiFi enabled modems to enhance their customers experience and convenience. Installation is easy and from the first moment you can connect all of your computers as well as iPhones and iPod Touch devices with no problems whatever.

They also come with standard Ethernet ports to allow direct wire connections for older computers. Or those of us who want to have a more secure connection. This is convenience at the utmost and it saves you money at the same time over your wireless data plan.

If you have other thoughts about using WiFi instead of your wireless data plan on your data phone or smart phone. Please feel free to leave your comments and thoughts as part of this blog. We can all use more ideas to save us money, find new applications and enable the phones we have to be better tools for us.

For more wireless internet details and info, click here.

Save


Renting RotoTillers

Renting RotoTillersShould you purchase a rototiller or consider renting rotoTillers, and what kind should you get. We have a garden that is roughly 10 feet wide and 20 feet long. It is too big to dig by hand although I have done it and this was really a workout, believe me. For those of you who are into exercise, digging up your garden by hand and then raking it and working the soil until it is pulverized and ready for planting will definitely give you a workout! On top of that, you will also save money since you do not need to purchase a tiller or go to the gym. You save money which is the point of this website, however, it is not really the point of this post.

I have been renting rototillers for the past 5 or 6 years and have found them to do a really good job, they are small enough to fit in the trunk of my car and I only need the tiller for perhaps 2 hours. There are a couple of issues about renting a tiller. First how long you rent it and when you rent it can make a difference in how much you pay. In addition, you need to consider the size of tiller that you use, to ensure that the job gets done quickly and to your satisfaction. Last should you rent or buy.

Renting RotoTillers – When should you Rent?

Most places that rent equipment of this type to homeowners as well as construction people have standard rates and there is really not too much negotiation that you can do regarding the price. However, there is several little tricks that you can use to make sure you pay the minimum. First they will usually rent for a minimum hour time, sometimes it can be for 2 hours and then you pay by the hour after that. For example, the tiller I rented was $16 for the first 2 hours and then $3 for each hour after that. If you can get your job done in 3 hours or less you are going to pay $19 and that is not too bad.

I always try to go in just before closing and rent my equipment for the minimum time frame. This way I would pay $16 for the tiller, yet I would have it for a full 24 hours instead of just two hours. Now you need to be able to get your work done in the evening since it does get dark early depending on where you live. Another good time is just before a long weekend. The shop is usually closed for the holiday, so you might it lucky and have the equipment you are renting for a full 48 hours at the 2-hour price. Now that is a deal!

Size of the Tiller you should rent?

Always make sure you rent a tiller that is large enough to do the job. A small tiller will take you longer to cover the area that you are working up, as well it may not be heavy enough to really dig into the soil if it has dried out and become hard. This was my case, and my light tiller would only work into the soil about 4 inches. I would have liked to go deeper and have before, but this year the soil is dry and hard. We simply did not get enough snow this year.

A larger rototiller would have been more difficult to transport. It would have been heavier and possibly would not have fitted into my trunk. However I know a heavier tiller would have done a better job in this case. Even though it would have been more expensive to rent,  I would rather use it to do a better job.  So do not go for the smallest tiller if you are looking to work the soil to a deeper level. It will also complete the job quickly. They are  more powerful and heavier so they will go deeper and work faster.

Should you rent or buy a rototiller?

I have been renting a tiller for the past 5 or 6 years. I have to say this is the best approach for me. Each time it costs me about $25 with taxes to rent the tiller.  I have spent approximately $150 over the past 6 years. This does not come close to what a new one would cost. Now I tend to keep my tools a long time and maintain them. I know that a rototiller would definitely pay for itself over the long run. However, I only use a tiller once per year for maybe 2 hours at a time. Gas can go bad and gum up the carb. Iit just is not worth it for me to purchase my own rototiller.

For larger gardens, it might well be worthwhile to have your own. You would probably use it more often and then it makes it all worthwhile. So save yourself some money by renting a rototiller. If you really want to save money work up the soil by hand. The job will be almost as good, and you will really get a lot of exercise.

That is it for this post. If you like this post, leave your comments and suggestions for more posts. We are always trying to save some money for everyone and we look for great new ideas.


Big Ugly Dish

big ugly dishSome readers will remember the days when you needed a large big ugly dish, 8 foot wide satellite dish placed in your backyard or in some cases even in your front yard so that you could receive TV programs via Satellite.  Thank goodness that the days of the big ugly dish are long gone. Now we only need to deal with the smaller dishes that are approximately 2 feet across.

The picture on the left shows the kind of satellite dish many early adopters were willing to put up with in their back yards. Or even in their front lawns to enable them to receive a strong signal. Many municipalities even passed bylaws preventing these dishes from being erected. They were considered public spaces even thought they were on private land.

Some people might see the new dishes as still falling in the category of the big ugly dish. They are much smaller and compact than anything we had before. Also they deliver many more channels compared to even the large dishes.

New Style vs. Big Ugly Dish

The new style of satellite dishes are much smaller. They can be mounted on top of a pole, on the side of your home or even on the roof. The installer must do a good job of installing these small dishes. There is no need to worry about water damage or wind damage. The key really is to make sure that all penetrations of the wall or roof are properly sealed. Ensure that there is no chance of water penetrating through these holes and getting inside the walls. We will discuss this a little bit more later in this post.

From the picture you will note that there are multiple set top boxes. They enable satellite TV viewing to be shown on multiple TVs with different channels at the same time. Basically when you are using satellite TV reception you must have one set top box for each TV. Otherwise you cannot use your TV without a set top box.

Small Dish Installation

This is an example of a small dish mounted on the peak of a roof of a home. When you are installing these dishes, the main issue is to be able to have an unobstructed view of the satellite or line of sight . If there are buildings or trees with lots of leaves in the way there is a problem. You are going to be unsuccessful in receiving a strong signal from the satellite.  Many people make the mistake of installing a new dish with line of sight in the fall or winter. There are no leaves on trees and receive an excellent signal.

When the spring rolls around and the leaves come out on the trees, the leaves block the signal and their satellite TV reception fails. Now they have to move their dish to another location.  You may be able to get a good line of sight from the side of your home, however some people will need to mount them on the roof of their home to avoid conflict with other homes impeding the line of sight view with the location of the satellite.

Installation on the Side of a Home

This is an example of a small dish being installed on the side of a wall of a home with no siding or wall covering. The cable from the dish runs down the wall and enters the home through the basement  somewhere and then is distributed to the right location within the home.  The installer was able to find sufficient height this way to gain line of sight with the satellite for this home owner. Once the home owner decides to cover the walls of his home with brick or siding he will need to remove the dish and reinstall it on top of the siding, which will cause holes to penetrate his new siding. As long as they are sealed properly he will have no problems with leakage.

The picture on the left shows what the installation would look like with the siding installed and the dish installed on top of the siding. In this case the wire goes inside the home at the dish location and they do not have an unsightly wire running down the side of the home. If you plan to get a satellite service as an experiment to compare to standard cable , remember you can return the dish and set top boxes, however the holes in your roof or wall are permanent and must be sealed properly to prevent moisture and insects from entering your walls and causing further damage.

Apartment Buildings

Many people in apartment buildings will install satellite dishes to improve their reception. Note that you usually must get permission from the building owner or condominium board prior to installation to ensure that they are allowed in your building. Many building owners refuse to approve them. This is due to the damage they cause and the unsightly look of so many dishes.

I have seen apartment buildings with almost every apartment having a dish hanging off the balcony. It does not look very attractive to any one considering living in the building. Also you can only install these dishes on the side of the building that faces the satellite you are trying to receive a signal from. So before you buy check to make sure you actually face the direction you need to get a strong signal.

The big ugly dish has shrunk in size . However when you add them together at an apartment building, they truly are the big ugly dishes!

Feel free to add your comments and thoughts about these satellite dishes appearing everywhere and ruining your view! For more satellite dish info, click here.

Save


  • Copyright © 1996-2010 Managing Home Maintenance Costs. All rights reserved.
    iDream theme by Templates Next | Powered by WordPress