Archive for September, 2012

Hardwood Floor Refinishers

Tackling Simple Wood Floor Problems
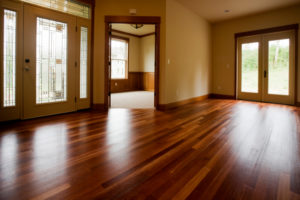
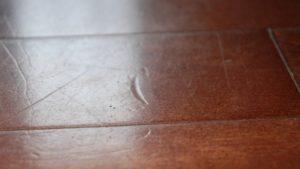
The floor in this picture really is in need of some work. Hardwood floor refinishers can bring an old floor like this one back to almost new condition if it is done properly. With all of the scuff marks and dust, it actually looks worse than it is. With a sanding and new stain it will look fantastic!

This floor needs a lot of work and you may want to hire a professional hardwood floor refinisher to do the work for you. However it is a good idea to understand what should be done for a floor like this. So that you can properly evaluate the proposal from any company that comes to do this work for you. There are many companies that offer hardwood floor refinishing services. The only way that you will be able to evaluate them properly is to know and understand the process. Also have some idea of how long the work will take.

First Steps for Hardwood Floor Refinishers

Before you call anyone, we would suggest that you vacuum the floor completely to remove all loose material. Next we would suggest that you clean the floor with a damp mop, not a wet mop. The objective is to remove any dirt etc. that may be on the floor. You want to be able to see all of the imperfections in the floor, any damage to the floor. You really be able to assess what is needed to bring this floor back to a like new condition. Some people might say that this is a waste of time. The refinishing people are just going to remove it anyway. While this is true, you will be able to see just how bad your floor is and make your own assessment.

The final step at this stage is an important one. When the floor is refinished, the top layer of finish and wood is going to be removed to expose clean wood that has not been penetrated by stain. If a floor is quite old, it may have been sanded several times before. It may not have much wood left for you to sand. You need to evaluate whether this is a hardwood floor that can be sanded or not. The easiest way is to remove the hot air register in the floor. Determine the thickness of the wood that is left. If you do not have a register in the floor, you are going to have to determine some other method of assessing the thickness.

Refinishing the Hardwood Floor

Whether you do the work yourself or have someone do it for you there are a number of things to keep in mind. First of all we suggest you talk to professionals to help you understand exactly how to proceed. This post is just too short to cover all of the details. To start with when you are sanding, you should never sand across the grain of the wood. never use orbital sanders, since they will leave scratch marks that run across the grain of the wood. Always use an inline sander to do your sanding. Keep the sander moving continuously to avoid over sanding in one spot. Only sand off what you need to expose the original wood.

With old floors there may be scratches and nicks in the floor. Unfortunately you are going to have to put these down to adding character to your floor. Minor nicks can be sanded out, while deeper scratches and nicks will have to be left the way they are, other wise you will sand too much of the wood off. You may need to use a small pic to remove stain or wax from the grove or nick in the floor. There will also be some hand sanding on the floor in corners and other hard to get at areas.

Once  the sanding is completed, a thorough cleaning is needed to remove all dust from the room and the floor. Again a damp mop is a good idea to pick up any remaining dust. Vacuum as well to get the dust out of the cracks between the strips of hardwood flooring.

Apply Finish

Next you can apply the finish to the floor. There are many kinds of finish including stains to stain the wood to a particular color that you may prefer. As well as protecting coats that can be placed on the floor. The best approach is to go to a paint store and speak to someone who is knowledgeable in the subject regarding hard wood floor stains etc. They will be able to recommend the best stain and covering for your floor based on the condition as well as the look that you are trying to create. Most people will use a clear var-ethane type of product to protect the floor from normal wear and tear of people walking on it.

Ask lots of questions and make sure that you are comfortable with the professionals that are doing the job. Also that they know what they are talking about and that these hardwood floor refinishers will not leave it worse that it was before they started.


Electricity Consumption

Electricity ConsumptionMany people are just not aware of what their electricity consumption is during the day or even during the month.  The chart on the left is for one day in June of 2011 for our home. It illustrates a number of things. But before we get into that we need to explain the chart a bit and how it relates to energy consumption.

In our city we have time of day billing for energy consumption. The green represents electricity used from 7pm until 7am. Yellow represents two time zones, one from 7 am to 11 am. The other from 5pm until 7pm. This is the mid level while the green is called off peak usage or consumption. The red runs from 11am until 5pm in the afternoon and is called peak usage time. They charge almost double for energy consumption during the peak times compared to what they charge in off peak times. The idea is to encourage customers to use less power during the day and more at night. It tends to balance out the electrical load between commercial customers and residential customers.

We have found that we can reduce our electrical bill a great deal by drying our clothes in the dryer during the evening, shifting air conditioning to the evening hours and generally not using electricity during the day.

Electricity Consumption – Why Should I Bother

Many people might take this attitude when they look at the chart and see that they are only talking about a dollar a day for peak hours. However if you multiply this by 365 days and you can save lets say even two or three dollars a day, pretty soon your getting close to a thousand a year that you can save.

I do not know about you , but a thousand dollars in my pocket instead of the electrical utility is a lot better in my books! It is not that difficult to save this kind of money compared to doing nothing at all. it is really just getting into certain habits which will not impact your life that much and will save you money.

What Do I need to Do to Reduce my Electricity Consumption?

It is pretty simple really. First focus on the big consumers of electricity and try to move their consumption from peak or mid peak to off peak hours. Drying and washing clothes, washing dishes in the dishwasher, adding a timer to your pool pump, running your furnace on your home later in the day are all good examples of major consumers of electricity. Anything with a motor or a heating element should be shifted into off peak usage rate hours.

Next turn off all appliances that are not in use. If you are not in the room , turn of f  the TV set for example. While things like radios and other electronics draw very little electricity, they all draw something, so why have them on if you are not in the room. Same thing with lights. turn them off if you are not in the room. Convert all lights from incandescent to LED or fluorescent lighting and save big time on your usage in this category.

Once you and your family get into the habit of turning off things especially during the day, it will become second nature and you will see the results when your electrical bill arrives. this is extra money that can be used to spend on trips, clothes or whatever your families needs are.

Electrical Consumption is All About Attitude

Some people just do not want to be bothered about reducing electricity consumption, while others consider it beneath them to even have to worry about something like this. One neighbor really just cannot be bothered. He would rather work and pay his higher bills instead of reducing his electricity consumption. Early we talked about potentially reducing your electricity bill by as much as a thousand dollars.

Did you consider how much  you need to earn in order to pay that extra thousand. Depending on your income tax rate, you might have to earn as much as $1500 to $2000 in order to pay that thousand dollar bill. I do not know about you, but I would rather put that money to other uses and or work less.

Something to think about when it comes to reducing electricity consumption and reducing your overall energy cost.

For more electricity reduction ideas, click here.


Cost of Replacing Windows

Cost of Replacing WindowsThe cost of replacing Windows in your home can be extraordinarily high especially if you have to replace all of the windows at the same time. In our neighborhood we have seen three or four of the neighbors make arrangements with a contractor to replace all of the windows on their home at the same time, whether they needed to be done or not. We also have one neighbor who does not paint his wooden frame windows at all. They look like crap and are probably rotting away which is not good for his home, his family or his home’s value.

Since this web site is all about saving money, I thought this would be a good topic to write about and discuss the various options and the extremes as mentioned above.

Cost of Replacing Windows

Basically there are four options with regards to managing the cost of replacing windows on your home. We are going to assume you hire someone to install the windows for you, although if you have the skills to do your own installation, then you can save in this area as well.

The four options we have outlined for dealing with wood framed windows are:

  • Do nothing
  • Scrape and paint your windows every year
  • Replace windows as needed
  • Replace all windows at once

We will discuss these options in more detail and some of the pros and cons of each scenario. You will have to make your own decision regarding which scenario is best for you in your own situation. We are assuming that all of the existing windows are wood frame windows on your home.

Do nothing –

We are really not in favor of this scenario, however as mentioned earlier one neighbor is using this approach and saving a lot of money for now, however sometime in the near future he is going to have to replace all of his windows due to the wood rotting etc.  His windows look bad from an esthetic perspective and as they rot and loosen, air will begin to seep through and all of the seals will be lost. In fact if enough moisture enters, the surrounding wood framing can also be damaged causing more expensive repairs. From a cash flow perspective, expense is delayed for some time and then a major cash outflow will be required.

Scrape and paint your windows every year –

if properly done, this scenario can extend the life of your windows for an extended period of time.  Each year home owners need to inspect their windows and if needed scrape loose paint or bubbling paint away and then repaint the windows. If you do this every year and do a good job of it your wooden frame windows will last for more than 25 years.

Avoid using companies such as student painters unless you give them specific instructions and inspect the work. They may not scrape loose paint away  properly and water gets into the area that is cracked etc. In fact you may as well not bother painting at all if you do not properly scrape your windows prior to painting. Doing it yourself is by far the best approach providing that you are comfortable working from a ladder. The cost will be a can of paint and some of your own elbow grease to get the job done every year.

Replace windows as needed –

We like this scenario combined with the previous one the most. We were able to limit  cash flow the most and still maintain quality seals for the windows around our home. Basically we are scraping and painting our windows as mentioned above. Until we notice – wood rot, window cranks fail or the windows lose their seal between the panes of glass.

When this occurs we arrange for new low maintenance windows to be installed. Our first window was replaced over four years ago, we have added 7 more in the ensuing four years and we have one more that we need to do this year. Compared to spending over $20,000 four years ago, we have been able to delay this particular cash outlay and spread it over many years. In fact we thing that it will be spread over 10 years which is roughly a thousand a year which is much more affordable than doing it all at once.

Replace all windows at once –

We really do not like this scenario for the reasons mentioned above. However many of our neighbors have opted for this approach. I guess they want to only deal with the problem once and then move on. They also do not want to have to paint their windows at all. In fact one neighbor is not good at doing his own maintenance. He simply does not have the skills or the desire. For him this scenario is by far the best. Although you have to spend a large amount of money all at once, all of the windows are replaced. No painting or scraping is required and the new windows are more energy efficient as well. This scenario really makes sense for those people who are not concerned about cash flow. They do not want to be concerned about checking their windows every year.

As we mentioned earlier, depending on your own situation, one of these scenarios will appeal to you more than others. If you do plan to paint your windows yourself or replace your windows,  follow safe working conditions. Ask someone to stabilize the ladder while you are on it.  Make sure that it does not fall while you are up the ladder. For more information about remodeling and other repairs, click here.

Save


Improving Energy Efficiency in Homes

Improving Energy Efficiency in HomesImproving energy efficiency in homes is becoming more and more important as oil prices and gas prices continue to rise. We all are becoming more concerned about  energy these days. How much it costs us? Were it is coming from? What it is doing to the environment? How can we control our cost of using energy? Ultimately the only things within our control is how much we use and what steps can we take to improving energy efficiency in our homes leading to a decrease in the overall cost of the energy we use.

If we can purchase our energy at the cheapest price we can find and then minimize the amount of energy that we use, then we are saving as much as humanly possible. The trade off of course is what does it cost us to save a dollar of energy. If we have an old fridge and have to spend a $1000 to get an energy efficient fridge, is it worth the investment? We do not think so unless you plan to replace the fridge for other reasons. then you should buy the most energy efficient fridge you can find.

So what are the steps we can take towards improving energy efficiency in homes. We have compiled a general list that many consumers can consider and use depending on their personal situation and their current energy foot print as it relates to our homes.

Improving Energy Efficiency in Homes

Check for Leaks

There are many locations around your home were cold air can leak into your home in the winter time and hot air in the summer. Check for leaks around your windows and doors were there is a bad seal, a bad fit or missing weather stripping. Seal up all of these locations so that air cannot escape. You can even arrange to do a compression test to determine how much air you are losing and were the leaks are.

Fill all holes around Water Lines, Cable, etc

Whenever utilities must enter your home, they always drill holes through the foundation or the upper walls. These holes are sources for insects to come through along with air that can leak in either direction. In most cases they are already plugged, however it is a good idea to check all of them to make sure that no air can escape in either direction. Check water lines, electrical lines, cable TV lines, Telephone lines, gas lines, central vac systems that exhaust to the outside, air conditioning systems and any others that may exit or enter your home.

Improving Energy Efficiency in Homes – Caulk the Exterior

Check around your homes exterior and caulk any locations that you feel might be a source for air to penetrate. Check around windows, doors, exhaust vents and any utilities as previously discussed. Seal all of them to ensure your home is air tight.

Manage the Thermostat

This is a big one and can save you a lot of money by reducing your homes energy consumption. You can save 20 or 30% by setting your thermostat cooler in the winter at night and when you are not home. No need to heat your home at normal temperatures when you are not in the home. Same things goes for the summer time, when you can turn up the thermostat to reduce cooling costs when you are not there.

Close The Blinds in Summer

The sun can add a lot of heat to your home in the summer simply by shining in through your windows. Close the blinds on windows facing the sun to reduce the cost of cooling in the summer time. Keep them open during the winter to take advantage of the suns heat in the winter time.

Improving Energy Efficiency in Homes – Turn off Lights and Appliances

It is surprising how many people do not turn off lights in rooms they are not in. Same thing with appliances. By turning them off you can contributed to improving the energy efficiency of your home. Not only do you save the energy the appliance uses when not turned on, you reduce the cooling cost as well. All devices generate some level of heat when they are on and you have to add this to your cooling load in the summer time.

Upgrade to Energy Efficient Devices

Everything from removing incandescent lights, to using low flow faucets, to dual flush toilets can be implemented in your home to improve the overall energy efficiency of you home. All of these devices will cost some money, however the payback is getting more reasonable all of the time as the cost of energy increases. Although you are probably not going to shell out a thousand dollars to upgrade a major appliance  just because it is energy efficient, there comes a time when it is necessary so you may as well get the most efficient one you can when it is time.

Look at Everything with Energy Efficiency in Mind

While we cannot cover everything in one post, we encourage everyone to look at everything they do with energy efficiency in mind. Take every opportunity you can to reduce your energy footprint. Ultimately it will save you money in the long run as prices go up and up. Furnaces,  water heaters, air conditioners, and major appliances fall into the category of major energy users with a long payback if you are only looking at energy savings. Many of these items need to be replaced simply because they get old and cannot be repaired. Always go for the energy efficient appliances when it comes time and look for discounts and coupons offered by  companies and governments for energy efficient devices.


Hardwood Floor Cleaning Services

Hardwood Flooring InstallersThere is nothing nicer than a gleaming shiny hardwood floor like the picture on the left. This floor obviously has been not only kept clean, the owners have taken really good care of the floor while they lived there. Consumers can hire hardwood floor cleaning services to help them keep their floors looking pristine, but it is also important to treat your floor with care and respect to keep it nice over the years. Refinishing a hardwood floor is expensive and messy, so the longer you can avoid having to refinish the floor the better. Take care of it and you will not have to worry about refinishing for many years. This is an investment in your home that maintains its value for many years.

What to Look for Regarding Hardwood Floor Cleaning Services

If you plan to use a service to clean your hardwood floors there are a few things to consider before you hire a company to clean your floors. Aside from the obvious checks that you would do regarding someone coming into your home to deliver services, you need to find out how they plan to clean your hardwood floor. Using the wrong chemicals can certainly do more damage than it cleans leaving you with a bigger problem than what you started with.

If you are unsure about what products to use or the cleaners should use, you may want to talk to a hardwood floor sales company. They are going to wan to know what kind of finish is in the floor before they can provide solid advise regarding what to use. Most newer floors come with a finish on the floors to protect them and to make them look great. you do not want to damage this finish in any way.

Always Vacuum First

First of all they should plan to vacuum the floor to remove all grit that may be on the floor and any dust particles that may have built up over time. If you try to clean the floor with a mop or a cloth, before vacuuming, there is a high risk that you will grind any grit into the floor and even scratch the finish. Over time this approach will leave your floor looking dull and scratched.

In fact it is a good idea to vacuum your floors at least once per week and more often if you feel that there is a lot of dirt and grit that is tracked into your home onto your hardwood floor. You may hire a hardwood floor cleaning service or do this yourself.

Wash Your Floor

This is a very important step and must be done properly to avoid any damage to your floors. Basically hardwood floors do not like water and to avoid any damage, always use a damp mop rather than a wet mop to wash your floors. If you do get a few drops or a small puddle of water on the floor, wipe it up immediately. Run the damp mop across the floor several times and then rinse it thoroughly in a pail or in the sink. Plain water is find or you can use a little bit of dish soap that is really diluted. We also suggest that you use a paper towel to dry the floor, however if your mop is only damp , any moisture will dry almost immediately as you are mopping the floor.

Do not use any chemical based cleaners, such as pledge and other sprays or chemicals. They can sometimes remove the coating on your floor or leave a dull finish to your floor which is very difficult to remove afterwords.

Washing your floor with a damp mop is by far the best approach. The frequency will depend on how much traffic the floor receives and whether you were your shoes in the house.  We really recommend that owners of hardwood floors do not walk inside with their shoes, especially if they have been warn outside. They track too much sand and grit into the house and over time this will wear the finish off of the floor.

Make Sure Your Hardwood Floor Cleaning Services Avoid These Cleaning Products

If you are going to hire a cleaner to clean you hardwood floors, make sure they do not plan to use the following products:

  • Oil based, wax, polish, or strong ammonia-ted or abrasive cleaners.
  • Steel wool or scouring powder.
  • Wet-mop the floor with soap, water, oil-soap detergent, or any other liquid cleaning material. This could cause swelling, warping, delamination, and joint-line separation, and void the warranty.
  • Buffing machine.

All of these products can harm your floor. When you interview your cleaner, you will quickly get to know which cleaners know what they are doing when it comes to hardwood floor cleaning and which ones do not. Remember it is your home and your floor. It is always a good idea to stay informed and take charge rather than let someone else make the decision on your behalf.


Home Maintenance Tasks

Home Maintenance TasksEveryone forgets to do the routine Home Maintenance Tasks around the home unless it is something that you have to do every day or perhaps once a week such as taking out the garbage. Usually something is neglected for some period of time and then it becomes a problem that requires a more expensive solution beyond simple cleaning. We will cover a number of situations such as apartment renters, apartment owners, condominiums and single family homes.

We will not cover routine things such as cutting the grass or taking out the garbage. Everyone knows that they need to do these things. What we are looking at are some of the things that should be completed on a quarterly basis, seasonally and even annually around the home to make sure that you continue to live comfortably, safely and inexpensively compared to something breaking down and causing a lot more damage.

These tasks are difficult to remember because they’re so infrequent, but keeping up on the maintenance will not only extend the life of your appliances, it will also help them run more efficiently. To remind yourself to do them, set up email reminders, use a to do list or just making a not e on a calendar. Many smart phones have to do lists or you can down load an app that will help you keep track of these items.

Home Maintenance Tasks That You Should complete Around an Apartment or Apartment Condominium

Whether you’re renting or you own a home, it’s easy to let repeated tasks of home maintenance slip your mind.

The tasks you’re probably forgetting for someone who lives in an apartment are:

  • Flip the mattress (every three months).
  • Replace batteries in your smoke alarm (every three months).
  • Change your water filter (every two to six months).
  • Change your air filter (every two to six months).
  • Clean your fridge coils (once a year) and behind the fridge
  • Wash the windows, at least on the inside
  • Vacuum the vent pipe from the dryer once per year

Home Maintenance Tasks That You Should complete Around a Home

Whether you’re renting or you own a home, it’s easy to let repeated tasks of home maintenance slip your mind.

The tasks you’re probably forgetting for someone who lives in a home are:

  • Check that the drain pan under the cooling coil mounted in the furnace is draining properly and is clean for all air conditioning systems.
  • Lubricate circulating pump on a hot water heating system.
  • Examine the forced air furnace fan belt for wear, looseness and noise.
  • Have your furnace checked every year for faulty components and cleaning
  • Vacuum return air vents and cold air return vents to remove any dust buildup
  • Remove the grills on forced air systems and vacuum inside the ducts.
  • Replace furnace air filters each month during the cooling and heating season.
  • Ventilation system, such as heat recovery ventilator, filters should be checked every two months.
  • Check to see that the duct work leading to and from the heat recovery ventilator is in good shape, the joints are tightly sealed in any depth installation of plastic duct wrap is free of tears and holes.
  • Check smoke, carbon monoxide and security alarms, and replace batteries.
  • Clean portable de-humidifier, if one is used every week.
  • Clean central humidifier every month.
  • Turn off the water supply to the humidifier at the end of the season
  • Check to see that the bathroom exhaust fans are operating properly. Check the airflow to make sure that air is being drawn into the vent and expelled.

Avoid Water Damage

  • Check sump pump and exhaust line to ensure proper operation.
  • Confirm sump pump has no line obstructions or visible leaks.
  • Replace storm windows with window screens
  • Ensure windows and skylights close tightly; repair or replace weather-stripping as needed.
  • Insure all doors to the outside shut tightly, and check other doors for ease of use. Replace your weather-stripping if required.
  • If there is a door between your house and garage, check the adjustment of the self-closing device to ensure it closes the door completely.
  • Remove cover from the air-conditioning units and turn on power in the spring.
  • Insure that the ground around your home slopes away from the foundation wall, so that water does not leak into your basement.

Remove Leaves

  • Clean leaves from the eaves trough and roof and test downspouts to ensure proper drainage from the roof in the spring and the fall after the leaves have fallen.
  • Install outdoor hoses and turn on indoor valves in the spring.
  • Have well water tested for quality. It is recommended that you test for bacteria every six months.
  • If you have a septic tank, measure the slide and scum to determine if the tank needs to be emptied during the summer. Tanks should be pumped at least once every three years.
  • Remove winterizing landscaping material, for example, prepared gardens and if necessary protect young trees or bushes for winter.
  • Set up all lawn furniture, inspect fences and gates for damages or movement due to frost in the spring
  • Rake the lawn, remove all debris from the winter and add fertilizer once the ground is unfrozen
  • Plant flowers, shrubs etc at the appropriate time for your area and climate.
  • Place wire mesh over all potential openings that raccoons and other rodents can use to get into your homes attic. For more info click here

This partial list is a great start for all home owners and anyone who wants to take care of their home whether they rent or not. Good maintenance will ensure you have the lowest expenses over the long term.


Save


  • Copyright © 1996-2010 Managing Home Maintenance Costs. All rights reserved.
    iDream theme by Templates Next | Powered by WordPress