Archive for August, 2014

Caulk Before You Paint Window Frames

Caulk Before You Paint Window FramesIf you do not remove loose paint and caulking before you paint all the work you do in painting your windows is a complete waste of time and money. Paint will bubble up on window sills and frames for a variety of reasons. There will be nothing holding it in place other than the connection to the paint. You also need to caulk before you paint window frames.  There is no connection with the wood underneath. Also there will likely be cracks where moisture can find its way inside causing wood rot over time.

There are a variety of things that will cause the paint to chip off or bubble up. In some cases it is age. The sun that will cause the paint to deteriorate and chip away. For many people in northern climates it is the repeated freezing and thawing. Snow and water on the window sill will also cause the paint to crack. Water gets underneath not only pushing the paint up, it will also cause the wood to rot underneath if something is not done in a reasonable amount of time.

We recommend that the windows be checked every year and if there any signs of cracking or paint peeling, the offending area should be scraped and painted. Remember to caulk before you paint window frames. We have out lined the steps to follow below.

Caulk Before You Paint Window Frames – Steps

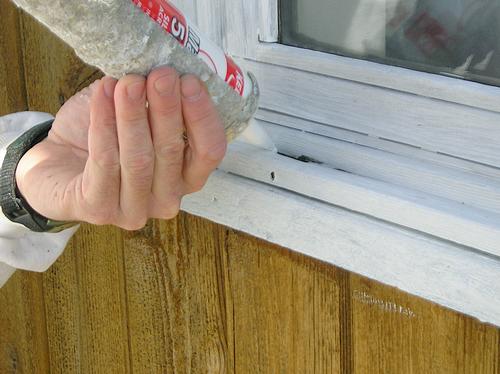
The first step is to scrape away all loose paint chips. In some cases this will be confined to the window sill, while in others like the picture shown it will be on the vertical surfaces as well. Next, use steel wool to remove all loose particles and roughen up the wood so that new paint will adhere to the wood. You can also use sandpaper, however we find that the steel wool is more flexible and easier to get at corners and round edges. The final step before painting is to apply caulking to all joints so that there is no chance of moisture getting into areas that could cause other problems such as cracking and wood rot. Once it is dry you can then begin applying an outdoor paint.

Use Paintable Exterior Caulking

Always use exterior caulking that is flexible, will withstand extremes of temperature, and can be painted. After all, you do not want to have caulking that cannot be painted marring your window frames! Where ever there is bare wood, you probably should apply a primer paint first. Then apply whatever color you chose. We have always just applied two coats of the regular paint. This provides good results since the wood is already sealed from the initial coat of primer paint.

Follow these steps every year and your windows should last many years. If someone is painting the windows for you, always discuss the details in terms of scraping and removing loose paint, caulking, and painting as discussed above. For more information about repairs around your home and saving money doing it, click here.

Save


How to Manage Energy Use

How to manage energy use is all about creating awareness and creating habits. That first step is probably why you are reading this post. You want to learn more about managing energy use and how you can control it! The image on the left came from www.businessenergy.com” at http://www.businessenergy.com/commercial-electricity-prices.html

For most of us it is about turning the lights off, using less water, buying energy efficient appliances, turning down the thermostat in the winter and turning up the thermostat in the summer. Converting to a high efficient furnace with a DC motor will save money too. If you have a time of day electrical system with peak rates and off peak rates you can shift energy use to the off peak times. This step does not reduce energy use but it does reduce your overall cost.

Create Habits – Manage Energy Use

Get into the habit of turning the lights off when no one is in the room. Adjust the thermostat , talk about it with the family. Get them involved as you try to manage energy use. It may take some time but they will gradually become converts! You may even have to provide some sort of incentive to help them form the habit of always turning off lights for example when they leave a room.

Increase Awareness – Manage Energy Use

Increase awareness about how to manage energy use can mean that you talk about it with the family. Get them involved and provide them with an incentive. Maybe a small trip with the savings. When you manage energy use, you save money so that it can be spent on other things that are more important to you and your family. Sometimes examples are helpful. Showing them the bills and letting them know how much things cost sometimes helps.  If a heating bill is much higher than normal, this is something you can discuss with the family and explore reasons that it is so high and what all of you can do to reduce the cost of heating in future months.


Paving Asphalt Driveway Design

paving asphalt drivewayOur driveway had settled next to the garage entrance by approximately three inches and it was time to find a solution. Our choices were to replace the asphalt with a new asphalt driveway, to replace it with patio stones in its entirety,  or to keep the asphalt and apply patio stones with some sort of design that would minimize our cost and also enhance our homes view from the street. We chose the paving asphalt driveway design with a patio stone design that involved a half moon approach at the top of the driveway and borders down each side of the driveway. We considered other designs, but settled on this one as the most attractive in our opinion.

It was also the most cost-effective as well since a new driveway was going to cost over $5000, while this do it yourself project cost less than $500 not including the bricks which we already had leftover from a previous project. While it was very hard work and not something I would recommend for the casual do it yourself consumer, it is very rewarding to have completed it and saved a great deal of money at the same time.

Paving Asphalt Driveway Design – Construction

Once we had finalized the driveway design it was time to begin construction. The most difficult part was laying out the circle. basically we had to find a center point in the driveway and then scribe a circle that left a border equal distance from both sides. We also wanted to come out 5 feet from the edge of the garage to provide adequate slope for water dispersal from the home.  This also represented the point where the settling of the driveway had stopped. We then cut the asphalt using a skill saw and an appropriate blade to cut the asphalt. Once the asphalt was removed, the gravel was set to the proper level and compacted. The patio stones could then be placed as per the design.

Paving Asphalt Driveway Design – Finishing Touches

Once all of the patio stones are in place, a sand concrete mixture is placed on the patio stones. This mixture fills the joints between the stones. Then the compactor is run over the stones to settle them all in place. This process also evens out the level of the stones so that they are all the same. In addition, the vibration from the compactor causes the sand to settle to the bottom of the joints. More sand is added. The compaction process is repeated until the sand completely fills the joints between all of the stones.

This sand mixture then must be dampened. This triggers the cement mixture in the sand to harden in place and become impervious to water and plants.  The trick is to only spray the bricks with a very light mist. Too Much Water and the sand will not harden properly. We also resealed the existing asphalt to protect it. This application will return it to the like-new condition when it was when first installed.

Save


Using The Bagster for Renovation Work

Using The Bagster for Renovation WorkThe Bagster is a really practical solution for those home owners who do not want to have a large steel bin parked on their driveway to handle all of the trash from a construction or renovation project. Consumers can purchase the bagster from one of many home renovation stores for a relatively small fee. It comes in a plastic bag that is about 18 inches by 24 inches and about 4 inches thick. Once unfolded it is 4 feet by 8 feet and approximately 30 inches deep. Consumers are urged to check the instructions. However you can place just about any material that is non liquid in nature into the bag for later removal.

In this picture the home owner has placed some renovation trash in the bag. They can be filled up completely as long as you do not exceed weight limitations. The limitations are advertised on the bagster package. For example lumber is pretty light. You can fill up the bag to overflowing and there will not be an issue. On the other hand if you place concrete or asphalt in the bagster, you should check with the company. Confirm how much material you can actually place in the bagster.

The Bagster – Removal Cost

Once you buy the bag and then fill it with trash, there is a fee for the company to come and remove it. The cost will depend on the area that you live in. In our case was going to be $200. They come with a truck that has a hoist on it and grab the straps and lift it onto the truck. It is easy and painless other than the cost of the removal.

If you have an alternate means of trash removal, that is less expensive, you may want to consider this. At a total of $250, if you have access to a trailer even with dumping fees, it will be cheaper to haul the trash away yourself. Whatever you do don’t be one of these idiots that just dumps the trash in a ditch somewhere. This is not helping anyone. It actually increases our taxes since someone eventually will need to clean out the ditch and haul it away.

The Bagster – Weight Limitations

If you are placing wood and drywall into the bagster, you are pretty safe relative to the weight limitation. If you are disposing of concrete or asphalt for example, there is a limitation of how much you can place in the bagster. The guideline we received was that there should be no more than 10 inches of material in the bagster covering the full 4 by 8 area of the bag. This rule is in place to manage the total weight of the material and to avoid any potential accidents when the bagster is lifted onto the truck.

We suggest that you call the 1-800 number on the package to verify the contents and the weight limitation that you have to adhere to before you purchase the bagster.

Save


Garden Edging Tips

Garden Edging TipsOver the years we have tried a variety of garden edging solutions and found that really only one stood the test of time in our opinion. We have used the black vinyl edge which comes in a coil. It has to be uncoiled and inserted partially into the ground in order to hold it in place. It does not look too bad the first year. But after that, it tends to become more exposed as the ground settles or the frost causes it to heave up. Our solution at that point is to either remove it or re-install it. We are not fond of either solution so we just do not use it any longer.

We have also tried just using a shovel to provide a clean edge. It looks great for the first week, then it either rains and fills in the edge, the grass grows and it just starts looking unkempt. With the pavers, we just use the grass edger or whipper snipper. It trims the grass back to provide a nice clean edge.

Garden Edging Tips – Natural Edge

We have also tried just creating a natural edge with a shovel or actually a spade. This works not too badly. However at least twice a year you have to go around and re-edge the lawn and the garden to make it look neat and tidy. Mowing the lawn is problematic. Either the wheel of the lawnmower goes into the groove you have cut or the lawnmower must be left back from the edge a little bit. This leaves an edge of long grass that has to be trimmed with a trimmer. This is more work and does not always look great.

Garden Edging Tips – Use Patio Stones

We have found the best solution is to use patio stones and an edge. Install then flush to the grass level. They provide a hard flat surface to place the wheel of your lawnmower on so that grass is cut to the edge of the patio stones. At times we also use an edger to trim the grass if it begins to encroach over onto the patio stones. Use a blower to blow away all grass cuttings etc off of the pavers.

The picture shows the installation and it has been in place for several years. As you can see these patio stones look great and they also have not moved. They were installed simply by removing the grass and some of the soil to allow a flush installation with the grass level. A base of crushed stone was not added as most experts might call for. The simple reason is that this edging is not a walkway and there is no weight placed on it. If it does move a bit, it probably will move with the level of the grass. All you need to do is take a few minutes and re-level it if needed.


Using Pavers for Garden Edging

Using Pavers for Garden EdgingWe had a number of patio stones left over from a patio that we built some years ago and were wondering what we should do with them. As you can see from the picture we are using pavers for garden edging to separate the lawn from the garden. They provide a nice border that separates the two and makes it easy to cut and trim the lawn as well. As you can see from the picture they provide a nice aesthetic addition to the property when they are used in relatively small areas. Installation is relatively easy compared to installing these same stones in a patio or a retaining wall by comparison.

Using Pavers for Garden Edging – Installation

These particular stones do not even have a base of crushed stone. All we did was remove some of the grass and soil to the appropriate depth. They placed the stones as shown in this picture. These stones in this picture have been in place for roughly four years and have not moved. They do not need to support anything and they do not need to stay flat. Instead, we want them to move with the lawn as it shifts over time.

This saves a great deal of work as well as expenses. If there was a retaining wall or if this was a walkway, we would have to excavate down to at least 18 inches and then fill with crushed stone that was then compacted. Not so with this simple border as a garden edging. They have not really moved in any noticeable way over the four years. It makes cutting and trimming the lawn very easy as a result.

Using Pavers for Garden Edging – Benefits

One of the benefits of edging such as this is that it is a lot easier to cut the lawn. We just run one wheel of the lawnmower along with the stones and cut the lawn at the proper height. There is no damage to any plants. The soil is not disturbed and if you use mulch it does not get picked up and distributed over the lawn.

From time to time we need to trim the grass since it begins to encroach over the stones. This task is also much easier as well since the pavers or patio stones provide a nice flat surface. There is a well-defined edge to trim too. Consider this approach as a simple means of establishing garden edging. Using pavers for garden edging is relatively inexpensive as well, especially when you have some left over from other projects. They also add a decorative look to your lawn.


Manage Energy Use at Home

Cooling Your RoofWhen you try to manage energy use at home it must become a way of life. In other words the entire family must support your attempt at reducing the cost of electricity, heating fuel and so on if you really want to make a substantial change. But it is a struggle to get the family on board. They are either not interested or they just do not care because they are not paying the bills!  If they have no idea of what the cost of electricity and heating fuel actually is, then they may not care that much that the cost of this energy  can be reduced putting more money in your pocket. Thus is typical in families and yet you can make it happen over time.

Creating Habits – Manage Energy Use

Even my spouse is hard to convince. We now do the laundry after seven at night because the cost if electricity is cheaper. My spouse does the laundry at that time because she knows that it would be upsetting to me if she did the laundry at some other time. I have this feeling that if I was not there she would do the laundry whenever she felt like it. When the cat is away, the mice will play is the expression that comes to mind. But we are making progress, we now use timers for some lights and we do the laundry after seven!

Set an Example – Manage Energy Use

There are two ways to manage energy use and the associated cost. First shift your use from peak rate times to low rate times e.g. Do the laundry in off peak time frames. Run your pool pump, your air conditioner, cook meals etc in off peak times to reduce your overall cost.

Secondly you can reduce your energy costs by using less energy. Energy efficient appliances, converting to LED lights, turning lights off when not in use etc. are all ways of reducing energy use. Managing your heating and cooling cost is another way to reduce your overall energy cost. Simply adjust the temperature so that your heating system and your cooling system does not run as often. You will save energy for sure. LED’S are by far the most efficient light that can be used and will save you a great deal of money. Most people just have to get over the initial sticker shock, but they are definitely worth it.


Disposing of Asphalt From Your Driveway

Disposing of Asphalt From Your DrivewayIf you are planning a do it yourself driveway repair such as the one shown in this picture, one of the things that must be considered as part of the job is disposing of asphalt from your driveway that has been cut out of the driveway. In this case two strips, one on either side along with a half-moon near the garage entrance. This is a lot of asphalt and in our particular case we cut out about 40 cubic feet of asphalt. Cutting the asphalt was relatively easy. We used a skill saw with the proper blade for cutting asphalt. Consumers can rent a larger gas-powered machine that will do the job faster, however, this has a rental cost of approximately $100 vs. a couple of blades for less than $10.

Getting Rid of Asphalt – The Bagster

The original plan was to purchase a product called the bagster,  for a price of $40, fill it and have the company come and pick it up when ready. There were two problems with this approach. First of all the cost for pick up was going to be $200 in addition to the cost of the bag which was $50 including tax. The second problem was that for heavy material, the company requires that only the bottom 10 inches of the bag be filled. As you can see this bag is very full and has about 2 feet of material in it.  This was going to cost much more than planned since I might have to purchase a second bag and the total cost was going to come to around $500!

Disposing of Asphalt – the Solution

Fortunately there was a landscaping contractor working around the block on a neighbors property. He already had the truck and the bobcat and was willing to pick up the material and dispose of it for $150, a net savings of $50, and would also take all of it in one load which saved even more money.

He came over with his team one evening just as they were finishing up with the other property and in the space of 10 minutes it was all gone with the driveway swept up and clean of any sign of the asphalt originally in the bag. Now I am trying to sell the bag at a discount to get some of my $40 back. Either way whether I sell it or not, I have already saved money on this deal.

We wrote about this particular issue to show readers that there is always more than one way to deal with items that might be problematic for do it yourself people. If I had my own truck or a trailer, I would have disposed of the material myself and probably had to pay a dumping fee.

This contractor was already going to the dump and had factored that cost into his current project, so the $150 was pure profit for him and it saved me money as well, definitely a win-win for both of us. This is something else to consider when doing your own work on big projects.

Save


Driveway Paver Installation

driveway paver installationThis is a continuation from a previous post about installing pavers or interlocking stones on your driveway. Once you have compacted the base, leveled the base and placed the patio stones in the design that you have chosen it is time to complete the final steps. In this case the stones were placed in a half moon shape. Borders running down both sides of the driveway. It is important to install the pavers as level as possible. Before adding the sand concrete mixture to go in between the joints.

Pour the sand across the driveway starting at one side. Using a brush, push the sand across every stone so that all cracks are filled. Once this step is completed you will want to run a compactor across all of the pavers which will accomplish two goals. The first is to compact all of the pavers well into the base  and essentially make them all level with each other.

The second objective is to vibrate the pavers so that the sand concrete mixture penetrates the joints all the way to bottom. This is the way the professional do it. They make sure that the base is well compacted and level as possible following the natural slope of the driveway. Compacting the pavers and pushing the sand into the space between the stones ensures that they will not move. Also water does not easily penetrate between them.

Driveway Paver Installation – Repeat the Process

Once the first phase is completed, you find that more sand concrete mixture must be added. Again using a broom, brush the sand across all cracks so that they are completely filled. You will also want to sweep up any access at this point as well Some consumers will run the compactor over the stone one more time and refill any cracks that require more sand. Too much sand mixture on the stones will cause it to adhere to the top of the pavers. You will want to remove all excess sand mixture before completing the next step in the process. The last step is critical and must be done correctly otherwise the sand concrete mixture will not set properly.

Driveway Paver Installation – Lightly Spray Water

We really mean lightly spray some water on the sand concrete combination to harden it. If you spray too much water on it too soon, the sand concrete mixture will not harden properly. You may find it lifting in the future from these cracks. The final bond will ensure that the joints are all sealed and no water will get in between them especially in the winter which would cause cracking and lifting of the patio stones.


  • Copyright © 1996-2010 Managing Home Maintenance Costs. All rights reserved.
    iDream theme by Templates Next | Powered by WordPress