Garden

Keep your Lawn Healthy over Winter

Keep your Lawn Healthy over WinterMost consumers and homeowners do not realize how important it is to complete proper fall cleanup to maintain their lawns and gardens. After the colder weather in the fall sets in most plants begins to go into their dormancy phase. Trees lose their leaves and annuals die off. Fall cleanup is often the furthest thing from everyone’s mind during this time frame. If you want to keep your lawn healthy over winter, there are a number of things to do. Thanksgiving and the holidays are just around the corner.

Keep your Lawn Healthy over Winter

Properly prepare your lawn for the winter and spring. This step will ensure you have a healthy lawn in the coming year. Leaves left to rot on the grass can often kill the grass underneath. Leaves also provide a home for small rodents. Small rodents will build burrows through the longer grass leaving a mess in your lawn. This occurs when a lawn is left too long just before winter sets in.

Lack of proper fertilizer that strengthens the root system can make all of your plants vulnerable to damage. A dry winter or spring will damage lawns with weak root systems.

Fall cleanup prices offered by landscaping companies will depend on the lawn clean-up services actually performed. The following is a brief fall clean-up checklist that consumers and homeowners may consider.

Keep your Lawn Healthy over Winter – Fall Clean-Up Checklist

  1. Trim Lawn to the proper length to discourage small rodents
  2. Apply fertilizer to promote proper root growth
  3. Rake all leaves and other debris from the lawn and gardens
  4. Remove all dead annuals
  5. Pickup dead or broken branches from shrubs and trees
  6. Clean out eaves troughing
  7. Install protective burlap wraps on shrubs if needed
  8. Additional services as required

This is not a complete list. Every homeowner may have specific tasks that they may want to be considered. These can be included in a packaged clean-up cost estimate or quoted separately.

Competitive Pricing

Many consumers will consider doing some or all of the work themselves. Suddenly they find that it is too late to do most of the fall cleanup themselves. Homeowners can request a competitive pricing estimate today for leaf cleanup, lawn and garden fall preparation. Once they have the cost estimate, they can make a decision to have all or part of the work completed.



Inexpensive Lawn Care

inexpensive lawn care Everyone loves a beautiful yard, with Rich green grass in the weeds.  Many people either do not know how to achieve this result or feel they have to spend a great deal of money to have a really nice lawn. They want inexpensive lawn care solutions. Consumers all over North America know that keeping the lawn well-maintained will ensure that it looks great but it also keeps weeds away.  Weeds will overtake the lawn particularly if the grass is not healthy or not very thick. The reverse is also true, a healthy lawn will prevent weeds from taking hold and will even prevent them from growing to start with.

Inexpensive lawn care

The following are steps that every homeowner can take to have a great-looking lawn without spending very much money. It may take a few more hours of your time but it is definitely worthwhile and will ensure that you don’t spend a lot of money either.

Here are the steps for inexpensive lawn care :

  • Fertilize your lawn four times a year
  • Water your lawn on a regular basis
  • Use weedkiller twice a year
  • Apply spot we killer as needed
  • Apply grass seed to thicken up the lawn to thicken up the lawn
  • Pull all larger weeds by hand once a week
  • Mow the lawn as often as needed but maintain grass height at 1 1/2 inches to provide good cover

Homeowners who follow these simple steps will have a great-looking lawn which will be inexpensive to maintain. You will also be the envy of the neighborhood.


How to Make a Fruit Fly Trap for the Home

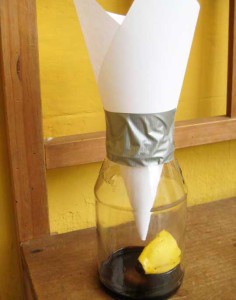
How to Make a Fruit Fly Trap for the HomeThe picture on the left shows how to make a fruit fly trap for the home. It is pretty simple really. All you need is a glass jar some over ripe fruit, some tape and a piece of paper. Put the fruit in the bottom of the jar. Coil the paper into a cone and place it in the jar as shown with the narrow end down. Seal the gap around the jar with tape and you have your first fruit fly trap. These work pretty well, but what do you do with the fruit flies when they are all in the jar. I guess you take them outside and let them go, or perhaps drown them with water. Don’t forget to dispose of the fruit in the garbage and seal the bag.

There will probably be eggs on the surface of the fruit which will hatch within 8 days and then you have a whole new set of fruit flies buzzing around and bothering you.  There are other types of traps to consider.

How to Make a Fruit Fly Trap for the Home

Another approach is to place some cider vinegar in a bowl. Add a drop of dish soap to the vinegar. This breaks the surface tension of the liquid which causes the flies to sink to the bottom and drown. Not only do you catch them, you also kill them preventing any further egg laying by the adults. This is one of the best ways to get rid of fruit flies.

Aside from trapping fruit flies, the best way to get rid of them is to get rid of potential food sources. Wipe cupboards, counter tops etc of fruit flies, you w to make sure there are no crumbs left over. Throw out all overripe fruit and seal the garbage bag. If you have a lot of fruit fly’s you may have to build several traps to capture all of them.

Save


How to Get Rid of Ants

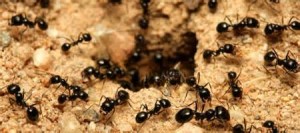
How to Get Rid of AntsThis year ants have invaded our yard building nests wherever they can. We have interlocking stones for our patio. They love to build their nests under these with the entrance between the joints. There is lots of sand excavated on top. Sand even gets washed into the pool when it rains. We have found thousands of ants in the pool, which get cleaned up by the pool skimmer. We are researching to figure out How to Get Rid of Ants. Over the years, we have also tried a variety of chemicals to get rid of them in addition to natural solutions. The only thing that seems to work is the real stuff, Raid!

How to Get Rid of Ants

Basically, if the ant entrance is between the bricks, I spray raid all around the entrance and into the entrance. This kills them almost immediately! If the ant hill is in the lawn or around shrubs, we have used a lawn spray that is mixed with water to kill the ants and many other insects, including grubs. We have a grub problem also, so this solution does double duty in killing the ants as well as grubs.

But it is a never-ending battle. It is impossible to get rid of all of them, and they just keep breeding and creating new ant nests. You see, there is a little leaf linden in our backyard that is infested with aphids. The tree is far too big to spray, and the ants love the aphids and the sweet sap that leaks from the leaves. As it turns out, this is one of their primary food sources and provides a breeding ground and lots of food for them to consume.

The best we can do is control the number of ant hills. By the way, we also placed ant traps near the entrances to our home inside so that any ants that do come in find the traps and take the poison back to the nest. At best, we have ongoing skirmishes with no one winning the battle.

Save


Best Garden Bed Edging Tips

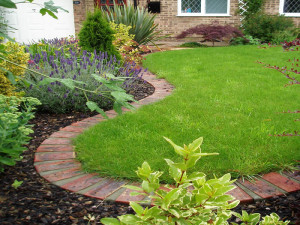
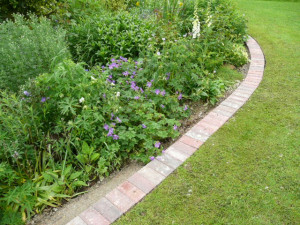
Best Garden Bed Edging TipsAdding edging to your garden improves the overall look of your lawn and your garden as well as providing separation between the two. We found that it was much easier to mow the lawn with this particular type of edging since you can rest one wheel of the lawnmower on the stones. The stones are flush with the level of the lawn. Also when it comes to trimming the grass along the edge it is much easier as well to create a nice defined edge to the lawn. The brick is actually pavers that were leftover from another landscaping project. This is one of our preferred Best Garden Bed Edging Tips.

We did not bother with a gravel base. We just removed the amount of grass and earth we needed and placed the stones in place. Since they do not need to support any weight and we also want the pavers to move with the level of the grass, this works really well and is very easy to install. We tried this approach in another area of our property last year and it has worked quite well. the pavers have not moved and they do the job of separating the lawn and garden very well. It is an inexpensive way to create a really nice environment in your lawns and gardens.

Best Garden Bed Edging Tips – Types

There are a variety of edging materials in addition to the one that is shown in the picture. Many people use a flexible rubber liner. It is placed partially in the ground and extends an inch above the ground level. While this works effectively, it is more difficult to cut along the edge. It also means that you have to use an edger more often to keep the grass from getting overgrown along the edge. You can use any kind of edging. However, you will need to take into account how easy or difficult it is to mow the lawn and maintain the edging. We have tried this approach in past years. The plastic liner rises over time and becomes a nuisance. We would rather not use this liner at all.

Best Garden Bed Edging Tips – Maintenance

The stone edging that is shown in the picture requires virtually no maintenance. In was installed over one year ago and only one stone needed a slight adjustment over that period of time. The flexible rubber liner we had previously had to be readjusted almost every year. My money is on the paver stones for long term maintenance and overall look and feel. If you are concerned about the cost, check for sales. Check for leftover pavers in the fall at building supply stores. If a neighbor is replacing his patio, (this happened in our area), ask if you can have the pavers. Reuse these pavers to create a great looking edge for your lawn.

For more information about your garden and also garden edging tips, click here.

Save


Garden Edging Tips

Garden Edging TipsOver the years we have tried a variety of garden edging solutions and found that really only one stood the test of time in our opinion. We have used the black vinyl edge which comes in a coil. It has to be uncoiled and inserted partially into the ground in order to hold it in place. It does not look too bad the first year. But after that, it tends to become more exposed as the ground settles or the frost causes it to heave up. Our solution at that point is to either remove it or re-install it. We are not fond of either solution so we just do not use it any longer.

We have also tried just using a shovel to provide a clean edge. It looks great for the first week, then it either rains and fills in the edge, the grass grows and it just starts looking unkempt. With the pavers, we just use the grass edger or whipper snipper. It trims the grass back to provide a nice clean edge.

Garden Edging Tips – Natural Edge

We have also tried just creating a natural edge with a shovel or actually a spade. This works not too badly. However at least twice a year you have to go around and re-edge the lawn and the garden to make it look neat and tidy. Mowing the lawn is problematic. Either the wheel of the lawnmower goes into the groove you have cut or the lawnmower must be left back from the edge a little bit. This leaves an edge of long grass that has to be trimmed with a trimmer. This is more work and does not always look great.

Garden Edging Tips – Use Patio Stones

We have found the best solution is to use patio stones and an edge. Install then flush to the grass level. They provide a hard flat surface to place the wheel of your lawnmower on so that grass is cut to the edge of the patio stones. At times we also use an edger to trim the grass if it begins to encroach over onto the patio stones. Use a blower to blow away all grass cuttings etc off of the pavers.

The picture shows the installation and it has been in place for several years. As you can see these patio stones look great and they also have not moved. They were installed simply by removing the grass and some of the soil to allow a flush installation with the grass level. A base of crushed stone was not added as most experts might call for. The simple reason is that this edging is not a walkway and there is no weight placed on it. If it does move a bit, it probably will move with the level of the grass. All you need to do is take a few minutes and re-level it if needed.


Using Pavers for Garden Edging

Using Pavers for Garden EdgingWe had a number of patio stones left over from a patio that we built some years ago and were wondering what we should do with them. As you can see from the picture we are using pavers for garden edging to separate the lawn from the garden. They provide a nice border that separates the two and makes it easy to cut and trim the lawn as well. As you can see from the picture they provide a nice aesthetic addition to the property when they are used in relatively small areas. Installation is relatively easy compared to installing these same stones in a patio or a retaining wall by comparison.

Using Pavers for Garden Edging – Installation

These particular stones do not even have a base of crushed stone. All we did was remove some of the grass and soil to the appropriate depth. They placed the stones as shown in this picture. These stones in this picture have been in place for roughly four years and have not moved. They do not need to support anything and they do not need to stay flat. Instead, we want them to move with the lawn as it shifts over time.

This saves a great deal of work as well as expenses. If there was a retaining wall or if this was a walkway, we would have to excavate down to at least 18 inches and then fill with crushed stone that was then compacted. Not so with this simple border as a garden edging. They have not really moved in any noticeable way over the four years. It makes cutting and trimming the lawn very easy as a result.

Using Pavers for Garden Edging – Benefits

One of the benefits of edging such as this is that it is a lot easier to cut the lawn. We just run one wheel of the lawnmower along with the stones and cut the lawn at the proper height. There is no damage to any plants. The soil is not disturbed and if you use mulch it does not get picked up and distributed over the lawn.

From time to time we need to trim the grass since it begins to encroach over the stones. This task is also much easier as well since the pavers or patio stones provide a nice flat surface. There is a well-defined edge to trim too. Consider this approach as a simple means of establishing garden edging. Using pavers for garden edging is relatively inexpensive as well, especially when you have some left over from other projects. They also add a decorative look to your lawn.


How to Get rid of Aphids

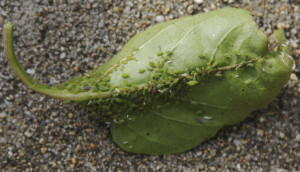
How to Get rid of AphidsYour wondering how to get rid of aphids. One of the best ways to get rid of aphids that have infested your flowers next to using a pesticide of some kind is to use soap spray. The picture that is included with this post is from our garden and the flowers and the leaves were just infested with aphids by the thousands. Not only is it not a pretty sight, but the flowers and the plants will also quickly show signs of stress if something is not done quickly. By stress we mean they will begin to turn brown and eventually die if something is not done about all of these aphids. If the leaves begin to curl you probably have aphids on the inside of the leaves. Just uncurl the leaves to check them out and confirm what you already know is attacking them.

When you first notice aphids on your flowers, it can be a bit sickening to see so many of these insects crawling around.  While it is not nice to look at, they will not hurt you in any way. You just need to get on with the job if removing them.

How to Get rid of Aphids – Use a Soap Mixture

We tried using soap with some success. They were reduced but not totally eliminated and we had to use several treatments before we really made an impact on the number of aphids on these flowers. You will want to use a spray bottle that is leftover from some other liquid. Make sure you clean it out and rinse it thoroughly before using it for the flowers. You do not want to accidentally kill your flowers by spraying Windex or some other liquid on them which would be harmful to the plants. Once you have your spray bottle follow the directions outlined below and be prepared to apply several applications of the mixture to the flowers to get the best results.

Mix the following in a spray bottle:

1/4 cup vegetable oil
2 drops of liquid dish soap
4 cups warm water

Shake well, and spray the leaves and stems of infected plants. Also spray the surrounding plants to get rid of a current aphid problem. Spray weekly to keep new ones away. Also, spray the top side of the leaves and flowers as well as the underside. There are just as many aphids on the underside of the flowers and leaves. You need to get rid of all of them to ensure that they do not harm the plants.

Safety tip: The first time I made this solution I used way too much dish soap. It burned the leaves of my flowers. You really only need a couple of drops of soap in the spray bottle. You may also need to apply the soap mixture several times and soak the leaves each time.

Save


  • Copyright © 1996-2010 Managing Home Maintenance Costs. All rights reserved.
    iDream theme by Templates Next | Powered by WordPress