Maintenance

Repairing Exterior Door Frames

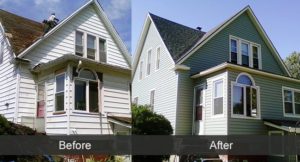
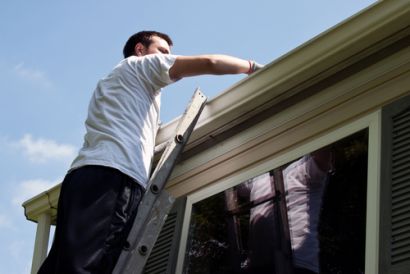
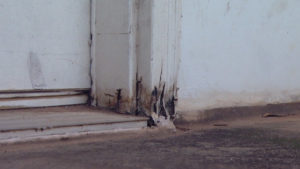
If your exterior door frame looks like this one, there are several repair alternatives. Repairing exterior door frames can be very expensive. You could replace the entire frame and perhaps even the door. Depending on your decision, a new door will cost several hundred dollars or more.  Fancy doors will cost in excess of a thousand dollars. Remove damaged parts. Make sure you remove all of the rotted wood. Replace it with a piece of wood that matches the area you are removing, caulk and paint. When you do this work yourself it can be very inexpensive. We will cover this step in more detail in the next section.

Repairing Exterior Door Frames

The following steps can make your door look like new again and cost very little. The outside frame is also refereed to as the brick mold.

  • Dig out the rotted wood with a knife or chisel
  • Next, you need to determine how much wood to remove and how deep it goes
  • Identify solid wood about an inch above the rotted area
  • Using a square, draw line where you will cut out the brick mold
  • You will need to purchase a piece of brick mold that matches the area you are cutting out
  • You may need to make adjustments to get an exact fit
  • Take the time to ensure that if fits well to ensure that the finished product will look great
  • Once you are satisfied with the fit, pre-drill two holes for the screwnails you will use to secure the new piece of wood.
  • Screw the wood into place
  • Use exterior paintable caulk to fill any gaps that may exist and to water penetration
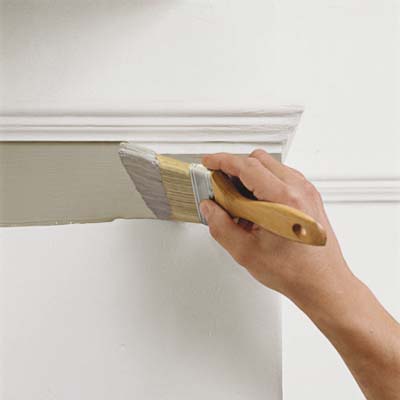
  • Once you are satisfied with the result, paint the new wood and the rest of the door frame
  • Although time consuming, do it yourself consumers may only spend $20 or $30 instead of hundreds or thousands of dollars.


Do Gutter Guards Really Work

We wondered, do gutter guards really work and what are the cash savings if any from installing these guards?  The principal is that water running down your roof carrying debris will be separated by the gutter guard. The water going into the eaves trough will be carried into the downspout. Debris will be washed over the edge and down onto the ground. Without a guard, annual cleaning is needed to avoid situations like the one shown in the picture. The gutters quickly fill up if you have trees nearby.

If you do not clean the gutters, dampness remains in the gutter causing mold and can cause the roof to become spongy and rotten under the shingles. Gutter cleaning could cost from $100 to $200 or even more depend on how many feet of gutter you have. With lots of trees, you may have to have them cleaned twice a year. Over 10 years, that’s $2000 assuming that you hire someone to do the work for you.

Do Gutter Guards Really Work

There are several different types of gutter guards. in situations with heavy rain, most will cause the water coming off the roof to just wash over the gutter and onto the ground. If you do not have heavy rains very often, this may not be an issue for you. Depending on the gutter guard you choose, there still may be a need to clean debris off of the guards and in one case to remove seeds that can embed themselves and sprout. Here are the different types of guards and specific issues you should consider for each in addition to those mentioned above.

More Information

  • Reverse Curve Guards – These are typically made from metal or vinyl and sit over the gutter opening. They essentially form a cover that allows water to slip around the guard but prevents large debris from coming to rest in the gutter. High volumes of water will simply overshoot the gutter and fall to the ground below.

  • Slit Gutter Covers – These are a variant of the reverse-curve and usually include one or two recessed slots that increase the amount of rainwater that can flow into the gutter. These systems also struggle to manage heavy downpours like the simple recurve system.

  • Sponge Guards – This approach places a sponge that is shaped to conform to the inside of your gutter. Water flows through and since the mass of the sponge fills the gutter space, large debris cannot accumulate. The real downside is that small debris particularly seeds can get caught in the sponge and sprout.

  • Metal Screens – These curved screens come in short sections and fasten onto the outer lip of the gutter.  They are inexpensive and easy to install but are susceptible to clogging because the opening size in the mesh catches small debris.

  • Micro-Mesh Gutter Guards – Micro mesh guards consist of a support frame and a filtering mesh material which ranges from fine to micro mesh. The advantage of micro-mesh technology is that they provide the best flow-through characteristics and do not clog with small debris. While their performance is superior the only real drawback is that the systems are more complicated to install.

How Much do You Want to Spend

They all come at a price, some more expensive than others and some are easier or difficult to install. Based on the concerns expressed for each it is obvious that some level of maintenance will still be required.

Before you invest in gutter guards, compare the cost of installation including materials. Consider annual maintenance from time to time. Compare with the cost of just having your gutters cleaned out once or twice a year. If you are ok with climbing ladders, factor the do it yourself cost as part of the comparison.


Should You Install Gutter Guards

Should you install gutter guardsAs a homeowner I’ve always wondered should you install gutter guards in my eaves trough? I have always cleaned out the eaves trough at least once a year and sometimes twice a year. They’re always seem to be an accumulation of leaves, keys from the maple tree in front of our house, and other debris that lands on your roof and is washed into the eaves trough. When I was younger, it was no problem to get up on the ladder and clean out the stuff. Now that I’m getting older and inclined to climb less I’m wondering if I should invest in a gutter guard for the eaves trough or pay someone to clean it out?

Should You Install Gutter Guards

It will probably cost between $50 and $100 each time I have someone come over and clean out our eaves trough. If I do it twice a year that will be $200 a year. Over 10 years that’s $2000 that I will spend paying someone to clean out my eaves trough not taking into account any inflation.

I have about 50 feet of eaves trough that would need a gutter guard installed. At $20 per foot, that’s about $1000 in total for the cost of the materials. I probably could install it myself at this point. But many people are unable or just do not want to get up on a ladder to install something like a gutter guard in the eaves trough. Installation of the eaves trough would probably take a couple of hours. Conservatively it would cost roughly $200 to install for a total cost of $1200 compared to paying $2000 over 10 years.

The gutter guard seems to be a clear winner, however, there are other points to consider. Not all gutter guards are made the same way. If they’re not installed properly debris will still build up on top of the gutter guards. The gutter guard must be aligned with the slope of the roof. Rainwater must wash any debris off of the gutter guard.

Overflow

There will be some overflow onto your garden, driveway, or whatever’s underneath your roof. Some water will not drain through the gutter guard and will simply flow over the gutter guard. This will happen in severe and heavy rainstorms.

Since we just had our tree removed, I have decided not to install the gutter guard. I probably will get them cleaned once a year. Which will cut my costs in half and make it much cheaper than having gutter guards installed and risking that I will still have to have the debris removed from them. Each consumer should evaluate their own situation, understand the costs involved in your location. Make your own decision using these kinds of guidelines and thought process that I went through for myself.


Should You Replace or Paint Your Vinyl Siding

Should You Replace or Paint Your Vinyl SidingVinyl siding is an extremely popular material that is used all over the country to cover the walls of homes. In many cases, brick will be used on the front of the home. Vinyl will be used on the other three walls. It is very durable and retains its color for many years. Just the same, the colors do fade after many years. Homeowners who want their home to look great must make a decision. Should You Replace or Paint Your Vinyl Siding?

Assuming that the vinyl is still in good shape physically, i.e. no holes or broken pieces, consumers can definitely consider painting the vinyl. If you do have to make repairs i.e. add a new strip of vinyl, it will be virtually impossible to match the colors. Your vinyl will have faded and changed color over the years. It is not possible to obtain an exact match. Painting becomes a very desirable solution. Although we always encourage consumers to obtain quotes for both scenarios, to confirm that it is less expensive to paint than replace, we feel that painting is less expensive and it is something you can do yourself.

Should You Replace or Paint Your Vinyl Siding – Steps to Follow

  • Complete Repairs – remove and replace any broken or cracked pieces.
  • Clean the surface of the vinyl from a build-up of dirt and chalky substance that may have built up over the years.
  • Remove any mold from the siding especially under the eaves.
  • Ensure you have a dry day with low humidity and light or no wind, especially if you will use a sprayer to paint the vinyl to avoid paint drift onto other surfaces.
  • Use paint as close to the original color as you can. Avoid darker colors. Vinyl absorbs heat especially with dark colors and will expand and contract a great deal causing the vinyl to overheat and possibly warp.
  • Use paint that is specifically made for vinyl siding. This paint is made to stretch and contract with the vinyl as it heats and cools.
  • Spray paint works the best, however, brush or roller painting works well especially on corners, etc.
  • Allow the paint to completely dry before applying a second coat.
  • Follow the instructions of the manufacturer to ensure that your paint application will last many years.

For more maintenance-related posts, click here.


How to Stop Mildew Forming in Showers

how to stop mildew forming in showersWe are confident that almost all consumers have had to contend with mildew forming in showers. Mildew or mold is a common problem for many consumers and once it takes hold, it is very difficult to remove it. In our next post we will discuss how to remove it. However for our first post about we thought we would focus on how to stop mildew forming in showers in the first place. Mold or mildew needs two things to live and grow. Moisture which is obviously a problem in the shower and bathroom area. the second thing is food, such as soap, oils and skin cells from our bodies and other products we may use. There are easy methods to control mildew growth.

How to Stop Mildew Forming in Showers

Let’s first deal with the moisture issue. Consumers should always use a fan when running the shower. If you do not have a shower fan, like us, leave the shower door open when not in use. Air circulation will absorb the moisture and dry out the shower. Secondly always squeegee the tiles, door or curtain after you shower. You want to remove as much of the moisture and soap as possible from the walls etc.

Using a squeegee also removes the food that the mildew needs to live. But that is definitely not enough. At least every two weeks consumers should  clean the walls, door or curtains to remove all soap buildup and other material. Washing with vinegar is one of the best ways to clean the tiles etc.

We had mildew forming on our ceiling like the one in the picture. Once we started leaving the door to the shower open it stopped forming. We then sanded the ceiling and repainted the ceiling with a mold resistance paint.  So far it has lasted a year without more mold or mildew forming. Remember moisture and food. That is what you need to control to keep mildew from forming.


Save


How to Remove Mildew From Tiles in Showers

Our last post discussed how to prevent mildew and mold forming in bathrooms on shower tiles. This focuses on how to remove mildew from tiles in showers once it has formed. The first recommendation is to keep your shower clean and dry if you want to avoid mildew and mold in the first place. Once it has formed, you will need strong cleaners to remove the stains. There are many products on the market. Some work, some do not. We are not recommending any one particular product. Vinegar works well as does bleach, however you need lots of ventilation and protective gloves. Be careful of your clothes as well to avoid stains from the bleach.

Remove Mildew From Tiles in Showers

This picture clearly shows lots of mold on the grout. Consumers need to remove all soap scum, calcium stains etc from the tiles. It is going to take some time and elbow grease to remove the stains. Using bleach or vinegar, spray the tiles, let it soak for awhile and then scrub the tiles. Wash with water. Repeat the process until the tiles are clean.

The soap scum on the grout is much more difficult to remove. Scrubbing and application of vinegar will remove the surface material. If the grout was not sealed in the first place, the soap scum will come off. A high pressure steam cleaner can be used to clean the grout as well. This works well although again your need to use a lot of elbow grease to clean the grout.

The worst case solution is to use a grout removal tool to get all of the grout material out of the joints. Re grout the joints and seal the grout joints.

Once you have your shower tiles nice and clean follow the steps outlined in the previous post to prevent further damage from mold and mildew. Keep your shower walls dry and clean your shower every two weeks.


Warranty Claims for Roof Shingles

warranty claims for roof shinglesMy roof has black stains all over it on several different parts of the roof. We are thinking about warranty claims for roof shingles. However the industry has a really bad reputation for warranty support. A neighbor has curling shingles after only 7 years. Apparently he has to join a class action suit to get any money back. Even at that it will be minimal in terns of cash. It will not come anywhere close to replacing the roof. With this information, we think there is little chance of any help from the shingle manufacture for us. They do not pay for installation under the warranty so you are really out a great deal of money. It seems that the black stains on our roof is caused by algae and there is not a lot that can be done about it.

Warranty Claims for Roof Shingles – Algae

One solution is to wash the roof with a chemical wash. However you need to take proper precautions to avoid damaging the roof further. In addition there is the cost of the chemical and finding someone who will go up on the roof to apply the chemical.

Our roof is 14 years old and it supposedly has another 11 years to go. They were 25 year shingles. The shingles look physically ok, it is just this black coloring on the roof in specific areas.

We took pictures, had them printed and filled in this long report. I think there is less than a 10% chance that the shingle company will do anything about this.

Update: about two months later, we received a replay. Sure enough they denied the claim and indicated that this is a common mold that forms on many roofs. We have since noticed that many homes in our area have the same problem.

There is basically nothing we can do at this point, so I guess we just live with it.

If you are interested in reviewing renovation posts, click here.

Save


Mulch Beside the Foundation

Mulch Beside the Foundation When placing mulch beside the foundation there are several issues to consider. Consumers want to avoid future problems. Although it may look nice, if leaks, deterioration of the foundation, mold etc develop you will regret the day you placed the mulch. The main consideration is always about the presence of water, drainage of water and moisture remaining in place. Whenever there is water present in liquid form or dampness, there is a chance that your foundation will pay a price. This means it will cost you money at some point in the future. We will explain further.

Mulch Beside the Foundation

As landscaping of any kind is considered, the following rules should be considered to avoid future problems:

  • Ensure that there is always a gentle slope away from a foundation to channel water away from the wall
  • Always keep the ground level at least 9 inches below the top of the foundation.
  • Always avoid earth or mulch touching a wood wall or siding. Water will penetrate and begin rotting your joists.
  • Using stones instead of mulch against the wall would be a better solution than mulch
  • The ground will often settle next to the wall over time due to water washing down the wall and into the weeping tile that surrounds your foundation. This is a natural process and should be topped up so that water will channel away from the wall
  • Lack of eaves troughs allows water to fall next to the wall and the foundation. Install eaves trough and channel the water away from the wall.

By following these steps you should be able to avoid leaks in your basement, damp  basements and deterioration of supporting wood structures sitting on top of the foundation. For other maintenance information concerning your home, click here.

Save


Rent or Buy Your Furnace and Air Conditioner

Rent or Buy Your Furnace and Air ConditionerOur furnace just quit working and our air conditioning unit is 27 years old! Amazing life cycle and it still works. The furnace is only 14 years old and we are trying to figure out if we should rent or buy your furnace and air conditioner or just repair it. Most people would just say replace it.

After all the AC unit does not owe you anything and it will likely quit sometime soon anyway. We could perhaps just repair the furnace and hope for the best. However we wondered what the economics would be considering repairing the furnace or replacing both the furnace and the AC unit. Also a third scenario has been proposed and that would be to rent both units. The price would include all cleaning and servicing for as long as we paid the monthly payment. My initial reaction was to always purchase however when you do the math, there is a surprising answer.

Rent or Buy Your Furnace and Air Conditioner

We assumed a 15 year study life, a cost of $9500 to purchase the units, a cost of $25 a month to provide service and warranty once the manufacturers warranty was finished. We also assumed a cost of $700 for repairs which would last for one year. The rent scenario assumes $50 a month for the furnace and $45 a month for the AC unit including all servicing and warranties.

Using these numbers it makes sense to rent if you are planning on 12 years or less to rent. It makes sense to purchase if you feel that the units will last longer than 11 years which they should. However I need to find $9500 to pay for the installation and I still need to pay $25 a month for insurance.

I can finance the cost of the furnace etc.  Or I could use some of my savings to pay for these units and forego any income I might get from the current investments. I am fortunate to collect 3% on my investments at the present time. This is a real cost to me which I would save if I were to rent the furnace and the AC unit.

This income when factored in changes the breakeven period from 11 years to 20 years. This is probably more than the life cycle of these new units and longer than I plan to live in the house.

I still need to confirm all of the estimates with actual quotations. However I am definitely leaning towards renting and not making a purchase at this point.

For more maintenance ideas and ways to save money, click here.

Save


Dryer Vent Ice Dam

Dryer Vent Ice DamIf you have a dryer vent ice dam or moisture forming under cold dryer vents, you should make repairs immediately. All of this moisture dripping on to the floor or the wall is going to cause deterioration of the wood through rotting and worse. Mold can cause health issues. We will discuss how these situations occur and what the solution is for a situation like this. Starting with this pipe shown in the picture which is the worst pipe that can be used for a dryer vent that exits to the outside.

 How does it Happen

Basically warm moist air flowing through a cold pipe is going to cool quickly. This will cause moisture to condense on the side of the pipe. It then run to the bottom of the pipe and drip out of the joints in this particular pipe. If it is cold enough on the outside of the pipe the water will freeze. The ice can melt later when the weather warms up. This water can cause extensive damage to underlying floors and walls including rotting wood and mold. If it is cold enough the moisture can actually freeze in the pipe causing an ice dam inside the pipe as well as outside.

Dryer Vent Ice Dam – Solution

Change the pipe to a single continuous pipe with no joints or seams. If there is a seam along the length of the pipe, make sure you install it with the seam on the top. In addition surround this pipe with insulation so that the pipe is kept relatively warm. This will avoid freezing the moisture in the dryer exhaust.

Any time you have icicles on your roof or forming from a dryer vent, there is a problem somewhere. Homeowners need to pay attention to these kind of issues immediately to avoid much more expensive repairs in the future.


Window and Door Screens

Window and Door ScreensIt is a cold day in January and you might wonder why we are writing about window and door screens at this time of year. Turns out this is one of the best times to arrange for new windows and door screens to be installed. If you need a window replaced, the window repair companies are offering great deals at this time of year. They do this to keep their business going during the slower months of the year. You can easily ask for a 10% or more discount. Ask for more discounts because they are hungry for business. Winter time is a slow time of the year for them. They want to keep their people working they are willing to negotiate discounts.

Some consumers are concerned about heat loss while the window is being replaced. Yes you do have some heat loss. However it can be minimized by closing the door to the room that is being worked on. In addition the window is only out of the window opening for 5 or 10 minutes before the new one is in place. The amount of heat you lose and the corresponding cost will be less than $5.00 worth. There is little to be concerned about.

Window and Door Screens

Whether it is new window and door screens, many consumers like to have screens on their windows. Particularly for the warm summer months. Open the windows, let the fresh air in  and keep the bugs out. There are a variety of screens. Some are sliders like the one shown in the picture. While some fit over the window and stay in place when the window is opened. They can be removed to wash them, which should be considered once per year. Washing screens is pretty easy.

All you need to do is remove the screens, take then outside, brush them with soap and water. Then spray them with the garden hose to clean off all of the dirt and soap. Do it on the lawn so the water and soap nourish the lawn. Then just let them dry in the sun for an hour and reinstall them in your window frames. While they are drying you can wash the inside of the windows as well.

Your choice of window screen or door screen will pretty much be determined by the type of window you select. New screens come with new windows. If you are installing a new door, you may want to install a second door with a screen. In all cases make sure that the window screen or door can be locked to prevent access. Even though someone can easily break the screen, it prevents the opportunist from entering your home without actually having to break it. It also alerts you to a break in when they smash through the screen.

For more information about routine maintenance around your home, click here.


Save


Painting a Room – Steps to Follow

Painting a RoomHaving just spent the last couple of weeks painting several rooms in our home, I thought it would be interesting to write about what I learned. And cover some of the steps to follow when painting a room in your home. We have baseboards along the floor which is standard in all homes, hardwood floors and popcorn ceilings. There are several windows and doors with closets. This means there is lots of trim to deal with. In addition these rooms have not been painted in a while so there are nail holes in the walls that were used to hold up pictures, mirrors and small paintings. There is even the odd nail pop and other imperfections to deal with.

In addition, to painting my wife has decided that all of the door hardware etc is going to be changed along with the window coverings. You get the idea we hope of what the typical room is like and what needs to be done.

Painting a Room – Preparation

Proper preparation of a room before you actually start painting can save you a lot of time. For example all of the furniture should be removed from the room or at the very least moved into the center. Everything should be taken off the walls. Any nail holes or nail pops should be sanded and plastered. There will be dust on the floor and on the corner round. Make sure you vacuum up all of all of the dust and then wash the floorboards and corner round. The last thing you need to do is to apply tape on the floor against the wall to protect the floor from any paint while you’re painting and doing edging. Some people will also tape the windows to keep paint from getting on the window panes, however I just use a steady hand and a high quality brush.

Painting a room – painting

The next step is to actually paint the room. Start by cutting in all of the edges along windows and floors and ceiling. You can use a one and a half inch brush that has that is high-quality. When cutting in make sure you paint from the edge out at least 3 inches from the wall or window. Once all the cutting in is completed, you can then use a roller to paint the walls. Never start at the edge, always start at least one roller width from the edge of the wall or the last point that has been painted. Roll back towards the area that has been painted.

This allows you to overlap and distribute the paint evenly. Roll slowly so that you don’t have paint splatter. If using latex paint you can usually paint again the second coat within a few hours however I’d like to wait at least 24 hours before adding the next coat.

Give all of your trim a new paint job as well. We painted all of the window trim, door trim and doors with white paint  to provide a contrast against the paint that we placed on the wall.

Painting a room – replacing hardware

If you are replacing the hardware on the doors for example remove the old hardware first before painting. Complete all of your painting and then install new hardware. Hardware includes hinges as well as door knobs or handles. Following this approach will avoid paint getting on any of the new hardware.

Painting a room – clean up

Once you have completed painting the room it is now time to clean up. You will want to remove all of the painters tape that was placed on the wall and windows. You may also need to do some touch ups here and there if you found that you missed a few spots. If by chance you got any paint on the floor now is the time to clean the floor. Vacuum first and then wash all of the floors to complete the job.

While this sounds like a lot of work, it is the best way to ensure a high quality job.


Stain Removal from Fences and Decks

pressure washerUsing a pressure washer to remove stain or paint from a deck is a great time saver and does a fantastic job if completed properly. A pressure washer can reduce the job to hours instead of days. You may have to do some sanding after you have finished removing the old stain to ensure a smooth surface, however this is much easier compared to sanding to remove the old stain. In addition you can also remove stain out of the nooks and crannies which sanding will never be able to remove.

Operators need to be careful that they do not remove the wood or cut holes in the wood if the water pressure is too high and the stream of water too tight. Practice on some areas that are out of the way and not seen or on a separate piece of wood to get the hang of it before you use it on the real thing.

Stain removal from the deck made easy

We suggest that you set the nozzle of the pressure washer to its widest adjustment. This will provide you with a 1 inch to 3 inch spray of water that will not damage your deck while at the same time lifting off any loose paint or stain from the wood of your deck. Consumers need to be careful that they do not remove any of the actual wood.

We suggest that you begin in an area that is not visible at the back of the deck to experiment and learn to use the pressure washer. You will find that you may have to vary the distance of the end of the wand from the deck to vary the actual force of the water. The closer and tighter the spray, the more damage you can do to your wood. Start from a distance of at least two feet and determine from how much closer you need to go to get the results you are looking for.

Safety is always a concern with using a pressure washer

Consumers using a pressure washer should always use safety goggles to avoid any debris from getting into your eyes. Be very careful where you point the water jet to avoid damage to your person, other people or inanimate things that could be damaged by the high pressure of the water. If you follow these steps and those above, stain removal can be very easy.

Never ever point the pressure washer wand in the direction of another person or pet. This high density high speed stream of water can easily damage and hurt someone very badly. Flying debris can also damage eyes and hurt small children, so be very careful when you are using a pressure washer around the home or on a work site.

For more practical information about maintenance issues around the home, click here.


Save


How to Use a Pressure Washer

Pressure WasherA Pressure Washer can be a very useful tool around the home when used properly. It can also be an extremely dangerous tool if not used properly. We believe in safety first and urge readers to also read their instruction manuals. Pay particular attention to the safety aspect of the instruction booklet. We are not encouraging readers to purchase any particular type of Pressure Washer. However, we do encourage consumers to use them carefully. I was originally against buying one of these tools. I thought it was kind of frivolous and just a gimmick until I borrowed a neighbors. Then I realized just how useful a tool it actually was. Since we purchased it, we have used it for many different projects, that have been made much easier than it would have been otherwise. If you are considering purchasing one, just do it. They are really quite good.

Pressure Washer – Safety

The basic rule is never to point the wand at anything that you do not want to be damaged. This includes other people, yourself, and anything that could be damaged by a high-pressure stream of water. We have seen a jet of water cut right through the wood, cut plants in half, pierce the skin, and remove paint from a car.  Used incorrectly they can be both dangerous and cause a lot of expensive damage. Read all of the instructions and experiment first on something that you do not mind damaging to get used to using a pressure washer.

Pressure Washer – Adjust the Water Jet

The wand is designed to allow operators to adjust the concentration of water exiting from the wand. It can deliver a really tight stream of water. This is useful to cut things with, get at hard to remove paint on a cement wall, and remove stain from wood in hard to get to places. Adjusting the wand so that the stream is wider is also convenient. This adjustment will reduce the pressure of the stream which can be used to remove paint from walls or stain from wood. We found that it was excellent for removing loose paint and stain from wood.

When we wash the car, the wand is set to deliver as wide a stream of water as possible. Make sure you stand well back to make sure that there is little chance of removing any paint from your car. If your car is rusty or has loose paint, it is going to come off. This may some damage to your car that you may not be expecting. Standing back about six feet so that the wand is at least three feet from the car is usually enough. This distance should ensure that the paint will not be damaged by the pressure washer. If there is loose paint or rust on the car, even at this distance it is probably going to come off.

Save


Electric Chain Saws

Electric Chain SawsElectric Chain Saws can be a great tool for many home owners. They will save you a lot of money and they are easy to use. Also do not require gasoline or oil to mix with the gasoline if it is a two-stroke engine. They are electric and all you need to do is plug them in and they are ready to use. They are also relatively easy to use as long as you have an electrical outlet. This can be a problem if you need to cut trees and small shrubs in the bush. We will discuss a few more items about electric chain saws. These issues may help you in your decision to purchase an electric-powered saw vs. a gas-powered saw.

Electric Chain Saws – Maintenance

Maintenance is pretty simple. Usually, all that is required is oil for the chain in the reservoir to keep it lubricated. Also the occasional sharpening of the links on the chain. There is not much else on a regular basis that you need to do with these saws. You do not need to mix gas and oil for two-stroke engines and there is no carburetor to tune up once and a while. Electric chain saws are really easy to use, just get a long extension cord of sufficient gauge and plug it in and you are ready to go.

You will need to make sure that you are using a heavy gauge electrical extension cord to ensure that sufficient power is delivered to the saw so that it will operate at peak efficiency. Review the manufacturer’s guidelines to make sure that you are using the correct extension cord. If you use to light a gauge chord, there is a risk of the motor not generating enough power and overheating due to the voltage drop over the length of the chord.

Electric Chain Saws – Safety

Just like the gas-powered versions, these are dangerous tools that can do a lot of damage if not handled properly. Always use the emergency shutoff to avoid kickbacks and damage to yourself. Make sure that your chain is always sharp. if you are falling a large tree, wear a hard hat to avoid being hit on the head by falling branches that might be dead and ready to fall. Make sure that the falling direction of the tree is free and clear of any people, pets, and buildings to avoid any potential damage.

Use gloves when handling and using any chain saw. Also wear safety goggles to protect your eyes from flying debris.

Review the manufacturer’s safety instructions to ensure that you are using this device safely.


Yearly home maintenance

Yearly home maintenanceAs we travel around the country we see so many homes that are run down and have not been looked after. We also see a lot of homes that are in perfect condition. We wonder what the difference is between people who look after their homes and those that do not.

It does not take a lot of work to maintain your home. Especially if you do it yourself you can control the cost. DYI really keeps your expenses to minimum. Of course you can hire a contractor to maintain your home. These could include lawn care services, shrubbery and flowerbed services. Also basic repairs that are required from time to time. The driveway may need repairs and the house may need to be painted as well, especially around the windows to ensure that the wooden window frames are not exposed and begin to rot.

Yearly home Maintenance

Annual maintenance of a home should include basic outdoor activities as well as indoor activities. You want to make sure that all of the windows are secure, painted and not deteriorating. Also check to make sure that your roof is in good shape and not allowing any water to penetrate. You may also want to check that rodents cannot get in to your attic through the roof. They can cause considerable damage leaving a mess as well and even a strong odor.

Anytime you see any water leaks, it should be repaired immediately to avoid further water damage. Taps that are Dripping, Water underneath Your Sink, and Showers That Are Leaking into the Room or in the Floor below Should Also Be Repaired Immediately. Water damage can be extensive and the mold that usually follows water damage can be detrimental to your health as well. Deal with water leaks promptly to avoid these issues. Better yet repair your roof and windows before water leaks get started.

Water Damage Can Also Leave or Cause Mold to Appear causing health issues for people living in the home. Deal with these issues quickly so that they do not get worse and create thousands of dollars of expensive repairs that will need to be done.

Yearly home Maintenance – Furnace

Your furnace falls into a special category. You may not even realize that there is anything wrong with your furnace until it suddenly stops working.  Worse, if it is producing carbon monoxide, it can kill you and your family. We suggest that you have your furnace checked properly once per year and have any repairs made to it promptly to avoid any  problems that might occur.

While no one wants to have their furnace red flagged, i.e. meaning it must be shut down and repaired before it can be used, this is far better than having it spewing carbon monoxide into your home and possibly killing you and your family. Carbon monoxide is odorless and colorless and cannot be detected without a special monitor. Install a carbon monoxide detector in your home to ensure that you are also protected in this manner as well.

You may also want to have your water heater checked if it is also running on gas or some other kind of fuel other than electricity.

Save


General home maintenance

General home maintenanceAnyone who owns a home knows that they really need to spend time on general home maintenance almost every month of the year. Consequently your home is one of your largest assets and at sometime you may want to sell it. Any buyer is looking for a well maintained home that does not need major repairs. The best way to avoid major repairs regardless of how long you plan to live in your home is to keep up with general home maintenance. Always nake sure that repairs are completed quickly to avoid further damage. Even if you have to pay someone to do the work for you, it is definitely worth it to maintain your home. Your home will decline in value if you need to sell it.

Also savvy home buyers are going with home inspections and they are going to pick up on all of the little things as well as the major items that you may have ignored. If you want full price for your home keep up with maintenance.

What General Home Maintenance Is Needed

The following is a general list of maintenance steps that all homeowners should consider. Your home may have specific items that are needed and you may want to add this to this list.

  • Check, caulk and paint all windows
  • Paint your garage door
  • Tighten all bolts on your garage door
  • Ensure that water drainage is guiding water away from your home to avoid leaks
  • Empty all eaves troughs of leaves and debris in spring and fall
  • Maintain your lawn and shrubs
  • Ensure your fence if you have one is will maintained
  • Seal your driveway if it is asphalt
  • Repair and seal your interlock driveway
  • Repair all leaking taps in sinks
  • Check your roof on a regular basis
  • Paint and update rooms in your home to keep it looking fresh
  • Clean all floors and complete repairs especially for hardwood floors

While this is not a complete list, it does cover all of the major items that most home owners need to be aware of. Also you may want to do an inspection if you have not been maintaining your home properly to determine what is required immediately to avoid any damage. Your roof and windows are good examples of something that should be checked. If there are leaks of any kind, water damage can cause a great deal of damage and add mold to your home which can be harmful to anyone sensitive to mold.

Walls can be damaged, floors can be damaged by water leaks from the window leaks. In addition your home is not going to look great if your windows are not painted and looking great.

Save


Mold on shower ceilings

Mold on shower ceilingsAnother maintenance project for do-it-yourself people and consumers is painting the shower ceiling whenever it becomes tired looking or worse like ours. Mold on shower ceilings. The picture that we’ve taken and included in this post is the picture that shows how bad our shower ceiling was after about two years, since the last time that we painted the shower ceiling. Before we talk about removing the mold, we want to emphasize that if you leave the bathroom door open and let the shower dry after each use, there will be far less mold to contend with.

This is a small maintenance job that anyone can perform.

Mold on shower ceilings – steps to Follow

The steps needed to repaint the shower ceiling are as follows:

Remove the light

Sand your ceiling to make sure that it is smooth and all mold is removed. If the mold is really bad you may want to wash the ceiling with a combination of water and vinegar.

Lightly brush the ceiling to remove any dust that might remain.

Paint your ceiling with semigloss or glossy paint. The paint should be able to deal with high moisture situations.

If you use regular Low sheen or flat paint that paint will not resist the moisture that routinely it is exposed to whenever someone takes a shower.

This is just a simple thing that one can do to keep your house looking great and will cost virtually nothing other than the cost of paint.

Allow the paint to dry at least 24 hours before the shower is used. You want the paint to really harden so that moisture cannot penetrate. Even if the instructions say that the paint will be dry in less time, wait for at least 24 hours.

Caution

One caution, if you’re using a step ladder in your shower always protect the feet of the ladder, so that it does not scratch the bottom of your shower. You can use a couple of old towels placed on the bottom of the shower. If there’s some concern about the stepladder slipping, you may want to have someone hold it for you.

We always use latex paint, since there is  less smell and it is easy to clean up. If you use oil based paint, make sure there is lots of ventilation to clear the air. It can become over powering if there is no ventilation. Open a window, use a fan etc to move the air from inside the shower where you are working.

Bathroom Fan

In our particular situation, there is no fan to draw the moisture out of the bathroom. It is not expelled outside when people are taking hot showers. There probably should be a fan. The builder should have put a fan in the bathroom however it was not done. There are fans in all the other bathrooms, even the one which is just a two piece.

If you happen to be a new homeowner, who’s having a home built, this is one of the things to look for. Make sure that there are exhaust fans installed in all bathrooms.


How Much to Budget for Home Maintenance

Budget for Home MaintenanceBudgeting for home maintenance is difficult to be exact, however to make sure that you have close to the right amount set aside for home maintenance so that it is not a burden to you when the time comes, is relatively easy.  As your home gets older, there is always going to be something to replace or repair. Take a look at the things that are nearing their end of life. Obtain quotes for replacement and / or repair. Decide if you will do the work yourself or hire someone. This makes a huge difference in terms of how much you will need to budget for home maintenance.

Budget for Home Maintenance – Assess your home

The first step is to asses your home. Look at all of the big items that will need some sort of work done in the next 20 years. These typically include the following items – roof, driveway, furnace, water heater, air conditioner, windows, flooring, window treatments and garage door.

The next step is to figure out the cost of replacing all of these items and timing of when each item will need replacement. We are talking about average years to replace and the cost today to replace the item. You can allow for inflation as well. Which is a good step to take especially if the item in question will last for another 20 years.

Some work will be do it yourself jobs. But many of the larger jobs must be completed by skilled professionals or businesses with the right kind of equipment. E.g. replacing your driveway. Decide which jobs will be done by yourself. Which ones will not, make sure the full cost of material and installation is included.

Repairs and replacements don’t always happen as planned. For example a furnace that should last another 10 years might only last 10 years. While the water heater will last for 20 years. At least if you are setting money aside you will have some of the money saved if the furnace for example quits early.

Divide the cost to replace the item by the number of years that you expect them to last. The result is the amount that you need to save every year.

Upgrades, renovations, improvements

These items are another area to include since they are more discretionary. They can also involved big bucks. For example if you are planning to replace your carpet flooring with hardwood, the cost will be in the thousands of dollars. Again decide when it will be done, ask for several estimates and then decide how much you need to save to ensure you have sufficient funds to pay for whatever you are improving.

Improvements can include new floors, landscaping, adding a pool or hot tub and so on. The more you can do yourself the more you will save and reduce / control your overall cost.

Once you have all of the estimates and the cost for each item, the timing of each item figured out, you can arrive at a total number that will indicate how much you need to save for all of your plans and home maintenance costs. Depending on your income, there may be a need to make adjustments to your plans. For example the landscaping you planned may need to be delayed for a couple of years until you have enough money saved.


Average Home Maintenance Costs

Home Maintenance CostsCondos have condo fees for a reason. There is a lot of maintenance and upkeep that needs to be done for any building. Whether it is an apartment building or a townhouse style of home or regular single-family home. The difference with condos is that you are paying a management fee to someone to manage the building. You are paying labor costs for all of the work that needs to be completed. Much of which most people can do themselves e.g. cutting and trimming the lawn. Home maintenance costs are very small when you do the work yourself.

Management fees are a set fee that the management company will charge just to manage the property. Their job is to collect the money, hire contractors, and make sure that the work gets done. The work should be completed according to the instructions they receive from the condo board. When you are in your own home, no one needs to pay management fees. You are the owner and the manager and you get to do the work, providing huge savings.

Labor Fees

Labor fees are another factor that comes into play when you have your own home vs. a condo. In a condo, you get to pay labor costs for everything at the going rate. While in a home there are many things that homeowners can do themselves. From raking leaves to planting flowers to fixing leaking faucets to name a few. This is a huge saving for anyone who can do the basic level of work. The larger jobs you can contract out or hire someone to help you.

Before this post begins to sound too much like a condo vs. single-family home post, we just want to say one thing more. A homeowner can shop around for materials. They can take advantage of sales for the material. While a contractor buys material and may get a discount for quantity. They may or may not pass the savings along to the condo!

Home Maintenance Costs

Maintenance is regular things you have to do every year while repairs are something that needs to be fixed after it has broken or stopped working. Keeping your lawn healthy and trimmed looking is maintenance. Fixing broken fences or fences that have lasted beyond their age is something that needs repair. All of these things most people can do themselves as long as they are not afraid of a bit of hard work.

Set aside money for big Home Maintenance Costs

There are a number of large jobs that you will have to contend with particularly if you stay in a home for any length of time. We suggest that you set aside money for these things because they can cost a great deal and most people do not have that kind of money just sitting around. Here are a few examples of some of the things that people may want to consider saving for.

New roof – $4000 to $10,000 or more depending on the size of the home
Furnace Replacement – $3000 to $6000 again depending on the size of the furnace and features
New windows – $15,000 to $40,000 depending on how many windows and the type of windows
New driveway – $4,000 to $20,000 depending on size, asphalt or interlock
Upgrades – kitchen upgrades, bathroom upgrades, family room, basement etc can be high
Renovations – usually smaller jobs, but still expensive such as rug replacement, hardwood floors etc

A rule of thumb is to take the job you are going to do, figure out the cost of the job, decide when it will be done and divide by the number of years to get the amount you need to save each year. For example, if your roof is already 10 years old and has another 15 years of live, and th estimated cost to replace it is $5,000, then you need to save $5000 divided by 15 each year in order to have enough saved when the roof needs replacement. Apply this approach to all of your items and you should end up with enough money in your maintenance pool to pay for all of your repairs!

Save


  • Copyright © 1996-2010 Managing Home Maintenance Costs. All rights reserved.
    iDream theme by Templates Next | Powered by WordPress