 Hardwood flooring is increasing in popularity. It is one of the most durable choices compared to carpeting. With current prices, hardwood flooring is very competitive compared to wall to wall carpeting which has really become passe. Hardwood Floor Installation is easy with a few basic carpentry skills. Installing a hardwood floor is a relatively easy do-it-yourself project, however stairs can be more challenging, even for the best carpenters. Many people will opt for carpet on the stairs to avoid additional expense and concerns about slipping on the hardwood flooring on the stairs. A prefinished hardwood floor has a better finish and there is less work involved installing a hardwood floor.
Hardwood Floor Installation
The materials and tools that you will need are as follows. (note that you can also rent the tools you do not have at many of your local home improvement stores.)
- Hardwood flooring
- Staple gun
- Vapor barrier paper
- Variable speed drill and assorted drill bits
- Hammer
- Chalk line
- Tape measure
- Pry bar
- Pneumatic Flooring Package (air compressor and hose, nail gun, mallet and staples)Chop saw
- Table saw
- Nail set
- Hardwood flooring wood putty
- Earplugs and safety goggles
The steps for hardwood floor installation are as follows:
- Select the hardwood species and the board widths for the room you will be working in.
- Measure the width and length of the room and calculate the square footage. Allow 10-15 percent extra for irregular boards and any cutting mistakes.
- The sub-floor minimum requirements are a 3/4″ plywood sub-floor. Eliminate squeaks by screwing a long drywall screw into the sub-floor and joist where the squeak occurs. Remove all molding from the room and vacuum and clean thoroughly.
- Roll out strips of vapor barrier paper, allowing at least a 4″ overlap and staple securely to the sub-floor. We used a 15 pound tar paper or felt. In climates were there is a basement, the vapor barrier is usually not required.
- Begin the installation at the longest unobstructed wall. Remove the shoe molding and snap a chalk line 3/8″ out from the baseboard to allow for expansion in the hot, humid weather and contraction in the colder, drier weather of the hardwood flooring.
Use Long Boards on The First Row
- Begin by selecting a long board to start the first row. Pick one that is straight. Align the edge of the board with the chalk line and drill pilot holes down through the hardwood plank and into the sub-floor and joist. Face-nail each board at the point of every joist and set the nail with a nail-set. Face-nail the entire first row and remember to keep the board lengths random. It is important to face-nail the first row because you can’t get the pneumatic nail down in there, it will hit the wall and the force would push the wood against the baseboard and you would lose your 3/8″ expansion and contraction.
- It is important the lay the first boards perpendicular to the joist which are underneath. That is important because you want to get a nice solid anchor. You can look at the sub floor to see which way the nails and seams run. You might be able to go underneath your crawl space or into your basement to see how they run.
- After the first few rows have been installed, drill pilot holes down into the tongue of each board and hand-nail the rolls until there is enough clearance for the pneumatic nail gun.
Measure and Re-Measure to Avoid Mistakes
Tip: Lay out a box of hardwood boards ahead of the installation to visualize lengths, wood grain, and colors of the boards. When laying out the boards, keep in mind that you never want to have the ends of boards in adjacent rows line up with each other. Keep the lengths random and at least 6″ in length.
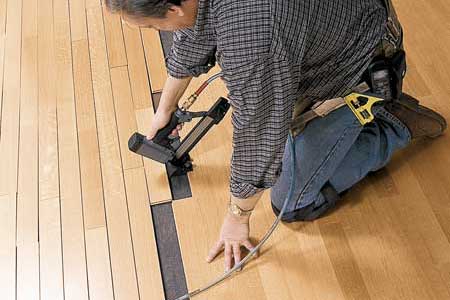
- Using the pneumatic nail gun, place the gun lip over the edge of the board and strike firmly with the mallet, driving the staple into the tongue of the hardwood plank.
- When installing up to a threshold, it is not critical to make cuts exact. Come back later after the floor has been installed and use a circular saw to cut across for a precise cut.
- When cutting along the baseboards, select a piece that will fit in there and leave yourself 10 or 12 inches more and you can cut it off and use the other piece on the beginning of your next row. You don’t always have to get it in there real close and throw out the end piece. That will save you some time and waste.
Fit Ends Together Carefully
- You have to be sensitive to the way the ends fit together. One end has a tongue and the other end has a groove — this is called end matched. You need to make sure that you always cut the wall end of the wood so that you do not cut off the groove that fits to the tongue. If you do that, you would end up with a pretty big gap. You find a piece and lay it along side the hole you have and then flip it over. Make sure when you make your mark, you are going to cut off the wall side, not the room side. When you make your mark, you can butt it up against the baseboard and then mark at the end of that tongue. That will leave your 3/8″ gap for expansion and contraction when you install the piece.
What to Do Near Walls
Note: When you go to nail, you need to make sure you put at least 2 nails in every board. The rule of thumb is to place a nail every 10″ to 12″.
- As you near the opposite wall, clearance for the pneumatic nail gun again becomes an issue. Drill pilot holes and hand-nail the boards until there is no longer clearance for the drill and hammer. At that point, drill pilot holes down into the top of the boards and face-nail the boards, remembering to set the nails with a nail-set.
Tip: Use a pry bar and a few extra scraps of flooring to firmly seat the hardwood plank as you nail.
- If you are left with a narrow gap for the last board, take a measurement and rip (cut length-wise) the last board to fit into place. Remember to leave a 3/8″ gap at the end wall for expansion and contraction space.
- Replace shoe molding in room and putty all of the nail holes that have been face-nailed. Be sure and get wood putty that matches your floor. Fill the hole and wipe off the excess.
- Maintenance is easy for a pre-finished hardwood floor — keep grit off of the surface by sweeping regularly and use a flooring cleaning kit (alcohol-based) and spray on and wipe off with a damp cloth. Hardwood floors also help cut down on dust mites.
November 10th, 2011 on 11:51 am
very nice post, i certainly love this website about hardwood floors, keep on it