The do’s and don’ts of Shopping at a Wholesale Price Club

wholesale price clubShould you pay the membership at one of the wholesale price club like Costco, Sams club or BJ’s? It really depends on your shopping habits, how much you will purchase and whether you can find better prices elsewhere. Consumers who have time to do some comparison shopping will often find better prices for various items at other stores when they are on sale or on special. Buying those items at other stores will save you money. The return policies at price clubs is extraordinary. Service is top notch and prices on average are very competitive. But should you join wholesale price clubs to save money?

The do’s and don’ts of shopping at a wholesale price club

Each family will have different needs however the following can be considered general guidelines which may or may not apply when making a decision to purchase items at a wholesale price club:

  • Buying in bulk means you need to have storage areas
  • Can you use all of the bulk items within a reasonable period of time
  • Can you use items before the expiry date
  • Purchases of goods on sale or on special at other stores may save you money
  • Do you return many items, it is easier at wholesale price clubs
  • Large families can generally benefit more
  • Will the rewards pay for the membership fee

If you can answer yes to many of these questions, then belonging to one of the wholesale price club might be the right answer for you. If you answer no to many of the questions, you may want to say the membership fee and shop elsewhere. If you take advantage of specials at the competition, you can definitely save money compared to shopping at Costco. These are price leader deals that are offered to get you into a store where the store hopes you will spend money on other items at a higher price.

Save


Keep your Lawn Healthy over Winter

Keep your Lawn Healthy over WinterMost consumers and homeowners do not realize how important it is to complete proper fall cleanup to maintain their lawns and gardens. After the colder weather in the fall sets in most plants begins to go into their dormancy phase. Trees lose their leaves and annuals die off. Fall cleanup is often the furthest thing from everyone’s mind during this time frame. If you want to keep your lawn healthy over winter, there are a number of things to do. Thanksgiving and the holidays are just around the corner.

Keep your Lawn Healthy over Winter

Properly prepare your lawn for the winter and spring. This step will ensure you have a healthy lawn in the coming year. Leaves left to rot on the grass can often kill the grass underneath. Leaves also provide a home for small rodents. Small rodents will build burrows through the longer grass leaving a mess in your lawn. This occurs when a lawn is left too long just before winter sets in.

Lack of proper fertilizer that strengthens the root system can make all of your plants vulnerable to damage. A dry winter or spring will damage lawns with weak root systems.

Fall cleanup prices offered by landscaping companies will depend on the lawn clean-up services actually performed. The following is a brief fall clean-up checklist that consumers and homeowners may consider.

Keep your Lawn Healthy over Winter – Fall Clean-Up Checklist

  1. Trim Lawn to the proper length to discourage small rodents
  2. Apply fertilizer to promote proper root growth
  3. Rake all leaves and other debris from the lawn and gardens
  4. Remove all dead annuals
  5. Pickup dead or broken branches from shrubs and trees
  6. Clean out eaves troughing
  7. Install protective burlap wraps on shrubs if needed
  8. Additional services as required

This is not a complete list. Every homeowner may have specific tasks that they may want to be considered. These can be included in a packaged clean-up cost estimate or quoted separately.

Competitive Pricing

Many consumers will consider doing some or all of the work themselves. Suddenly they find that it is too late to do most of the fall cleanup themselves. Homeowners can request a competitive pricing estimate today for leaf cleanup, lawn and garden fall preparation. Once they have the cost estimate, they can make a decision to have all or part of the work completed.


Baby Boomer Renovation Boom

Baby Boomer Renovation BoomBaby boomers are retiring in droves. So much so that there is only one person available to take a vacant job for every two available. With so many people retiring, it is creating new opportunities for many people of all ages. Some baby boomers want to pursue other careers. Others want to relax and enjoy life. All baby boomers need to prepare their homes for retirement and aging related issues. this is generating a Baby Boomer Renovation Boom! These issue can be generalized into three main areas. Steps that make it difficult for people to navigate their homes. Bathrooms that are difficult to use. The third item is the effort needed to continue to use your own home and maintain it in a comfortable manner. We will discuss each of these in a little more detail.

Baby Boomer Renovation Boom

Steps – Whether it is walking up steps to get into your home, or to go upstairs to the second floor to your bedroom. As we age, it is harder and harder to get up those stairs. Solutions include:

  • Install ramps
  • Install automated stair climbers
  • Downsize and move

Each person needs to make their own decision when it is best for them. In all cases it is going to cost some money, however in the long run, your life will get easier.

Bathrooms – can be slippery and tubs can be difficult to get into. Many people install walk in showers or new tubs that have a door to allow you to walk into. Add a chair to sit on while using the sink etc.

Maintenance – of your home is so important to maintain the value in your home and to avoid more serious problems of a home that is not well maintained. Replace windows as needed, paint inside and outside as needed, hire a cleaner to help maintain your home.

Save


Residential Property Management Services Explained

residential property management servicesConsumers require residential property management services for a variety of reasons. As a result, some buy rental properties and need someone to look after the property. Other consumers will be absent from their homes for a long period of traveling. Look after your home. We will review these issues and others in the following post.
Residential Property Insurance Services Requirements

Many homeowners just close their doors and leave for their vacation. Many are very excited about getting away. They do not give a second thought about looking after their home. Many insurance companies have specific requirements about vacant homes. These requirements depend on the company, the time of year, where you live, and your heating system. Your insurance company may want someone to check your home every day. Call your residential insurance company to confirm their requirements to maintain insurance on your home. Also, condominium owners need to do this.

Temporary Absence Management

Many residential property management services companies will offer services to homeowners in this situation. Management companies can check your home for water leaks, power outages, heating system failures, and break-ins. Always have them check your home and report back to you after every visit. The report will be especially useful if you need to make a claim to your insurance company. They want to know that someone is checking your home for all potential emergency conditions.

Extended Absence

Arrange for residential property management services if you are leaving for an extended period. They will check for water leaks and heating system malfunction. For example, they may also provide landscape management, snow removal, and even water the plants. In other words, consumers can arrange for all of the services they need. Therefore they can leave their home with confidence.

Rental Residential Property Management Services

Many consumers purchase rental properties as investments. Some consumers will manage their own properties. However, others do not want to deal with tenants or some of the problems that arise. In other words, residential property management services can put your mind at ease. For example, services included are:

  • Tenant selection and approval
  • Rent check collection
  • Deposit to bank accounts
  • Property management services
  • Property repairs
  • Regular monthly reporting

Property management covers all of the things that most consumers take for granted about maintaining a home. In addition, this area of services may include the following depending on the building type:

  • Cutting the lawn
  • Hedges and shrub maintenance
  • Maintain watering system and watering the lawn
  • Routine repairs to appliances
  • Painting and cleaning after tenants leave
  • Management of special projects e.g. window replacement etc.

Residential property management services Summary

There is a property management solution for all situations. To clarify, decide how much time you will need a property manager. Subsequently, give your insurance company a call to confirm their minimum requirements. After calling your insurance company calls the management company. In addition, make sure that you will receive appropriate documentation from the residential property management company. After that, if you have to file a claim you will need these documents to make an insurance claim.


Baby Boomer Building Boom

Baby boomers are retiring in droves. I just read this morning that there are more baby boomers older than 65 than there are people under the age of 14 in this country. In addition there is only one applicant for every two jobs that are being vacated by baby boomers retiring from the work force. This is putting a lot of pressure on business and government, however that issue is a topic for another post. In this article we wanted to focus on the baby boomer building boom and what consumers over the age of 65 should focus on in their homes to allow them to age comfortably in place. After all most people want to do just that. They are not ready to move or downsize and in many cases it is just cheaper to stay where you are.

However there are some things that need to be done to their homes to make it more comfortable to stay in their home as they age. We will cover three major areas that we all need to pay attention to.

Baby Boomer Building Boom

Steps – get rid of those steps or at least find away so that you climb less steps every day. A number of things come to mind that are relatively inexpensive and yet will make life a lot easier:

  • Build ramps at appropriate locations
  • Install stair lifts to the second floor
  • Move bedrooms onto the main level
  • Add an addition to the home with no stairs
  • Hire people to do the house cleaning and other work that involves steps

Bathroom – Slips and falls in the bathroom are a major accident source for many seniors. Wet floors can be slippery, we tend to be less steady on our feet and our eyesight is not as good as it used to be.

  • Install Grab Bars in showers and tubs
  • Convert tub to a walk in
  • Add grab bars everywhere to give you something to hold on to
  • Use a walker or a cane, don’t be too proud

Remove Tripping Points – A rug, a one step stair, a bed too high etc are all places that can cause trips and falls. Combine grab bars with removing all items that could cause a trip or a fall to make it safer around your home:

  • Install grab bars
  • Remove throw rugs
  • De-clutter your home
  • Survey your home for all potential trip points


Inexpensive Lawn Care

inexpensive lawn care Everyone loves a beautiful yard, with Rich green grass in the weeds.  Many people either do not know how to achieve this result or feel they have to spend a great deal of money to have a really nice lawn. They want inexpensive lawn care solutions. Consumers all over North America know that keeping the lawn well-maintained will ensure that it looks great but it also keeps weeds away.  Weeds will overtake the lawn particularly if the grass is not healthy or not very thick. The reverse is also true, a healthy lawn will prevent weeds from taking hold and will even prevent them from growing to start with.

Inexpensive lawn care

The following are steps that every homeowner can take to have a great-looking lawn without spending very much money. It may take a few more hours of your time but it is definitely worthwhile and will ensure that you don’t spend a lot of money either.

Here are the steps for inexpensive lawn care :

  • Fertilize your lawn four times a year
  • Water your lawn on a regular basis
  • Use weedkiller twice a year
  • Apply spot we killer as needed
  • Apply grass seed to thicken up the lawn to thicken up the lawn
  • Pull all larger weeds by hand once a week
  • Mow the lawn as often as needed but maintain grass height at 1 1/2 inches to provide good cover

Homeowners who follow these simple steps will have a great-looking lawn which will be inexpensive to maintain. You will also be the envy of the neighborhood.


Inexpensive Weed Management

inexpensive weed managementAre you tired of dealing with weeds in your lawn? There is a time-tested way to reduce and eliminate them, but it does take some work! For inexpensive weed management in a nutshell keep your lawn really healthy. Apply fertilizer at the appropriate times. Thicken with grass seed at least once per year. Make sure it has sufficient water. Spot spray with weed killer as needed. Finally, pick the larger weeds by using a tool that will remove the weed and the root as well.

Some weeds can be easily pulled out root and all just by grabbing them around the stalk and pulling. Others like dandelions have to be cut off several inches below the ground and then pulled out. The writer uses a small chisel to cut the root about 2 inches below ground level and then pull the plant and root out. They come out quite easily this way and will not grow back. Dandelions are the easiest to deal with. They are large, easily seen, and are easy to pull out using the method mentioned.

A healthy lawn mentioned in this way will deter the weeds and make your job much easier to control weeds growing in your lawn. The grass will be thick and will have a fighting chance against all of the weeds that begin growing all of the time.

Inexpensive weed management

The above steps are relatively easy to do and do not cost a great deal of money. It can get very expensive if you allow the weeds to overtake the grass in your lawn. Once this happens there are not many alternatives. You can kill all of the weed by spraying, but then often you’re left with very thin grass or less. You have to be careful when you spray to avoid damaging other plants as well as people walking on a newly sprayed lawn.

One of our neighbors let his lawn go. Never watered it and never did anything about the weeds. Once this happened, all he could do is replace the lawn. He still has not replaced his lawn. It is simply too expensive for home. He took another approach.

He added grass seed all over the yard and then topped it off with topsoil. Just enough to cover the seedlings and allow them to begin growing. A much less expensive approach, but one that takes much longer for the lawn to recover.

He could also remove what was left of the sod and all of the weeds. Then he spread several truckloads of topsoil on the lawn and fertilized it. The next step involved applying new sod all over his yard and watering it for many days to avoid the hot sun killing the new grass before it had a chance to establish itself. We are confident that it cost him well over a thousand dollars for his new lawn.

Spending a few dollars and a few hours a week could have saved him a great deal of money. That’s the main message of this post. Saving money by doing some of your own work and maintaining your property, in this case, the lawn. But many people are less concerned about the savings they might achieve vs. the instant repair that laying new sod will provide.

For more saving money ideas, click here. Consumers can put a little work into their homes and yards and save thousands of dollars.


Stopping Dresser Drawers Falling

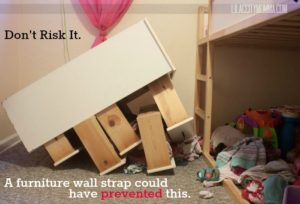
dresser drawers fallingA wall strap, an L bracket, screws through the backboard of the dresser all could have prevented this accident. Kids will be kids. They love to climb and they will whenever they get the chance. If the dresser is top-heavy either because of the child climbing on extended drawers or the contents, it is going to fall over. No matter how many times you tell them they will climb. Stopping dresser drawers falling is actually quite easy. You just need to take the time to properly secure them. It does not even cost that much either.

Stopping Dresser Drawers Falling

There are several ways to secure the cabinet so that it will not fall over. One way is to securely attach a cord to the wall and to the back of the dresser. Make sure you screw a strong hook into a stud and not just into the drywall. A screw will easily pull out of the drywall. The same goes for the back of the dresser.

Some people like to use L brackets which work really well. The cabinet cannot be moved at all once installed.

Another approach is to use long screws through the backboard of the dresser into the wall. Again make sure the screws are screwed into the studs and not just into the drywall. Most people will use a stud finder to help them locate the studs behind the drywall. Usually, they run vertically up the wall.

For more property management posts, click here.


Save


Secure Dresser to Wall

If you have young children, they are going to climb wherever they can. Dresser drawers are ideal for climbing. Just pull out the bottom drawer and start climbing. You know they are going to do it regardless of how many times you tell them not to. Secure dresser to wall using a variety of devices such as clamps, screws, chord,  etc. Just make sure that what happened in the picture in this post does not happen with your child underneath. While the dresser may not be that heavy, it can choke a child if it falls on his neck. Go and fix this right now if you have young children!

Secure dresser to Wall

There are various ways to do this. The better manufacturers will provide you with instructions and the screws and clips needed to complete the job. If you do not have screws etc, you will need to do this your self.

First locate the studs in the wall using a stud finder. Many people have them now so you should be able to borrow one from a neighbor, friend or family member. Next position the dresser in the location you want it to be and remove the top drawer. Screw large screws, at least 2 inches in length through the back of the dresser into the wall at the locations where you found the studs.

Another approach is to screw L brackets to the wall and also into the dresser. This takes a little more time, however if done properly is much stronger than just screws through the back of the dresser.

Another approach is to attach a strong chord to the wall at one of the stud locations. The other end can be attached to the dresser. Make sure it is securely attached and will not break or give way from the attachment device.


How to Caulk Baseboards

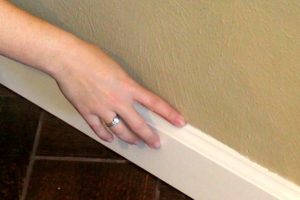
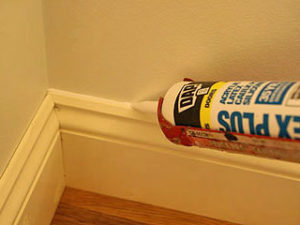
How to Caulk BaseboardsEver wonder how professionals make their baseboards look so great? No cracks or dark lines along the wall where the baseboards meet the wall. It is actually quite easy once you know the tricks that the professionals use to caulk baseboards. Use high quality paint-able caulking to fill the cracks before you paint the walls or the baseboards. When you cut the tip off the caulking tube, keep it small so that a minimum of caulk is applied. Using continuous pressure, run the tip of the tube along the joint filling the crack as you go. Remember that less is better, You can always add more later if needed. At this point the crack is filled, but it still may look a little rough and unfinished.

How to Caulk Baseboards – Smoothing

How to Caulk BaseboardsThe last step is to smooth the caulking with your finger. We like to keep our finger wet with a little bit of water. Run your finger along the crack filled with caulking to leave a smooth surface that fills the crack between the wall and baseboard. If you need more caulking in some areas because the crack was too large or you did not add enough caulking in the first place, just add more and repeat the smoothing process.

I like to have a paper towel handy to clean my finger of excess caulking. Wet your finger each time to deliver a smoother joint and decrease the amount of caulking material that adheres to your finger.

Let the caulking dry for 24 hours and then paint as needed. You will have a very professional looking joint as a result.

Save


How to Stop Mildew Forming in Showers

how to stop mildew forming in showersWe are confident that almost all consumers have had to contend with mildew forming in showers. Mildew or mold is a common problem for many consumers and once it takes hold, it is very difficult to remove it. In our next post we will discuss how to remove it. However for our first post about we thought we would focus on how to stop mildew forming in showers in the first place. Mold or mildew needs two things to live and grow. Moisture which is obviously a problem in the shower and bathroom area. the second thing is food, such as soap, oils and skin cells from our bodies and other products we may use. There are easy methods to control mildew growth.

How to Stop Mildew Forming in Showers

Let’s first deal with the moisture issue. Consumers should always use a fan when running the shower. If you do not have a shower fan, like us, leave the shower door open when not in use. Air circulation will absorb the moisture and dry out the shower. Secondly always squeegee the tiles, door or curtain after you shower. You want to remove as much of the moisture and soap as possible from the walls etc.

Using a squeegee also removes the food that the mildew needs to live. But that is definitely not enough. At least every two weeks consumers should  clean the walls, door or curtains to remove all soap buildup and other material. Washing with vinegar is one of the best ways to clean the tiles etc.

We had mildew forming on our ceiling like the one in the picture. Once we started leaving the door to the shower open it stopped forming. We then sanded the ceiling and repainted the ceiling with a mold resistance paint.  So far it has lasted a year without more mold or mildew forming. Remember moisture and food. That is what you need to control to keep mildew from forming.


Save


How to Remove Mildew From Tiles in Showers

Our last post discussed how to prevent mildew and mold forming in bathrooms on shower tiles. This focuses on how to remove mildew from tiles in showers once it has formed. The first recommendation is to keep your shower clean and dry if you want to avoid mildew and mold in the first place. Once it has formed, you will need strong cleaners to remove the stains. There are many products on the market. Some work, some do not. We are not recommending any one particular product. Vinegar works well as does bleach, however you need lots of ventilation and protective gloves. Be careful of your clothes as well to avoid stains from the bleach.

Remove Mildew From Tiles in Showers

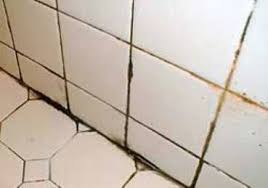
This picture clearly shows lots of mold on the grout. Consumers need to remove all soap scum, calcium stains etc from the tiles. It is going to take some time and elbow grease to remove the stains. Using bleach or vinegar, spray the tiles, let it soak for awhile and then scrub the tiles. Wash with water. Repeat the process until the tiles are clean.

The soap scum on the grout is much more difficult to remove. Scrubbing and application of vinegar will remove the surface material. If the grout was not sealed in the first place, the soap scum will come off. A high pressure steam cleaner can be used to clean the grout as well. This works well although again your need to use a lot of elbow grease to clean the grout.

The worst case solution is to use a grout removal tool to get all of the grout material out of the joints. Re grout the joints and seal the grout joints.

Once you have your shower tiles nice and clean follow the steps outlined in the previous post to prevent further damage from mold and mildew. Keep your shower walls dry and clean your shower every two weeks.


How to Remove remove old kitchen floor ceramic tiles

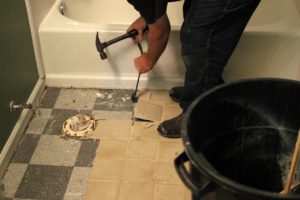
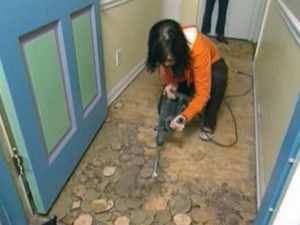
remove old kitchen floor ceramic tilesTiles have been very popular in many homes over the past several decades. New owners or even current owners sometimes feel the need to change them. They might have become chipped or cracked or they just are ready for a change. Remove old kitchen floor ceramic tiles, bathroom tiles or hallway tiles are much the same. You need to use the right tools and practice safety precautions in all cases.

There are many ways to remove tiles. The method you use really depends on the situation. You may want to take extra care to avoid damaging surrounding walls, cupboards, etc. The tile may be easy to remove in some situations. In others, you may need to almost use a jackhammer to remove the tile. We will cover some of the basics for safety and removal of tiles in this post.

Safely Remove Ceramic Tiles

Broken tile splinters and has lots of sharp edges. Pieces will break off and may even fly into the air. For these reasons we suggest that you wear safety shoes with steel toes. Leather gloves should be worn to protect your hands and safety glasses should be worn to protect your eyes. Saving money by doing it yourself is great as long as you do not suffer needless injuries.

Before you begin, remove any furniture and items that could be damaged by the broken tiles. You may want to consider covering some items with an old blanket if you are unable to remove the item from the area.

Tools to Remove Old Kitchen Floor Ceramic Tiles

The tools you will use to remove ceramic tiles really depends on the situation. Some are easy to remove, while others are very difficult due to the concrete used. Location and workspace can be an issue. For example, bathrooms do not have a lot of space to work in and around kitchen cupboards are also difficult.

Begin with a strong chisel with a wide blade at an edge to test how difficult it will be. If they come off easy keep going. You may have to graduate to an electric jackhammer with a flexible blade designed specifically for tile removal. These work well, however, take your time to avoid damaging the floor underneath and surrounding walls and cupboards.

The pictures above demonstrate the two examples discussed in this post. For more posts about remodeling your home and various considerations, click here.


Do you Lose Power with Solar Panels Installed

Do you Lose Power with Solar Panels InstalledMost consumers automatically assume that they will have electrical power, even if the electrical grid fails. Do you Lose Power with Solar Panels Installed? The quick answer is that it really depends on your installation and whether you have battery back up or not. Before you spend any money on solar panels, consumers need to review their objectives and decide what features are most important to them vs. their budget. Do they want emergency power that automatically switches on for them in a power failure.? Or do they just need to save energy costs and use solar power all of the time?

There can be large differences in each installation and the associated cost of these systems.

Many consumers are interested in saving money by having a solar power system. Their system will generate electricity during the day and feed it back into the grid. This will not only save them money but it will also generate income for them whenever they generate enough to feed into the grid.

When the power grid fails, the solar power system also shuts off. This is necessary to protect repairmen and avoid electrocution. As a result, the homeowner is also without power in this situation!

Do you Lose Power with Solar Panels Installed

Most consumers do not install batteries with their solar power systems. There is an approximate 30% additional cost to install battery backup. Anyone who really needs backup power for medical or business needs will take this option.

When the power grid fails, the solar power system will disconnect from the grid and continue generating power to feed the batteries. They, in turn, feed the home’s electrical requirements. Something to consider when you make a decision to purchase a solar power system.

For more posts about solar power, costs and benefits, click here.


Remodel your home for the sandwich generation

Remodel your home for the sandwich generationThe number of people living in multi-generation homes is increasing every year. The rate is 4.3% of families live with multiple generations in their home. As a result, these families enjoy many benefits of having multi-generations live under the same roof. At the same time, there are also hardships that impact the family, the quality of life, and the financial well-being of all parties. Many people will remodel your home for the sandwich generation needs, which can cost thousands of dollars in addition to many medical expenses.

Remodel your home for the sandwich generation

We will cover some of the following issues that many people find when they remodel these homes.

Family values – for many people this is just the natural thing to do. Their parents provided support and the kids would not have it any other way.

Support older generations – older generations need support financially, emotionally, and often physically as they age. Would you rather have strangers look after you or live with the family?

Save money – both parties can save money. Obvious living costs are lower for everyone when the costs are shared. In addition, built-in baby sitters, home sitting, and even some of the physical maintenance might be considered.

Avoiding poverty situations – many seniors just do not have enough funds to live comfortably. Living with the family reduces the overhead costs and allows them to continue providing valuable support to the family.

Built-in babysitting – is a huge benefit. The parents can get out once in and a while without paying for a babysitter.

Adjusting to habits – everyone’s habits are different. Sometimes there is an adjustment period. This includes compromise and flexibility. Keep an open mind.

Trend increasing – as the graph above indicates there is a general increase in multi-generational homes. We happen to think this is a good thing that provides many benefits to many people.

For more posts about remodeling your home and various considerations, click here.


Emergency Car Kits

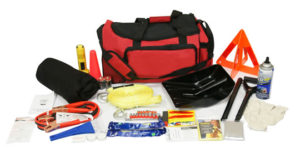
emergency car kitYou never know when you will need an emergency car kit to help you when you are stranded somewhere. In most situations, there are other vehicles traveling the road or there are homes nearby. But what do you do if you are traveling in the country late at night? Maybe your traveling in one of the western states with few homes, towns or places you can go for help. On some highways, it can be over 100 miles to the next place with services. Having an emergency car kit in your car can make life much easier for you while waiting for help!

An emergency car kit Should Include

  • Food that won’t spoil such as granola bars (avoid provisions that may be difficult to open such as canned food)
  • Water—use plastic bottles that won’t break if the water freezes and make sure to replace them every six months
  • Blankets
  • Extra clothing and boots


  • First aid kit, including a seatbelt cutter(glove compartment)
  • Small shovel, scraper and snowbrush
  • Candle inside a deep can and matches
  • Wind-up flashlight
  • Whistle—in case you need to attract attention
  • Roadmaps


  • Sand, salt or cat litter (non-clumping) to help you out of a snow bank
  • Antifreeze and windshield washer fluid
  • Tow rope
  • Jumper cables
  • Fire extinguisher
  • Warning lights or road flares
  • And of course, your cellular phone to call for emergency or towing services

Don’t get stranded on the road without these essentials. You never know how long you may need to wait for help especially during winter storms.

For more posts about safe driving topics, click here.


Treated Deck Lumber Rotting

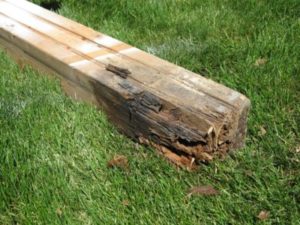
treated deck lumber rottingLets be realistic, most treated deck lumber rotting issues will occur to just about everyone sometime. Treated lumber contrary to the advertisements will not last forever even under the best conditions. However, the life of your deck or your fence can be extended if you follow some guidelines. Basically you need to keep the water from collecting and standing on the wood. If you can arrange to make sure that there is good drainage and avoid damp earth collecting on the wood, it will last a long time. let’s review a few examples to give you some idea. If you follow the basic rule, your deck etc will last many years.

Treated Deck Lumber Rotting – Guidelines

Since this post is about decks, we will discuss decks first. Always follow basic construction and design guidelines to ensure that you have a deck that is well supported. You want it to be strong enough to hold all possible weight conditions. Next ensure that the deck slopes slightly away from the house. All water and moisture will run off allowing the wood to dry properly after each rainfall.

Ensure that the bottom of all posts are above grade and that there is adequate drainage from around the bottom of the post. Any dampness that remains, will over time, cause the wood to soften and begin rotting.

If your deck receives lots of shade, it may not last as long as on that is in full sun. It just will not dry out. Moisture will not evaporate and will slowly cause the wood to rot. Either relocate the deck or remove some of the trees to provide more sunlight.

Fence posts should follow the same rule. Either encase the fence post in concrete and cap above grade or encase in porous gravel to bleed away moisture. If the moisture sits there, it will cause the wood to rot after even a short amount of time. It will not matter if it is cedar or treated lumber.

For more posts about repairs around your home and general maintenance, click here.

Save


Practical issues – solar panels on your house

solar panels on your houseMore and more consumers are installing solar panels systems on the roof of their homes. They have bought into the idea of generating electricity to reduce their costs. They consume less electricity and reduce pollution. Solar panels on your house can be an excellent way of saving money.

There are some practical issues associated with this trend. Many salespeople and solar panel companies will not talk about it. We happen to think it is important for the consumer to know these things. This info should be reviewed prior to making a decision about installing solar panels on your house.

Depending on the state and the subsidies, the amount of sun you get and the cost of electricity from the grid the payback for your investment could be as short as five years. You actually might save thousands of dollars in electricity costs over the lifetime of the solar panel power system which could last 25 years.

Sounds pretty good! But there are some issues the consumer should be aware of.

Solar Panels on Your House – Issues

While all of these incentives are available from government agencies, it may take some time to actually collect. If you are depending on this money for cash flow you might need to think again. The incentives will eventually arrive however just not in the time frame you were expecting.

Some systems require that you read the meter and send that information in once a month. Others will complete automatic readings for you at an increased cost. It really depends on whether you want to have the responsibility of meter reading once a month.

Most people assume that if the electrical grid goes down, they will continue to have power because they are generating power locally. Unfortunately, if the grid goes down, and you are connected to the grid your power system will automatically shut down at the same time. This is to prevent electrical power from being fed into the system while workers are trying to make repairs.

Finally, if you live in an area that gets lots of snow, you may need to clear snow from the solar panels before you can generate power in the wintertime. This is something that many consumers just do not consider as part of the decision to install solar panels on the roof. If Snow is covering the solar panels they will be unable to generate any electricity.

For more about solar panels and what to consider before installing solar panels, click here.


Treated Lumber Rotting

Treated Lumber RottingWe recently read a post about treated lumber rotting. The writer was surprised that the treated lumber on their deck had begun to rot. They had been assured that the lumber would not rot and would last a lifetime.

The bottom line is that all wood will eventually rot. Some will rot faster than others. It really depends on the type of wood used, the treating process and the location where the wood is placed. Treated lumber rotting is a common problem. Anytime you have moisture from poor drainage it will rot. If there is poor air circulation with moisture, it will rot. If there are insects such as termites, they will attack.

Treated Lumber Rotting

I have pulled out fence posts encased in concrete that are as good as the day they were installed after 29 years. On some posts where the concrete was below ground, the posts had begun to rot at ground level. They were exposed to dirt, moisture, poor air circulation and insects.

Deck components lasted equally well except for those pieces that were exposed to constant moisture. We had to replace the deck after 27 years. Either way this is not a bad life cycle for treated lumber.

Bottom line, don’t expect treated lumber to last a life time and you will not be disappointed. Expected it to last 15 to 30 years under good conditions. Check the condition on a regular basis, especially as the deck, fence etc. gets older. You will avoid surprises this way.

Also, don’t you think it is time to update your deck design, fence etc after 20 to 30 years! For more fence posts, click here.

Save


Reading Worn-out Tire Treads

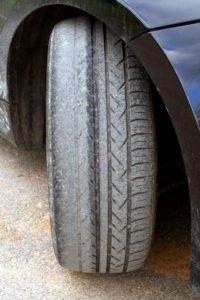
Reading Worn out Tire TreadsReading Worn out Tire Treads can be critical to your safety while driving your car. A worn-out tire can blow at any time, especially at high speeds. The tire will heat up causing the pressure to increase and pop goes the tire. A flat tire at high speeds can be quite dangerous and cause loss of control. If it leads to an accident, your life may be in danger. Take a look at all of your tires and take the appropriate action as needed before you have a catastrophic accident. Each check may cost some money but your tires will last longer and you just may avoid an accident.

Reading Worn out Tire Treads

Here are a few of the items that you should consider when reading worn-out tire treads.

Alignment – if your tire is wearing on one side or the other it usually means that your alignment is out and needs to be adjusted.

Overinflation – is indicated if the tire is wearing in the middle of the tire. Check your tires for over inflation especially during hot weather. High-speed travel also heats up your tires and can lead to over inflation.

Under Inflation – causes the tire to wear on both sides of the tire. Check your tires every week to ensure that they are not too low in cold weather. Tires lose pressure in cold weather.

Chopped or uneven wear – may indicate that your suspension needs to be adjusted or even have the shocks replaced. Poor shocks will allow the car to bounce and also the tire.

For much more information about tires and tire maintenance, click here.


  • Copyright © 1996-2010 Managing Home Maintenance Costs. All rights reserved.
    iDream theme by Templates Next | Powered by WordPress