Archive for February 21st, 2011

Tire Performance

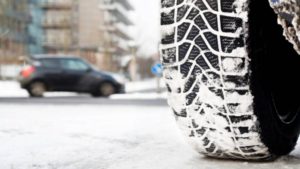
the right tires for your carGood tires will perform well in all kinds of conditions, snow , rain, hot pavement, gravel roads and sandy beaches. In fact, your tires actually give you much more comfort than many people realize. Good tires that are properly inflated and balanced along with the suspension system absorb  the bumps and potholes on the road providing you with a smooth ride at slow as well as high speeds. The tire performance is optimized when you they are balanced and inflated to the correct tire pressure.

With this in mind, it is important that you do take good care of your tires. In fact, you would not want to be driving a car that has worn out tires on it since it would be unsafe in many different situations, rain, snow and ice to name three.

Bald tires do not provide sufficient traction in these conditions and they are also more prone to blowouts. Aside from this, your chances of meeting a flat tire or having one of your tires blow up increase as the tread is worn down. Taking care of tires is important and relatively easy.

Tire Performance – Maintain Your Tires

There are four things that must be done to maintain your tires:

  • Proper inflation
  • Balance
  • Tire rotation
  • Alignment

Proper Inflation

At least once a month, you should check the tire pressure. All tires should be checked. To be sure that you have put in the right amount of pressure, check your car owner’s manual to confirm the proper pressure level. You may also find the information regarding this stamped on the side of the tire or on the information plate on the door jam. Make sure that you do not under inflate them or over inflate them. Both can cause premature tire wear.

Alignment

While driving, if you notice that your car is pulling in one direction even if you are driving on a straight road, then would be the time to have the wheels aligned. By having the car aligned, you are driving much safely and you also are lessening the pressure on the tires thus making them last longer.When the car pulls to one side or the other, the tires are also wearing on one side, which will prematurely cause them to wear out.

Balance Your Wheels – Tire Performance

You should also have the wheels checked and balanced if you  feel continuous  vibrations while driving at certain speeds. This is cause by the wheels not being properly balanced and can cause them to wear more quickly. While they are being balanced you should also have the tires rotated on your car to take advantage of different wear patterns on each side of the car.

Tire Rotation

Check your car’s manual for proper instructions concerning when to rotate your tires and the method of rotation. This will help to ensure that your tires will last longer and wear evenly across all four tires.

Your cars tire performance can be maximized if you take care of them following these steps mentioned above. Every tire has an expected life span and mileage expectation. You will only achieve the advertised amount of mileage if you maintain your tires at the optimal level all of the time, other wise they will wear faster than they should.

If you have comments on tire performance, on maintaining your tires etc, please feel free to leave comments. Our readers will appreciate your input. For more information on tire performance, click here.
Save


Frozen Pipes

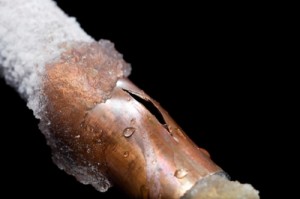
Frozen PipesIn our last post we talked about ,” Turning the Heat off  While on Vacation”. Frozen pipes can occur when you turn the heat down and it gets too cold outside causing potential frozen pipes as shown in this picture. If you have uninsulated water pipes on the outside wall you risk these pipes freezing in cold weather, however they can also occur for many other reasons as well. Many new homes have fresh air intakes that are required for today’s HVAC systems. If this fresh air intake is too close to any of your water pipes , they can freeze during very cold weather. By redirecting the make-up air inlet down to the floor, you can provide some pipe freezing protection.

Frozen Pipes can cause thousands of dollars in damage, from leaking water once they thaw out , not to mention the frustration of not having running water due to frozen pipes. Many of the northern states and all of Canada can have very cold weather during the winter, so if you do not pay attention to this issue of potentially freezing pipes you can have a huge expensive problem on your hands.

Frozen Pipes – Shut the Main Water Valve Off

If the pipes are already frozen and leaking you need to shut the main water valve off to prevent additional water leaking from the pipes.  If the pipes have not yet frozen, but are in danger of freezing make sure you know were the shut off valve is and have the name of a plumber you can call if there is a leak unless you can fix this problem yourself.

Remove all of your possessions that could get wet from the area to avoid any damage to them if there is a leak from the pipe bursting under the pressure of the ice in the pipes.

Next you need to deal with this fresh air vent. Do not plug this vent since that is what is providing you with fresh air in your home and avoids all kinds of issues including carbon monoxide build up in your home.

This fresh-air intake pipe is mission critical in today’s newer homes. It provides makeup air for ventilation fans, combustion air for some appliances, and it may be providing air for a traditional masonry fireplace.

Without a make-up air or fresh-air intake, you can have dangerous back drafting of exhaust gases from your fuel-burning appliances. Whatever you do, don’t block this mission-critical pipe.

Direct the air coming from the intake away from your water pipes. You may have to move the pipe or even add an extension on to it to take the air away from the vicinity of the water pipes. Even a deflector to deflect the cold air away from the pipes as it enters your home, will help in an emergency.

Thawing the Frozen Pipes

You can now start to thaw the frozen pipes. Do not use a torch. You can place  damp towels in a microwave oven and heat them up just like flight attendants do for all those pampered passengers who fly first class on airplanes. Wrap the pipes with these steaming hot towels to start thawing the frozen pipes. It will probably take repeated heating in the microwave for the towels to thaw the pipes.

Another approach is to place an electric space heater in the room were the pipes are frozen and warm up that room. This will take some time as well, but will gradually relieve the pressure on the pipes. Combining the hot towels and the space heater may make this a quicker job.

Consumers have also use hair dryers with the blower directed at the frozen pipe to thaw them out. Remember once the water begins to flow the water will melt the rest of the ice in the pipe.

Avoiding Future Problems with Frozen Pipes

Unless you provide some kind of permanent solution to this problem. It is quite likely that you will have frozen pipes again the next time it gets really cold outside. Some people have been forced to let the water run at a trickle. So that there is always water moving in the pipes to keep them from freezing. This is a good short term solution, but not a long term one.

You may need to consider one or all of the following solutions to avoid this problem in the future:

  • Move the end of the fresh air intake away from the water pipes
  • Extend the end of the fresh air intake to the bottom of the floor
  • Insulate the water pipes in this room
  • Place a hot air duct in this room, and open it when the weather is cold
  • Place an electric space heater in the room and run it when the weather is cold
  • Move the water pipes to another area

Comments are welcome. Any comments that help our readers with this issue will be appreciated and displayed on this post.


Hardwood Floor Installation

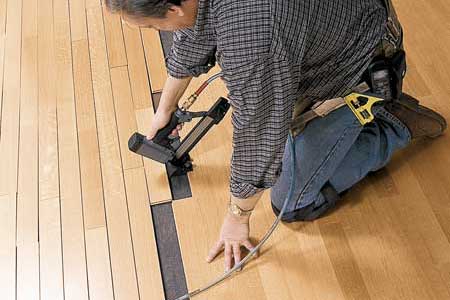
Hardwood Floor InstallationHardwood flooring is increasing in popularity. It is one of the most durable choices compared to carpeting. With current prices, hardwood flooring is very competitive compared to wall to wall carpeting which has really become passe. Hardwood Floor Installation is easy with a few basic carpentry skills. Installing a hardwood floor is a relatively easy do-it-yourself project, however stairs can be more challenging, even for the best carpenters.  Many people will opt for carpet on the stairs to avoid additional expense and concerns about slipping on the hardwood flooring on the stairs. A prefinished hardwood floor has a better finish and there is less work involved installing a hardwood floor.

Hardwood Floor Installation

The materials and tools that you will need are as follows. (note that you can also rent the tools you do not have at many of your local home improvement stores.)

  • Hardwood flooring
  • Staple gun
  • Vapor barrier paper
  • Variable speed drill and assorted drill bits
  • Hammer
  • Chalk line
  • Tape measure
  • Pry bar
  • Pneumatic Flooring Package (air compressor and hose, nail gun, mallet and staples)Chop saw
  • Table saw
  • Nail set
  • Hardwood flooring wood putty
  • Earplugs and safety goggles

The steps for hardwood floor installation are as follows:

  • Select the hardwood species and the board widths for the room you will be working in.
  • Measure the width and length of the room and calculate the square footage. Allow 10-15 percent extra for irregular boards and any cutting mistakes.
  • The sub-floor minimum requirements are a 3/4″ plywood sub-floor. Eliminate squeaks by screwing a long drywall screw into the sub-floor and joist where the squeak occurs. Remove all molding from the room and vacuum and clean thoroughly.
  • Roll out strips of vapor barrier paper, allowing at least a 4″ overlap and staple securely to the sub-floor. We used a 15 pound tar paper or felt. In climates were there is a basement, the vapor barrier is usually not required.
  • Begin the installation at the longest unobstructed wall. Remove the shoe molding and snap a chalk line 3/8″ out from the baseboard to allow for expansion in the hot, humid weather and contraction in the colder, drier weather of the hardwood flooring.

Use Long Boards on The First Row

  • Begin by selecting a long board to start the first row. Pick one that is straight. Align the edge of the board with the chalk line and drill pilot holes down through the hardwood plank and into the sub-floor and joist. Face-nail each board at the point of every joist and set the nail with a nail-set. Face-nail the entire first row and remember to keep the board lengths random. It is important to face-nail the first row because you can’t get the pneumatic nail down in there, it will hit the wall and the force would push the wood against the baseboard and you would lose your 3/8″ expansion and contraction.
  • It is important the lay the first boards perpendicular to the joist which are underneath. That is important because you want to get a nice solid anchor. You can look at the sub floor to see which way the nails and seams run. You might be able to go underneath your crawl space or into your basement to see how they run.
  • After the first few rows have been installed, drill pilot holes down into the tongue of each board and hand-nail the rolls until there is enough clearance for the pneumatic nail gun.

(continue reading…)


  • Copyright © 1996-2010 Managing Home Maintenance Costs. All rights reserved.
    iDream theme by Templates Next | Powered by WordPress