Tips in Selling a Home on a Busy Street

Selling a house on a busy street can present some challenges, but with the right approach, you can still attract potential buyers and achieve a successful sale. A few ideas to help you sell a home on a busy street:

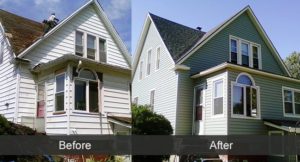
  1. Enhance curb appeal: Ensure the exterior of your home is visually appealing to catch the attention of passersby. Consider repainting the exterior surface, adding landscaping elements, and maintaining a neat and well-maintained appearance.
  2. Soundproofing: Invest in soundproofing measures to minimize noise from the street. Soundproofing can include installing double-paned windows, adding insulation to walls, or using soundproof curtains. Highlight these upgrades to potential buyers to demonstrate your efforts to mitigate noise.
  3. Interior staging: Stage the interior of your home to make it as attractive as possible. Depersonalize the space and create a neutral and inviting environment that allows potential buyers to envision themselves living there.
  4. Highlight privacy features: Emphasize any privacy-enhancing elements you have incorporated into your property. Privacy features include fencing, tall hedges, or landscaping that acts as a noise buffer or visual barrier from the street.
  5. Market the positives: While the busy street may have its downsides, focus on the positive aspects of the location. Highlight nearby amenities, such as parks, shopping centers, schools, or public transportation options, that potential buyers find appealing.
  6. Pricing strategy: Consider setting a competitive price that reflects the location and potential inconveniences associated with the busy street. Competitive pricing can attract buyers specifically looking for properties in your price range.
  7. Time your showings strategically: Schedule when traffic is lighter, such as early mornings, late evenings, or weekends. Proper scheduling can help potential buyers experience the property with minimal disruption from traffic noise.
  8. Please provide information about the neighborhood: Compile information about the neighborhood that showcases its positive aspects. Include details about the community, nearby attractions, and any ongoing development or improvements that might increase the area’s appeal.
  9. Offer incentives: Include incentives to potential buyers, such as covering closing costs or providing a home warranty. These incentives can offset any perceived drawbacks of the busy street.
  10. Work with an experienced real estate agent: Engage an estate agent with experience selling homes on busy streets. Real Estate Agents provide valuable insights and strategies specific to your situation.

Remember, every property has unique selling points, and with the right approach, you can successfully sell a home on a busy street.


Should You Remove Popcorn Ceilings

We will try to answer this question or at least give you some more facts to consider, about whether, Should you remove popcorn ceilings?
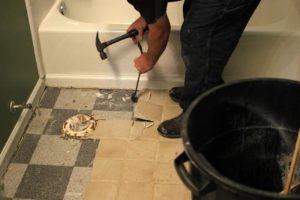
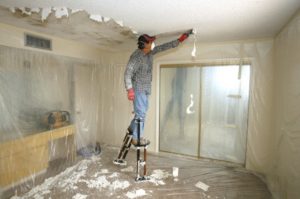
There are always other factors to consider before you remove the popcorn ceilings in your home. Some people will refer to the material as stiple. Either way, it is a messy job and always much more than you might have intended. Nevertheless, modern buyers are looking for houses with smooth ceilings. All the hard work will increase the value of your home. We will answer this question or give you some more facts to consider about whether you should remove popcorn ceilings.

Has the Ceiling been Painted

I guess a couple of big things before we get started, is whether your ceilings have ever been painted. Some people paint their popcorn ceilings to give them a fresh look, unfortunately it makes it very difficult to remove the pop corn later. If your ceiling has been painted, be ready for a lot of scraping and a lot of sanding or just put up new drywall.

Scope Creep

The next big issue, is scope creep. If your wife is like my wife, It is not just about removing the popcorn ceiling. For example, you guys may want to paint the walls, replace the baseboards, update the electrical outlets and switches, even change the lights in the ceiling if you have them, or install new doors. Every room is different. In addition you have to move everything out of the room, which means housecleaning. Potentially a lot of extra work.

Dust Everywhere

The next big issue is dust. It does not seem to matter how hard you try to control it, But dust just seems to get everywhere. I have taped doors, put towels at the bottom of doors, plugged the vents and it helps a lot but when it comes to sanding that’s when dust seems to find its way everywhere in your house.

Should you remove popcorn ceilings?

So if you’re OK with all that, and your popcorn ceiling has not been painted, it is actually quite easy to remove the popcorn. I use a small portable garden sprayer with water and spray a 4 ft.² section of the ceiling with water, lightly sprayed. Then, I use a scraper with a long handle holding it at about 40° from the ceiling and scrape off the popcorn. I hold a small bin underneath it to catch the material as it comes off the ceiling.
I then use a regular scraper, or trowel, and scrape the same area to make sure there’s very little material left. It makes sanding a lot easier and less time consuming. Once you have the ceiling completed, let it dry for a day, and then sand it. I have a manual sander that goes on the end of a long pole that I used to sand the ceiling. You’re welcome to borrow it. The main thing is to remove any ridges and any material that you missed when you were scraping.
The next step is applying plaster, filling any gouges that you might’ve made and feathering at joints if needed. Sand again and repeat as needed.
Once you’re ready, apply a coat of primer, and then whatever ceiling paint you want to use. It’s a lot of work, tough on the shoulders, but what else have we got to do these days?

Should you remove popcorn ceilings?

There are YouTube videos you can look at, some describing the process I use, other guys attach a scraper to the end of their shop vac hose and do it that way. They make it look easy but I think either way it’s still a lot of work.

Benefits of Wood Flooring, Compared to Other Types of Flooring

Benefits of Wood Flooring, Compared to Other Types of FlooringAre you planning major renovations like the guy in the image? Perhaps replacing warn carpet. Many people consider hardwood flooring as an alternative. If you are unaware of the benefits of wood flooring, you have come to the right post. This post lists all of the major benefits that consumers enjoy when they install wood floors. Don’t forget that it is a personal choice. Some of the benefits will be more important for some people compared to others. Review our list and make your decision based on what is a high priority for you. Take into account personal likes and dislikes. Are you selling? Do you have allergies, etc.?

Benefits of Wood Flooring, Compared to Other Types of Flooring

Last, For Decades – wood floors can last a very long time. They can even be re-sanded and stained to make them look new again. Carpets may need to be replaced due to wear and tear, stains, etc every five years or so.

Easy to Clean – use a light brush or vacuum to keep it clean. Once and a while wash the floors with a damp mop. Carpeting must be cleaned with a carpet cleaning machine.

More Hygienic – dust, skin particles, and even food find their way deep into the pile of carpets. All of this material is easily vacuumed with hardwood floors. Combine with a central vacuum that exhausts outside and you have a super clean home.

Eliminate Odors – carpets retain odors from pets and decomposing food particles. Hardwood floors are easier to keep clean and can be washed easily to get rid of odors.

Underfloor Heating – wood is a great medium to use for underfloor heating as is tile. Carpets are not recommended over underfloor heating.

Lower Long Term Costs – hardwood floors last longer as a rule and can be sanded and refinished. Soiled and worn carpets must be replaced at significant costs.

Timeless Appeal

Hardwood floors are always in – In addition they can be enhanced by adding area rugs and complimenting furniture

Available for all Budgets – Hardwood floors are now massed produced and come pre-finished. They are designed to fit all budgets.

Warmth and Feel – Wood floors are just cozier and feel warmer compared to tile floors

Sell Your Home Quickly – Your home’s value will not only increase, but it will also sell more quickly than a home with carpet.

There are many benefits to hardwood flooring. For many people, it comes down to their budget. Don’t forget to take into account the long term cost benefits of installing a hardwood floor.


Adjusting Your Thermostat While On Vacation

adjusting your thermostat while on vacationAdjusting your thermostat while on vacation is one way to reduce your energy use when you are not at home. But how much should you adjust it? Should you turn the furnace off completely? How long will you be gone? What does your insurance company require? These and many more questions are areas that consumers should consider when they go away on vacation during winter months. We will try to answer these questions by providing some general guidelines related to heating your home in the wintertime.

Adjusting Your Thermostat While On Vacation

Consumers should always consider adjusting the thermostat downwards when they go away on vacation.  Never turn your furnace off and never lower the temperature so far that there is a danger of freezing water pipes. Frozen water pipes can crack the pipes causing a great deal of water damage when the pipes eventually thaw.

Many websites and experts suggest that a temperature of no lower than 50F or 10 C for your home. Note that if you have a basement, the temperature will actually be a few degrees lower in the basement. Water pipes close to walls and windows in the basement could actually freeze when there is extreme cold outside. Check your basement temperature differential from your thermostat setting. If your setting is 50F and your basement is 45F, you may want to adjust the temperature setting on your thermostat. Adjust it upwards to ensure that the basement never goes below 50F.

Consumers should also check with their insurance company. Verify the guidelines they required to enable your home to remain insured. They may want the main water valve turned off. They may want someone to check on your home’s heating system every day. No one wants a huge water damage repair and finds out there is no coverage because they did not follow their insurance companies’ guidelines.


Do You Need a Cold Air Return Vent In Each Room

Do You Need a Cold Air Return Vent In Each RoomThe answer to the question, do you need a cold air return vent in each room, is no. However, it is important that the flow of air in your home is efficient. Hot air comes into each room through the hot air registers, usually located under a window. The hot air heats the room and rises to the ceiling, pushing cold air towards the floor. This is where your cold air return vents should be located. Cold air is drawn into the duct. Rooms with no cold air return vent and closed doors will have less air circulation.

Hot air coming into the room has nowhere to go. It creates positive pressure. Hot air is forced into other rooms with lower pressure. If you do not have a cold air return vent in each room, keep doors open to circulate air.

Do You Need a Cold Air Return Vent In Each Room

Our master bedroom does not have a cold air return vent. The room is cold in winter and hot in summer. If we keep our bedroom door closed the variance in temperatures is even greater. We keep the door open all of the time. We looked into installing a cold air return vent in the room which turned out to be impractical.

There was another solution which turned out to be one of the best decisions we could have made. A ceiling fan was the answer. We installed the fan and keep it on a low speed all of the time. The air circulates in the room. The fan pushes hot air from the ceiling towards the floor. Even with the door closed the temperatures are more consistent throughout the room.

The cold air return vent is located just outside the door in the hallway. With the door open and the fan running, the air is pushed out of the room towards the door. We have found that it is not perfect. However, the temperatures in our bedroom are more consistent and warmer in the winter.

Summer Time Solution

During the summer we have also found significant improvement. Circulate hot air with the fan. This leads to a much more comfortable overall air temperature in our bedroom.


Repairing Exterior Door Frames

If your exterior door frame looks like this one, there are several repair alternatives. Repairing exterior door frames can be very expensive. You could replace the entire frame and perhaps even the door. Depending on your decision, a new door will cost several hundred dollars or more.  Fancy doors will cost in excess of a thousand dollars. Remove damaged parts. Make sure you remove all of the rotted wood. Replace it with a piece of wood that matches the area you are removing, caulk and paint. When you do this work yourself it can be very inexpensive. We will cover this step in more detail in the next section.

Repairing Exterior Door Frames

The following steps can make your door look like new again and cost very little. The outside frame is also refereed to as the brick mold.

  • Dig out the rotted wood with a knife or chisel
  • Next, you need to determine how much wood to remove and how deep it goes
  • Identify solid wood about an inch above the rotted area
  • Using a square, draw line where you will cut out the brick mold
  • You will need to purchase a piece of brick mold that matches the area you are cutting out
  • You may need to make adjustments to get an exact fit
  • Take the time to ensure that if fits well to ensure that the finished product will look great
  • Once you are satisfied with the fit, pre-drill two holes for the screwnails you will use to secure the new piece of wood.
  • Screw the wood into place
  • Use exterior paintable caulk to fill any gaps that may exist and to water penetration
  • Once you are satisfied with the result, paint the new wood and the rest of the door frame
  • Although time consuming, do it yourself consumers may only spend $20 or $30 instead of hundreds or thousands of dollars.


Do Gutter Guards Really Work

We wondered, do gutter guards really work and what are the cash savings if any from installing these guards?  The principal is that water running down your roof carrying debris will be separated by the gutter guard. The water going into the eaves trough will be carried into the downspout. Debris will be washed over the edge and down onto the ground. Without a guard, annual cleaning is needed to avoid situations like the one shown in the picture. The gutters quickly fill up if you have trees nearby.

If you do not clean the gutters, dampness remains in the gutter causing mold and can cause the roof to become spongy and rotten under the shingles. Gutter cleaning could cost from $100 to $200 or even more depend on how many feet of gutter you have. With lots of trees, you may have to have them cleaned twice a year. Over 10 years, that’s $2000 assuming that you hire someone to do the work for you.

Do Gutter Guards Really Work

There are several different types of gutter guards. in situations with heavy rain, most will cause the water coming off the roof to just wash over the gutter and onto the ground. If you do not have heavy rains very often, this may not be an issue for you. Depending on the gutter guard you choose, there still may be a need to clean debris off of the guards and in one case to remove seeds that can embed themselves and sprout. Here are the different types of guards and specific issues you should consider for each in addition to those mentioned above.

More Information

  • Reverse Curve Guards – These are typically made from metal or vinyl and sit over the gutter opening. They essentially form a cover that allows water to slip around the guard but prevents large debris from coming to rest in the gutter. High volumes of water will simply overshoot the gutter and fall to the ground below.

  • Slit Gutter Covers – These are a variant of the reverse-curve and usually include one or two recessed slots that increase the amount of rainwater that can flow into the gutter. These systems also struggle to manage heavy downpours like the simple recurve system.

  • Sponge Guards – This approach places a sponge that is shaped to conform to the inside of your gutter. Water flows through and since the mass of the sponge fills the gutter space, large debris cannot accumulate. The real downside is that small debris particularly seeds can get caught in the sponge and sprout.

  • Metal Screens – These curved screens come in short sections and fasten onto the outer lip of the gutter.  They are inexpensive and easy to install but are susceptible to clogging because the opening size in the mesh catches small debris.

  • Micro-Mesh Gutter Guards – Micro mesh guards consist of a support frame and a filtering mesh material which ranges from fine to micro mesh. The advantage of micro-mesh technology is that they provide the best flow-through characteristics and do not clog with small debris. While their performance is superior the only real drawback is that the systems are more complicated to install.

How Much do You Want to Spend

They all come at a price, some more expensive than others and some are easier or difficult to install. Based on the concerns expressed for each it is obvious that some level of maintenance will still be required.

Before you invest in gutter guards, compare the cost of installation including materials. Consider annual maintenance from time to time. Compare with the cost of just having your gutters cleaned out once or twice a year. If you are ok with climbing ladders, factor the do it yourself cost as part of the comparison.


Should You Install Gutter Guards

Should you install gutter guardsAs a homeowner I’ve always wondered should you install gutter guards in my eaves trough? I have always cleaned out the eaves trough at least once a year and sometimes twice a year. They’re always seem to be an accumulation of leaves, keys from the maple tree in front of our house, and other debris that lands on your roof and is washed into the eaves trough. When I was younger, it was no problem to get up on the ladder and clean out the stuff. Now that I’m getting older and inclined to climb less I’m wondering if I should invest in a gutter guard for the eaves trough or pay someone to clean it out?

Should You Install Gutter Guards

It will probably cost between $50 and $100 each time I have someone come over and clean out our eaves trough. If I do it twice a year that will be $200 a year. Over 10 years that’s $2000 that I will spend paying someone to clean out my eaves trough not taking into account any inflation.

I have about 50 feet of eaves trough that would need a gutter guard installed. At $20 per foot, that’s about $1000 in total for the cost of the materials. I probably could install it myself at this point. But many people are unable or just do not want to get up on a ladder to install something like a gutter guard in the eaves trough. Installation of the eaves trough would probably take a couple of hours. Conservatively it would cost roughly $200 to install for a total cost of $1200 compared to paying $2000 over 10 years.

The gutter guard seems to be a clear winner, however, there are other points to consider. Not all gutter guards are made the same way. If they’re not installed properly debris will still build up on top of the gutter guards. The gutter guard must be aligned with the slope of the roof. Rainwater must wash any debris off of the gutter guard.

Overflow

There will be some overflow onto your garden, driveway, or whatever’s underneath your roof. Some water will not drain through the gutter guard and will simply flow over the gutter guard. This will happen in severe and heavy rainstorms.

Since we just had our tree removed, I have decided not to install the gutter guard. I probably will get them cleaned once a year. Which will cut my costs in half and make it much cheaper than having gutter guards installed and risking that I will still have to have the debris removed from them. Each consumer should evaluate their own situation, understand the costs involved in your location. Make your own decision using these kinds of guidelines and thought process that I went through for myself.


Efflorescence Garage Floor

efflorescence garage floorDuring the winter in northern states and in Canada, your car will be covered in snow and ice. There will be a buildup in the wheel wells on your car of slush. It is a mixture of snow, sand and salt which among other things eats away at your car. But also melts in your garage and lands on the floor. As the water evaporates your left with a mix of sand and salt deposits in a white powder like form. This white stuff is efflorescence. Efflorescence deposits on your garage floor do not look great. It  can cause damage to any tools etc. that may be in your garage. This is salt after all and salt corrodes any exposed metal.

How to Get Rid of Efflorescence Garage Floor Deposits?

Washing the floor will help remove some of the material, however there is still a great deal that will be in the concrete and will also be in the cracks in your floor. Once your floor dries, the salts will reappear. The best approach is to use a brush with stiff fibers and sweep up all of the loose material and discard it in the garbage.

You may need to do this several times to remove all of the material on the floor. If you have a leaf blower, this tool can get rid of almost all of the grit and salt left on the floor. Move your car and any other items that might obstruct the removal of the dust. I would move your car onto the street since there will be lots of dust in the air and you do not want it landing on your car.

Start at the furthest point away from the garage door and blow all of the dust out the door onto the driveway and then onto the street or your lawn. This method does not cost anything and will get rid of any fine particles of sand and salt that is left after first sweeping the garage floor with a broom.

There are lots of products on the market that advertised to deal with efflorescence garage floor removal, however this is the easiest and the least expensive method.


What is this White Powder on my Concrete Garage Floor

white powder on concrete garage floorIn northern climates, cities and counties spread lots of salt on roads to melt the snow and reduce accidents. The salt gets on our cars and makes a mess of our cars causing them to rust and deteriorate. When we place our car in the garage, the snow and salt mixture melts. It drips onto the concrete floor seeping into cracks in the concrete. When the saltwater evaporates it leaves a white powder called efflorescence. This is a very common occurrence. Especially in northern climates where a great deal of salt and sand mixtures are used to keep the roads from becoming too icy. Many people wonder what this white powder on my concrete garage floor is.

When the snow and salt mixture melts, it coats the floor with a salty brine. The concrete will absorb this brew like a paper towel,  readily soaking up all of the moisture including the salt. When the water evaporates at the salt is left behind. It sits on the surface of your garage floor as well as in the cracks in the concrete. It is just fine crystals of salt.

How to Clean Efflorescence White Powder on my Concrete Garage Floor

Washing the white powder with water does not work. This will cause the salt to be absorbed by the water and driven into the concrete. When the floor dries again the efflorescence will come back.

Even if you try to wash the floor several times the efflorescence or salt crystals will come back each time after the water dries. The best way to get rid of this fine powder is to use a fine broom and brush up the powder into small piles. Sweep the powder into a pile, scoop it up and place it in the garbage. You may need to sweep several times before it all is gone.

Some consumers will use an electric blower to blow all of the dust and all of the salt, this salt mix together out of the garage and into the street. This just adds to the dust floating around in the air which eventually falls to the ground, on your shrubs, grass, and even your car. My preference is to sweep it up with a broom as mentioned before and scoop it into the plastic garbage bag.


How to Install French Doors in Existing Opening

how to install french doors in existing openingMany consumers hire carpenters or handymen to install french doors for them when they could actually do the work themselves. It is actually quite easy if you take your time, follow the steps outlined below and perhaps watch a few YouTube videos showing some of the visual details on how to install french doors into an existing doorway. This post assumes that you already have doors installed that you are replacing. The existing doors are used as a template and once you finished with them can be sold to recover some of your cost. New doors come in a variety of sizes, with primer paint already applied. Once they are installed you can apply a final coat of paint on them to finish them off.

How to Install French Doors

You will need the following tools and materials.

  • Shims
  • Electric drill
  • Philips drill attachement
  • Drill bit to drill holes for door handles
  • Chisel
  • Rubber Mallet
  • Pencil
  • Square
  • Table to place doors on to make your job easier

The detailed step by step process is as follows:

  • Place shims under the existing door to hold it in place
  • Remove door handle
  • Place the new door on a table or some support structure
  • Unscrew hinges on the existing door
  • Remove the door and place it on top of the new door
  • Make sure that you match the bottoms of both doors
  • Line up the door to make sure that the old door is perfectly aligned with the new door.
  • Use the square to mark the hinge cut-outs that you need to make
  • Trace the hole you need to cut for the door handle
  • Remove the old door and begin drilling out the door handle with an appropriate sized drill bit
  • Stand the door on its side and chisel out the hinge locations using the rubber mallet and chisel
  • Take your time to be careful not splitting the door
  • Install the new door using the shims to support it at the correct height
  • Attach the hinges and test to make sure that the door operates properly and closes properly
  • The adjustment might be needed to ensure that it properly fits with the other door
  • Install the new door hardware to ensure that it fits with the other door

Repeat the process to install the other door. Then paint the doors, once you are satisfied with the installation. Remove the door handles before painting. Use masking tape to cover the door hinges to avoid getting paint on them. Most doors come with one coat of door primer applied.

For more remodeling ideas that can save you money, click here

Save

Save


What does My Home Insurance Cover

What does My Home Insurance CoverThis website is all about helping homeowners save money. We tend to focus on do-it-yourself items around the home that can be accomplished by the homeowner. We have also covered saving money heating your home, cooling your home, and even reducing gasoline consumption. One area we have to tackle is home insurance. Can you answer the question, what does my home insurance cover? Most people make assumptions. They then receive a rude shock when they find out they are not covered or only partially covered for a damage claim.

Check your home insurance coverage right now and confirm what coverage you actually have. Many insurance plans offer reduced fees, but they also may cover less than you think they did or should. For example, are you covered for the following types of claims?

  • Damage caused by animals e.g. raccoons in the attic
  • Wind damage
  • Damage from hail
  • Sewer backup
  • Water seepage through the roof
  • Cracked foundations

A significant item that affected the writer personally was damage from water leakage through the roof. My insurance company paid for the damage the water caused. However, they did not cover the damage to the roof or remove the ice dam. We were on our own for that. We had to have the ice dam removed to prevent future leaks as well.

What does My Home Insurance Cover?

If you have any doubt call your home insurance company today. Review all of the potential major claim areas and make an informed decision regarding which add-on coverage you need to purchase or continue taking the risk of not being covered.

Damage from animals entering your attic may also not be covered. Roof repairs, animal prevention, damage to the insulation, or worse are among the claims you might make, however you may not be covered for any of it. My own insurance does not cover this particular area and they do not offer an add-on for this particular claim.

While it might cost you a few more dollars each month to have added coverage, the savings could be in the thousands of dollars. For many people on a tight budget, it can be a difficult decision. Evaluate the risk of the event occurring, the cost of the insurance coverage, and the potential damage that may be caused. Then make an informed decision.

Many people will decide to continue to assume the risk. For example, in many areas earthquake insurance is just too expensive. They decide to absorb the risk themselves and know they will have to pay for rebuilding themselves if this particular threat were to materialize.

For other posts about home insurance ideas and claims, click here.


Installing New French Doors DIY Made Easy

If your handy at all, anyone can install new French doors into an existing opening with no problems and save money at the same time. Installing new French doors into an existing opening that already has doors installed is one of the easiest do-it-yourself jobs to do. The tools you will need are an electric drill with a Philips screwdriver bit, a table to lay the door on to make your work easier, a drill bit to make the holes for the door handle, a pencil, a measuring tape, a square, cedar shims, a chisel, and a rubber mallet. The money you save from doing the work yourself will more than pay for these tools if you need to purchase some of them.

Step by Step Process for Installing French Doors

What follows is a step-by-step explanation of what you need to do. I found it easier to only remove one door at a time as well. If you have someone to help you from time to time to hold the door while you are removing the old door and installing the new one it also makes the job much easier as well.

  • Place shims under one door so that it is held in place
  • Remove door handle
  • Place the new door on a table or some support structure
  • Unscrew hinges on the door side
  • Remove the door and place it on top of the new door
  • Make sure that you match the bottom of both doors
  • Line up the new door with the old door. Perfectly align it with the new door.
  • Using the square to mark the hinge cut-outs that you need to make
  • Trace the hole you need to cut for the door handle
  • Remove the old door and begin drilling out the door handle with an appropriate sized drill bit
  • Stand the door on its side and chisel out the hinge locations using the rubber mallet and chisel
  • Install the new door using the shims to support it at the correct height
  • Attach the hinges and test to make sure that the door operates properly and closes properly
  • Adjust as needed to ensure that it properly fits with the other door
  • Install the new door hardware to ensure that it fits with the other door

Repeat the process to install the other door. Remove the door handles and paint as needed, once you are satisfied with the installation, . Most doors come with one coat of door primer applied.

For more remodeling ideas that can save you money, click here.

Save


How to Thaw Out Frozen Water Pipes

Thaw Out Frozen Water PipesThe recent cold weather vortex that has descended on Canada and the United States has caused many homeowners to deal with frozen pipes. Once a pipe freezes, there is no water for even basic necessities. Especially if it is the pipe near the entry point to your home. If you are lucky the pipe will thaw at some point. The water will flow once again without any leaks. At the very worst you have a serious water leak. If the water is not shut off immediately, it will cause major flooding and damage to your home. Homeowners can take precautions to avoid frozen water pipes. Once you have a frozen water pipe, the question remains about how to thaw out frozen water pipes.

How to Thaw Out Frozen Water Pipes

Whatever you do, do not use a blow torch. There is tremendous danger in starting a fire which can quickly get out of control and actually burn your house down. Every year there are stories in the news of someone doing just that. Your home owner’s insurance may not cover this kind of catastrophe which would be huge.

Avoiding a frozen pipe in the first place is obviously the way to go, however, we will cover that later in this post.

First, if your pipes are frozen, i.e. there is no water flowing you need to take action immediately. If you can quickly identify the area where the pipes are frozen, turn up the heat in the area immediately to thaw out frozen water pipes. Install a portable heater in the area as well. It may take a few hours, but the pipes will eventually thaw. If there is a specific area and you can get to it, sometimes a hair blower will help to thaw the pipe.

Check for Obvious Breaks

Check for any obvious areas like the one in the picture. A leak like this one can quickly cause a great deal of water damage. In addition to warming up the room, shut the main water pipes off and then cut out the area and repair it. You may need to call a plumber to make these repairs.

It is much more difficult to thaw out frozen water pipes inside walls are much more difficult. Any pipe that is on an outside wall is a candidate for being frozen in very cold weather. With insufficient insulation and a cold interior room, these pipes can quickly freeze and crack the pipe. Look for signs of water damage and then open up the wall where the pipes are. You will have to repair drywall etc. however finding the leak is of paramount importance. Keep the rooms that have water pipes in outside walls warm to help thaw the pipes. Again a plumber may be needed to make repairs.

Check with your home insurance company to find out what coverage you may be eligible for.

Avoiding Frozen Water Pipes

If a cold snap is imminent and you are concerned about pipes freezing, turn up the heat. Focus on those rooms with water pipes on outside walls. You will spend more energy heating the rooms, but this is minimal compared to dealing with the damage from leaking water pipes, etc.

Anytime a wall is opened up either move the water pipe to an inside wall or make sure that it is adequately insulated for the most extreme temperatures you will experience in your area. Keep your furnace running to keep these rooms warm.

Many frozen water pipe situations occur when furnaces fail or the electricity is out for an extended period. If you’re going to be away from your home for more than a few days, shut the main water valve off to avoid any water leaks while you are not there. Have someone check your home every few days to make sure the furnace is running and your home is heated. They should also know what action you would want them to take if there is no heat in your home. i.e. call a furnace repairman, plumber, etc.


For other seasonal-related topics, click here.


Reasons Why a House is Cool in Winter With the Furnace Running all of the Time

Reasons Why a House is Cool in Winter With the Furnace Running all of the TimeThere can be a number of reasons why a house is cool in winter with the furnace running all of the time. The fundamental reason it is running more often is that it cannot meet the needs of your home. It can be due to a furnace not sized properly. In other words, it was sized too small for the home. Furnace suppliers typically will assess your home based on square footage. Also whether it is a two-story home or a single-story home.  They assume that it has standard insulation and will install a furnace that meets these requirements. The furnace provider can actually make a mistake and size it too small for the home in an effort to save money for the consumer, however, they know this will be a problem later on and seldom take this approach.

Other Reasons Why a House is Cool in Winter With the Furnace Running all of the Time

A poorly insulated home will leak heat like a sieve. Poor insulation in the ceiling and the walls means that you are losing a lot of heat that the furnace must replace. The colder it is outside, the more heat that is lost and the furnace must run more often.

The same applies to your windows. Fifty years ago single-pane windows were popular. Later on, companies added double pane windows to improve the insulating value of these windows. They then added argon between the windows which is an inert gas that conducts heat much less than even normal air. Well, insulated homes have these types of windows and sometimes even triple-pane windows. Also, insulation around the windows is much better and more thoroughly installed.

Doors also allow the heat to escape. If your door does not meet proper standards in terms of heat loss then you could be losing a great deal of heat this way as well. Make sure there is also adequate weather stripping around the doors to prevent heat loss.

These are the main areas to look at to prevent heat loss, reduce your furnaces running time and save you money which is what this website is all about.

Consumers can also insulate outlets that are on walls that face the eternal part of your home. Typically, there is no insulation behind these outlets. Keep your windows closed. Your furnace has a fresh air intake. Have your home tested for tightness? This involves pressurizing your home and examining where air can escape. Plugging these areas will also help to reduce heat loss. Some governments will help pay for these services to promote energy reduction.

For more information about Reasons Why a House is Cool in Winter With the Furnace Running all of the Time and ways to save money click here.


Removing Dark Stains from Your Roof

Removing Dark Stains from Your RoofConsumers living in areas with lots of moisture and the little sun will sometimes find black algae growing on the shingles of their roofs. It can turn a beautiful roof into an ugly stained roof that just does not look great even in the hot sun. Once it starts it just continues to spread leaving an unsightly mess on your roof. Fortunately, there is a way for Removing Dark Stains from Your Roof.

Removing Dark Stains from Your Roof

The first step is to remove any debris that may have collected on your roof. This includes moss that may have built up in areas where there is a great deal of shade. The best way to remove this debris is to use your garden hose and spray water on the area at an angle from about three feet away. Consumers must be careful to not dislodge granules from the shingles. Once all of the moss is removed, apply an oxygen bleach mixture to the areas needing treatment.

The best time to apply the oxygen bleach mixture is on a cloudy day. You need to keep the area wet for at least 45 minutes which can be difficult in full sunlight. Mix the oxygen bleach with water following the instructions provided.

Consumers should start in a small area. Make sure it is inconspicuous to make sure that this solution will work on the algae on your roof. Once you have confirmed that it does the job of getting rid of the algae and it has not harmed your roof. Apply the solution to the rest of the roof where the algae can be seen. You will notice a remarkable improvement in most cases.

Consumers may have to hire a professional roofer to go up on the roof to apply the solution. Avoid ladders of all kinds if you are afraid of heights or unstable on a ladder or being on a roof.


Should You Replace or Paint Your Vinyl Siding

Should You Replace or Paint Your Vinyl SidingVinyl siding is an extremely popular material that is used all over the country to cover the walls of homes. In many cases, brick will be used on the front of the home. Vinyl will be used on the other three walls. It is very durable and retains its color for many years. Just the same, the colors do fade after many years. Homeowners who want their home to look great must make a decision. Should You Replace or Paint Your Vinyl Siding?

Assuming that the vinyl is still in good shape physically, i.e. no holes or broken pieces, consumers can definitely consider painting the vinyl. If you do have to make repairs i.e. add a new strip of vinyl, it will be virtually impossible to match the colors. Your vinyl will have faded and changed color over the years. It is not possible to obtain an exact match. Painting becomes a very desirable solution. Although we always encourage consumers to obtain quotes for both scenarios, to confirm that it is less expensive to paint than replace, we feel that painting is less expensive and it is something you can do yourself.

Should You Replace or Paint Your Vinyl Siding – Steps to Follow

  • Complete Repairs – remove and replace any broken or cracked pieces.
  • Clean the surface of the vinyl from a build-up of dirt and chalky substance that may have built up over the years.
  • Remove any mold from the siding especially under the eaves.
  • Ensure you have a dry day with low humidity and light or no wind, especially if you will use a sprayer to paint the vinyl to avoid paint drift onto other surfaces.
  • Use paint as close to the original color as you can. Avoid darker colors. Vinyl absorbs heat especially with dark colors and will expand and contract a great deal causing the vinyl to overheat and possibly warp.
  • Use paint that is specifically made for vinyl siding. This paint is made to stretch and contract with the vinyl as it heats and cools.
  • Spray paint works the best, however, brush or roller painting works well especially on corners, etc.
  • Allow the paint to completely dry before applying a second coat.
  • Follow the instructions of the manufacturer to ensure that your paint application will last many years.

For more maintenance-related posts, click here.


Retire early – Mid course corrections – Save money now

We were actually thinking of writing this post for a retirement blog that we also run,(you can find it here), but then we thought that the idea of saving money fits well with this blog. The idea is to reduce expenses by doing a lot of your own maintenance and renovations around your home. If you can save even more money, you can retire early, take a trip or buy a new car. The main message is that you have far more flexibility about the decisions you can make. Retire early – mid course corrections is all about what changes you can make in your lifestyle to spend less and save for the future, whatever it is.

If you do retire early, life is going to throw curve balls at you which will or should cause you to re-evaluate what you need to do to keep your retirement as pleasant as possible. You may need to have money for unexpected expenses later in life which will cause these mid course corrections.

Retire early – Mid course corrections

This is a lost of mid course corrections that many people can consider. If you have others that make sense to add, let us know by leaving a comment. Pick and choose those that make sense for your family and your personal situation. Here is the list that we have so far along with the percentage of people who indicated they were interested in this area:

  • Make healthier food and exercise choices to save money later: 91%
  • Cut back on daily expenses: 90%
  • Reduce everyday leisure: 82%
  • Limit or cut back on donations to charities: 77%
  • Volunteer more and give monetary donations less: 75%
  • Work part-time in retirement: 75%
  • Downsize to a smaller home: 75%
  • Reduce or eliminate financial support to children: 70%
  • Purchase long-term care insurance: 68%
  • Move to a less expensive area: 67%
  • Postpone taking Social Security: 64% (though 60% said they’d “take Social Security as early as they can” — puzzling)
  • Develop a hobby into an income source: 62%
  • Reduce financial support to parents or in-laws: 59%
  • Take a housemate or become a housemate: 28%
  • Rent a room or part of my home on a short-term basis: 27%
  • Turn my car into a source of income: 24%

Start a Business

Whether it is renting out part of your home through AirBNB, VRBO or using your car to run an Urber business, there are many ways to earn a little extra income. Some people will start hobbies that they can turn into a small business.

Many will work online from home on various blogs like this one to earn extra income. It can be very emotional and difficult, but cutting support to your kids or to your parents, might be a big change or mid course direction to make.

Cutting back on daily expenses covers all sorts of areas. This could mean doing your own repairs and renovations as well as limiting or decreasing your entertainment expenses.

Notice that throughout this post that we do not say stop these areas. Instead we use words like reduce, cutting back and doing things that will help you spend less money and live more carefully.

Make a personal list that can help you achieve your own objectives for saving money and perhaps retire early as well. It will be worth it in the long run.


Duct Cleaning Scam or Not

How many calls do you get every month for duct cleaning services? We receive at least one per week and we just hang up on these guys. However there may be situations where you should consider having your ducts cleaned. But should you have one of these companies clean your ducts? Lets first talk about whether you need to have your ducts cleaned in the first place, then how to deal with these callers. Most ducts do not look like the one in the picture. If yours does, then definitely have have your ducts cleaned. We suggest that you check your ducts first and then make a decision.

Do You need Duct Cleaning

If you keep your home spotless, do not have pets and have not had any major renovation work completed around your home, you may not need duct cleaning. Any time you do renovations, dust is generated. If the AC or the heating system is running, this dust will be drawn into the duct system, onto the heating system elements and the cooling coils. Some will be captured by your filter but not all.

Another situation where duct cleaning is needed is when you move into a brand new home. We had ours cleaned and they found dust of course, but also cigarette butts, coke cans and cigarette packs.

Consumers who have pets may also need to have their ducts cleaned from time to time. Hair and dander is drawn into the system and adheres to metal surfaces.

Dealing with Duct Cleaning Calls

While many of these companies may be legitimate, some are not. Many will offer a great deal over the phone, however when they arrive at your home, they will try to up sell you on additional services or based on the size of your heating system.

Ask for references, review web sites, read reviews as part of your decision process. Avoid agreeing to duct cleaning services over the phone without doing some investigation first.

In addition verify what they will actually clean. All ducts both cold air return and heating ducts, vents, grilles, heating and AC components should be on the list. If they are going to open the furnace compartment, they should know what they are doing. Verify credentials before you allow them into your home.

While duct cleaning may be needed, consumers can save themselves a lot of money by keeping their homes spotless and avoiding dust and pollen from entering the home. for more information on keeping your furnace running efficiently, click here.


Sell Recycled Materials from Renovations

sell recycled materials from renovationsMost consumers throw out all of the materials that they remove from their homes during renovations. Any leftover new materials go the same route. In fact, all of the renovations shows on TV make a big deal of wreaking everything. It is less costly to remove the old shelves, cupboards, sinks, faucets, and toilets to prepare the space. They take sledgehammers to everything. It all goes out in one of those big trash bins or in a bagster like the one shown here. However, if you are careful you can sell recycled materials from renovations. Reuse the material as much as you can. You might even make some money from the old items.

Sell Recycled Materials from Renovations

Recycle or sell as much as you can. Sometimes the only way to remove something is to take a sledge hammer to it. Carefully remove items.  Reuse them or resell them.

Kitchen cupboards make great storage areas in your garage or in the basement. You just need to remove them carefully. Remove faucets in working order and resell them. Many people look for used materials to reuse in cottages etc.

One time I sold a used toilet for $10 to a guy. He was renting an apartment and somehow had broken his toilet. For $10, he was able to replace the broken toilet with mine. It was in good shape, very clean and in working order. Much better than have it take up space in a landfill spot somewhere.

Many items are just beyond recycling. Carpets for example are usually quite worn down and possibly dirty. Tiles are usually broken as they are being removed. Remove mirrors without damaging them. Light fixtures are another favorite item to be considered for recycling. Remove them carefully and resell them.

Window blinds are often custom-made to fit a certain size of the window. Blinds can be difficult to get rid of. However, we offered some blinds for free one time on a free advertising page. They were picked up almost immediately by a family who ran a boy’s school. The blinds were used for the windows. They did not need an exact match.

Summary

Before you take the sledgehammer to your old stuff take a moment to consider its value. Can the item you are about to demolish be reused or even sold at a bargain price. It can be a win-win situation. The buyer saves some money. You the seller make a little bit to help pay for the renovation work you are doing.

Save


  • Copyright © 1996-2010 Managing Home Maintenance Costs. All rights reserved.
    iDream theme by Templates Next | Powered by WordPress