 The recent cold weather vortex that has descended on Canada and the United States has caused many homeowners to deal with frozen pipes. Once a pipe freezes, there is no water for even basic necessities. Especially if it is the pipe near the entry point to your home. If you are lucky the pipe will thaw at some point. The water will flow once again without any leaks. At the very worst you have a serious water leak. If the water is not shut off immediately, it will cause major flooding and damage to your home. Homeowners can take precautions to avoid frozen water pipes. Once you have a frozen water pipe, the question remains about how to thaw out frozen water pipes.
How to Thaw Out Frozen Water Pipes
Whatever you do, do not use a blow torch. There is tremendous danger in starting a fire which can quickly get out of control and actually burn your house down. Every year there are stories in the news of someone doing just that. Your home owner’s insurance may not cover this kind of catastrophe which would be huge.
Avoiding a frozen pipe in the first place is obviously the way to go, however, we will cover that later in this post.
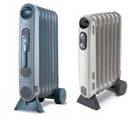
First, if your pipes are frozen, i.e. there is no water flowing you need to take action immediately. If you can quickly identify the area where the pipes are frozen, turn up the heat in the area immediately to thaw out frozen water pipes. Install a portable heater in the area as well. It may take a few hours, but the pipes will eventually thaw. If there is a specific area and you can get to it, sometimes a hair blower will help to thaw the pipe.
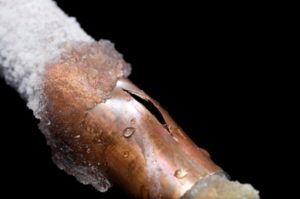
Check for Obvious Breaks
Check for any obvious areas like the one in the picture. A leak like this one can quickly cause a great deal of water damage. In addition to warming up the room, shut the main water pipes off and then cut out the area and repair it. You may need to call a plumber to make these repairs.
It is much more difficult to thaw out frozen water pipes inside walls are much more difficult. Any pipe that is on an outside wall is a candidate for being frozen in very cold weather. With insufficient insulation and a cold interior room, these pipes can quickly freeze and crack the pipe. Look for signs of water damage and then open up the wall where the pipes are. You will have to repair drywall etc. however finding the leak is of paramount importance. Keep the rooms that have water pipes in outside walls warm to help thaw the pipes. Again a plumber may be needed to make repairs.
Check with your home insurance company to find out what coverage you may be eligible for.
Avoiding Frozen Water Pipes
If a cold snap is imminent and you are concerned about pipes freezing, turn up the heat. Focus on those rooms with water pipes on outside walls. You will spend more energy heating the rooms, but this is minimal compared to dealing with the damage from leaking water pipes, etc.
Anytime a wall is opened up either move the water pipe to an inside wall or make sure that it is adequately insulated for the most extreme temperatures you will experience in your area. Keep your furnace running to keep these rooms warm.
Many frozen water pipe situations occur when furnaces fail or the electricity is out for an extended period. If you’re going to be away from your home for more than a few days, shut the main water valve off to avoid any water leaks while you are not there. Have someone check your home every few days to make sure the furnace is running and your home is heated. They should also know what action you would want them to take if there is no heat in your home. i.e. call a furnace repairman, plumber, etc.
For other seasonal-related topics, click here.
 precautions when closing your pool. These instructions are also for an in-ground swimming pool, however, for above ground pools, you can follow many of the same steps.
 around the beginning of Sept. The weather is still nice, but really it is not fun swimming when the air temperature is starting to cool off. Some people seem to enjoy swimming when the air is cold and the water is warm and heated by a pool heater. Closing Swimming Pools, it is time to do it. However we do not enjoy this and besides it is a huge waste of energy. If you live in the southern US or even in Southern Ontario, you can get another month of swimming in.