Archive for October 7th, 2012

Energy Efficiency Audit

Energy Efficiency AuditEnergy efficiency audits can tell you a lot about your home. Our home is approximately 25 years old. It is in need of some upgrades regarding windows that need replacement. Also a furnace that needs to be replaced and even our hot water tank. We were wondering if we should apply for an energy efficiency audit. Or just make the changes we planned and proceed from there. You have to pay for the audit. In some jurisdictions you will receive some of the money back once you complete the audit of all of the changes you have made and confirm that your home is now more energy efficient.

As far as we can tell there are a couple of reasons why you would want to have an energy efficiency audit completed. We have listed them below and then we will discuss them in some more detail:

  • Potential rebates for expenses to improve your home
  • Potential sales tool when it comes to selling your home
  • Scientific approach to fixing energy problems

We have read a number of posts from people who have had an energy efficiency audit completed. As well as looked at a number of web sites from official government sources. Our conclusion is that it really depends on were you live. In addition what programs are available to help consumers improve the energy efficiency of their homes. Each person must evaluate these factors based on were they live and the condition of their home, before they embark on an energy efficiency audit.

Energy Efficiency Audit

Potential rebates for expenses to improve your home

One post we read indicated that after the audit was completed and the rebates provided, the audit cost approximately $100 which is not too bad. Once you have the audit with recommendations for what needs to be done to improve your home you are eligible for rebates. You can then apply for rebates on the upgrades only after the work is completed. Before you can apply, you must have another audit to prove that you actually made some changes. In addition that your energy efficiency actually got better.

The rebates will depend on what you did and what is available in your state or province. Be prepared to shoulder the full financial cost in case the rebates do not apply. Or they are canceled or they feel that you did not do enough to improve your energy efficiency.

Potential sales tool when it comes to selling your home

This may or may not be something that everyone is interested in. If you are planning to sell your home anytime soon and also planning to do some upgrades in preparation, having one of these reports can only be a good thing. That is assuming that the report shows improvement . But also shows that you have a good rating for your home in terms of energy efficiency.

I guess if your audit does not work out, they you just do not mention it when it comes time to sell your home.

Scientific approach to fixing energy problems

We have thought about just going ahead and doing some of the up grades our selves without an audit. For example upgrade the furnace, replace the windows, seal all of the doors and add insulation in the attic.

What we would lose is any rebates that the government is providing which may or may not be substantial. We might also be spending money for nothing.

I recently spoke to a neighbor who has original windows in his home like ours. He just had an audit completed and the auditor said that there was no need to replace the windows. Since the R rating was ok and there were no leaks or areas were the wood was failing i.e. rotting. His energy rating was also pretty good. Basically he found out that if he spent some money on his house, he probably would not be eligible for any grants since his home was already pretty good.

The bottom line is that if you approach the problem in a scientific manner, you will get a better result. Hence also make better more informed decisions as well about improving your home from an energy efficiency perspective.

This is the best way to proceed, we think in terms of knowing what state your home is actually in. We will be looking into having someone come over to complete an energy audit for us before we spend any significant amount of money.
Good Neighbor Fencing

We just finished installing good neighbor fencing along one side of my lot. The existing fence was 25 years old and needed to be replaced.  As well, my neighbor wanted to also replace it and since we share it between us, this meant that not only would he help me build it, he would also split the cost of the fence as well.

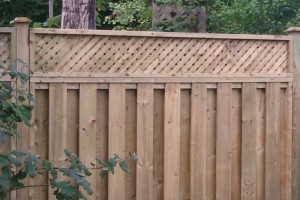
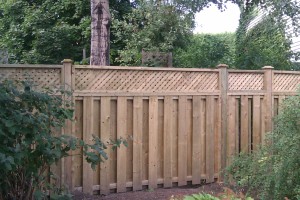
We decided on a traditional good neighbor fence, with a lattice at the top to add additional privacy and decoration. We also decided on a pre-built fence section which means the bottom part was built with a boxed-in effect using two by fours and the same approach for the lattice. The picture shows this superior fence. Using the two by fours as a box makes this fence a much stronger and sturdier fence. The good neighbor fence is vertical boards on opposite sides of the fence to allow the breeze to go through and to provide a more open look. More detail is provided in the following paragraphs.

Good Neighbor Fencing

Whenever you are building fences that are between neighbors there are several rules that apply in order to maintain good relations:

  • Always split the cost of installing the new fence
  • Always agree to design, style, price, and any construction details before proceeding
  • The fence should be on the property line
  • If it is a do it your self job, always help each other to build it unless there are health issues
  • When one neighbor is going ahead without the other’s consent, it usually means that the cost is not split and the fence should not be on the property line
  • If you hire a contractor, always make sure that everyone agrees to price, timing, style, and quality before giving the go-ahead

Good Neighbor Fencing Pricing

We elected to build it ourselves on the property line and split the cost of the materials.  We initially requested an estimate from a contractor who gave us a price of $4500 which worked out to a cost of $47 a foot which included removal of the old fence, construction of the new fence, and clean up after construction was finished. This was way too much for us and we decided to build it ourselves. The final cost for doing it ourselves worked out to be $1947 or $20 a foot which was a huge saving. We split the cost equally and so we ended up paying just under a thousand dollars each.

This is a much better fence than we would have had if we had hired a contractor to build it. We compared our fence to others in the neighborhood and not only is there more material in our fence, but it is also much stronger than any of the other fences that have been installed recently.

Compare Pricing for Good Neighbor Fencing

Whether you have someone build it or do it yourself, it is a good idea to compare pricing for the materials as well as labor before you begin. An important factor to discuss is the design of the fence to make sure you both agree on the design, but also how much material will be needed. There are many different designs and they all take different good neighbor fence sectionsamounts of material which affects the price. We compared pre-built fence sections from two major suppliers and found one to be superior. The superior fence was more expensive. However since we had a quote from the other supplier, the second supplier matched the price. We got a great deal, a superior fence design, quality materials all because we compared pricing. We saved at least $200 in cash and got a better fence!

Pre-built Sections or Build it From Scratch

Building a fence either way works well. However, using pre-built sections makes the job go a little faster. It means that you have consistency in the fence design in all sections of the fence. We did not compare pricing, however, with the sale price we received, we were happy with the final price.  With a price of $161 for an 8-foot section of fence, we had a very reasonable deal. This includes the 10 foot 4*4 post, sono tube and cement, screw nails, auger to dig the holes. Garbage removal for the old fence is also included. We could have saved some additional money if we had removed the garbage ourselves.

We had to work very hard to remove the old posts and cement. The new holes were dug to at least 42 inches. Once this part of the work was completed, the actual part of the fence building went relatively quickly. Both parties are very happy with the result. Plans are underway to approach other neighbors to build the rest of the fence surrounding our lot the same way.


Save


Wood Floor Installation

Wood floor installation is not too difficult if you have the correct tools and the proper set up for your floor first. We will walk you through the basic steps to lay a wood floor in the following notes on this post.

This is a step by step process to prepare and install a new hardwood floor. Wood floor installation is actually quite easy if you follow the proper steps and take your time. Look for videos on line from one of the many suppliers. These are quite helpful and will go through the process step by step.

Wood Floor Installation – Basic Tools

You will need basic tools such as : hammer, spacers, saw, punch for counter sinking nails, nail hole filler, ruler, pencil, pry bar, nailer, and carpenters knife. The floor should be clean and all material from the former floor should be removed. Make sure there are no nails or staples left in the floor and that there is at least a 5/8’s inch sub flooring in place to support the wood floor. If not you may need to add a sub floor onto whatever is already in place.

Here is the step by step process to installing a wood floor:

  • Remove existing flooring – carpet, linoleum etc
  • Remove the base boards
  • Prepare sub floor
  • Assemble all of the tools that you will need
  • Bring the wood into the room for at least 72 hours to acclimate with the air conditions in the home
  • Check each piece of wood for warping and defects
  • Lay out the guidelines along the longest length of the floor about on inch from the wall
  • Using one of the longest boards, lay this board along the guideline with the tongue side away from the wall
  • Place spacers between the wall and the first board for the expansion gap
  • The first board will have to be face nailed with a hammer and nail
  • Wear safety glasses
  • Pre-drill  holes about every 12 inches in the first board along the wall side
  • Nail finishing nails into these holes and then countersink the nails
  • Later you can use wood putty to fill these holes in the wood.
  • Lock the groove of the next board into the board that you just nailed down
  • Use a tapping block to ensure a tight fit
  • Position the planks so that joints do not line up with joints in the previous row at least 12 inches apart
  • You may need to cut planks to line up the joints in this manner
  • Cut the planks face side down to get a smooth cut using the right blade for floors

Use a Nailer

  • Once you have enough rows you can use a nailer to nail the rest of the floor
  • Stagger and match the grains as you go to create the effect that you are looking for
  • Position and cut planks around obstacles such as vents and pillars
  • As you near the other side there may not be enough room to use the nailer, so these rows will need to be hand nailed in the same manner that you did for the first row.
  • The last row may require the plank to be cut lengthwise in order to fit.
  • Measure the width you need, making sure that you leave a space for expansion
  • Place  last piece in the space and use a pry bar to press the last piece into the groove
  • Save your wall by placing a piece of wood against the wall for the pry bar to gain leverage
  • Install transitions as needed to match other floors as per manufacturers instructions
  • Paint your base boards before installing them
  • Remove spacers
  • Install new base boards , counter sink nails and fill with putty that can be painted over
  • Baseboards should be nailed to the wall and not the floor to allow expansion and movement
  • Paint and / or touch up base boards as needed
  • Clean your floor following the manufacturers directions and you are ready to move in

That is the basic wood floor installation process to follow. Pretty much anyone can do it with the proper tools and taking their time. Good luck!


  • Copyright © 1996-2010 Managing Home Maintenance Costs. All rights reserved.
    iDream theme by Templates Next | Powered by WordPress