Hardwood Floor Refinish

Hardwood Floor Sanders

Refinish Hardwood FloorsAn important part of resurfacing or refinishing an existing  hardwood floor is sanding. A professional sanded floor can add immense value to an old floor. Hardwood Floor Sanders can remove gouges and scratches, bring out the true beauty of your floors, and also allows you to change the stain if you wish to enhance the floor. This is work that can be completed by the average person.

Provided that you take the time to learn the proper way to sand a floor and also use the right equipment. If you make a mistake and ruin your floor it can be very expensive and depending how bad the mistake is, you might even have to replace the flooring with new flooring. Take your time, learn what you need to know and talk to experts. Experiment on a small area first to make sure that you have the proper procedure nailed down. Select an area that is out of the way and perhaps hidden by furniture.

 Sanding is needed

Sanding is necessary to remove water marks and other damage that may have occurred on the floor. When you have  large surfaces to cover, a hardwood floor sander is the only way to refinish a hard wood  floor. We have gathered some information regarding hardwood floor sanders along with some tips on their operation for those interested in taking on the task. Sanding the floors yourself can also save the consumer a lot of money, however care is need to make sure it is done correctly or you could actually ruin the floor completely.

Hardwood floor sanders come in many shapes and forms and each will perform their task in a different way. There are drum sanders, belt sanders, orbital sanders and disc sanders. Along with this there are still edge sanders to deal with not to mention the sand paper itself.

These machines are helpful tools when used properly, however if placed in the hands on someone lacking experience they can cause a lot of damage with expensive repairs required.

Hardwood Floor Sanders

Drum Sander

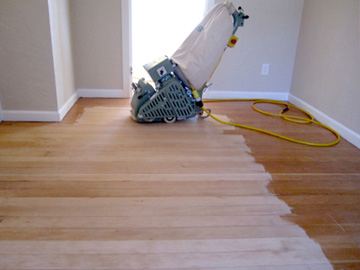
The most common of all the hardwood floor sanders is the drum sander. These sanders are meant to get right down to the bare wood and they do a good job. One problem with the power of drum sanders is that if you are not careful you can sand a groove in your floor. This means you should have some previous experience with the machine. Experiment first before you try it out on your expensive hardwood floor. It is a good idea to take a scrap piece of wood and try it before moving to the real floor.

Remember to use these sanders in the direction of the wood grain. This is also very important. Sanding across the wood grain will leave scratches that the stain and verathane will enhance leaving you with a non professional looking floor.
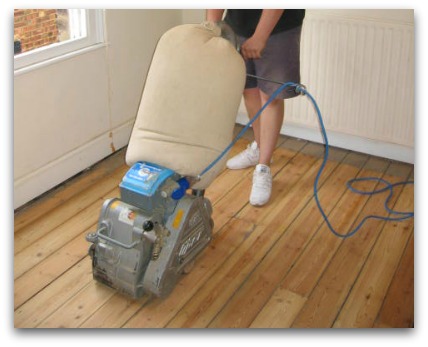
Belt Sanders

Belt Sanders are the next most seen of the hardwood floor sanders and are somewhat easier to use. These sanders do however require control and strength in order to do the job well.

Other Hardwood Floor Sanders

Orbital Sanders and disc sanders are more suitable for small jobs or for sanding specific areas. These however are known for their tendency to leave circular marks in the floor.

With hardwood floor sanders, everything comes down to what you feel comfortable with and what you are capable of handling. Gaining experience before you use the sanders on your floors is highly recommended. A good sanding job will revive your floors and add value to your home. Some of the larger chain stores will offer training courses from time to time on the use of equipment. These are definitely worth the time and you can then approach the job with more confidence.


Tips on Sanding Hardwood Floors

tips 0n Sanding Hardwood FloorsSanding a hardwood floor is a noisy and dusty job but also a necessary job when you want to restore and replenish the beauty of your wood flooring. It is also much cheaper than installing a new floor. As with every home improvement project, it is important to make preparations ahead of time to avoid any problems. It is also important to use the proper equipment when you take on this project.  Here are some helpful tips for sanding hardwood floors to make them look their best. Hire or discuss the issues with a professional before doing this work as a do it yourself project.

Tips for Sanding Hardwood Floors

Check out your Floors to Make Sure Sanding is Possible

Before beginning it will be necessary to carry out a little reconnaissance to see if your floors can be sanded. You should make sure that there is at least 1/8 th of an inch of wood above the tongue before you begin. Checking this can be done by removing a grate in the floor or door threshold and inspecting the boards. If you have sufficient wood above the tongue and groove, the floor can be easily sanded with a power sander which may remove up to an eight of inch of wood. On the other hand if you are limited by the thickness of wood, then hand sanding may be appropriate to avoid replacing the entire floor. This is a lot of hard work and should not be considered lightly.

Also, some boards may require more than sanding and refinishing. If a board sags, feels spongy or soft or is warped you should consider replacing it all together. Replacing a board is not a trivial exercise, however it may be necessary if there is a lot of damage to that area of the floor.

Preparation for Your Hardwood Floor Sanding Project

Now that you have determined that your floors are suitable, you can continue the sanding hardwood floor project. You should fill all gaps at the ends of boards or any other gaps you feel should be filled without taking away room for normal expansion of the wood.

Ensure you have the proper equipment including a drum sander, edge sander, buffer, shop vacuum as well as ear protection and dust masks for the messy procedure. Next prepare the room by removing everything and cover doorways with plastic sheeting. Some people find that fixing a fan in a window sill helps to send out a lot of the dust created. Before you begin, close the door and place a wet towel along the bottom of the door.

Turn off any central fans such as on your furnace and air conditioning. These will suck air into the circulation system and disperse fine sawdust throughout your house! Set any exposed nails and you are ready to sand.

Sanding Your Hardwood Floor

Sanding hardwood floor with the drum sander will take some getting used to, so try it at first in a hidden area such as under a couch. Begin with the most course paper (20-36 grit) walking forward and backward from wall to wall with the grain of the wood, then use progressively finer paper (60, 80, and 100 grit). Finish off sanding the hardwood floor by sanding the edges followed by a final buffing and you’re done!

Never sand across the grain of the wood, otherwise you will leave marks on your floor that will show up when you apply varnish or verathane to protect your floor. Sometimes you have to sand by hand to get at those tiny areas the sander cannot get to. It takes lots of elbow grease, but it is necessary to make a nice job if your floor.

Clean Up

Once you have finished sanding, you will need to clean up all of the dust. Start by vacuuming everything, the floor , the walls , even the ceiling. You want to get all of the dust out of the room. Next you need to use a tack cloth to remove any last remaining particles of dust off the floor. Complete this task before you begin to apply any stain or coating. Always do this just before you are ready to apply the covering. Make sure you have lots of fresh air, since the chemical smell may bother some people.

The Finished Job

Once you are finished you will have what looks like a brand new floor! I once had to remove carpet from a hardwood floor and sand the entire floor. Why the previous owners ever covered the floor with carpet, I have no idea. Once the carpet was removed, the floor sanded and varathaned, the walls painted, the house really took on a new look and added thousands of dollars in value to our home as well.

Comments are appreciated regarding tips and tricks to finishing and sanding a hardwood floor.


Refinishing Hardwood Flooring

Refinishing Hardwood FlooringTaking on the job of refinishing hardwood flooring can take time and hard work. But when done properly a good refinishing job can be well worth the effort saving you thousands of dollars.  Compared to ripping out the existing floor and installing a new one, refinishing an existing floor is much less expensive. You can hire someone to do it for you. Or it can be done by most home owners who are handy with tools. You should be comfortable doing this kind of work. You can save thousands of dollars when you do your own work around the home.

The ability of hardwood to be restored to its original beauty is one of its great properties  that should be taken advantage of.  If it is done properly, you will have a floor that looks just like new. You will want to be prepared before attacking this project. Here are a few tips regarding refinishing hardwood floors.

From beginning to end, refinishing hardwood floor can be broken down into many steps. They are usually spread out over a few days. The work depends on the working conditions and the size of the floor that you need to refinish.

Refinishing Hardwood Flooring – Is the Floor Suitable to be Refinished

First, you will want to make sure you are dealing with true hardwood. And not flooring made from engineered wood. Also, check that there is at least 1/8” of wood above the tongue. You can find out by removing a ventilation grate or threshold from a doorway and inspecting the boards. If this is an old floor which has been refinished many times it is possible that there may not be enough wood left to refinish. If this is not the case, refinishing the  hardwood floor here will not be possible. It will have to be left in place or removed. Sometimes a light sanding will do the job if you want to try it yourself. You might not get the brand new look, but it might be sufficient for your tastes.

Refinishing Hardwood Flooring – Tools You Will Need

The tools you will need for the job include a belt sanding machine, edge sander and floor buffer which you should rent or borrow before beginning. Prepare the room before refinishing the hardwood floor by removing everything inside including vents and grills. Remove all furniture and  then cover doorways and vents with plastic sheeting.The fine dust from the sanding activity is going to go everywhere. Plugging the vents etc is a must unless you want dust everywhere. Also if you have central air conditioning or central heating, make sure it is turned off. Otherwise you will have dust in every nook and cranny of your home. You will be cleaning for months.

Refinishing Hardwood Flooring – Sanding the Hardwood Floor

Begin sanding the floor along the wood grain in smooth even strokes. Beginning with the coarsest paper (36 grit) and moving to finer paper sequentially (36, 60, 80, 100).  Take your time and never sand across the grain. If you sand across the grain, you may leave scratches on the wood that cannot be removed. Repeat this with the edge sander until you are satisfied with the look.

Apply Stain

Applying stain and finish are the last steps in refinishing hardwood floor. Ensure the floor is clean and dry before applying your stain.  Use a tack cloth to wipe up all of 
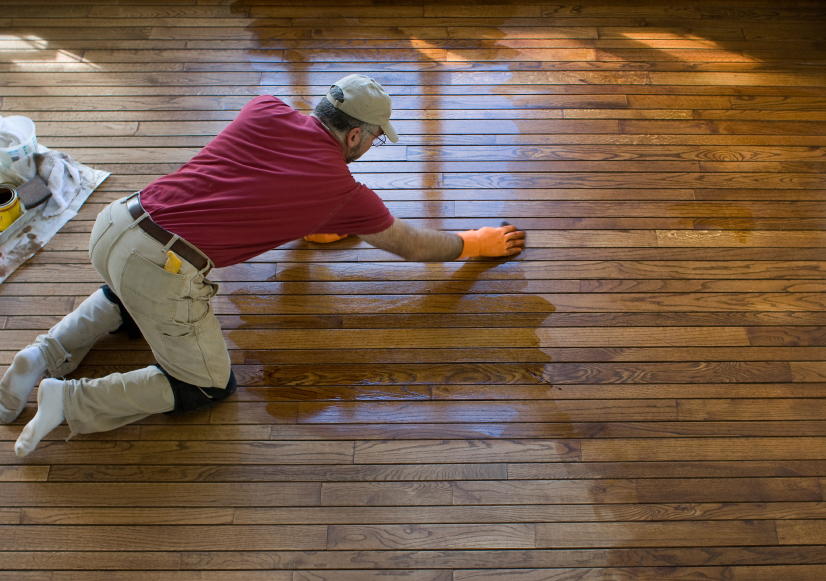
the fine bits of dust that may be left on the floor. Apply the stain  in even strokes along the grain with a brush for darker color, or rags for a lighter look. Ensure you have proper ventilation to avoid damage to your lungs.

Allow the stain to dry before applying the well mixed polyurethane finish in the same technique with a brush or roller. The polyurethane finish will protect the floor from scuff marks and other marks from furniture. Apply as many coats as you think are necessary and then you are done.

Let it Dry Thoroughly

Wait until the floor has dried thoroughly. If the humidity is high you may need to wait a few more days or use a dehumidifier to help with the drying. When the stain or the polyurethane finish is still wet avoid causing any dust whatsoever  to be in the room. Leave the central furnace fan off and the windows closed until the polyurethane finish is thoroughly dried, then air out the room to get rid of any smell from the polyurethane finish.

When you are ready you can move your furniture back in. You may want to place an area rug on the floor to add decoration and contrast as well. For more tips about do it yourself projects refer to this page, click here.

Please feel free to leave comments about refinishing hardwood floors and your experiences.


  • Copyright © 1996-2010 Managing Home Maintenance Costs. All rights reserved.
    iDream theme by Templates Next | Powered by WordPress