 Sanding a hardwood floor is a noisy and dusty job but also a necessary job when you want to restore and replenish the beauty of your wood flooring. It is also much cheaper than installing a new floor. As with every home improvement project, it is important to make preparations ahead of time to avoid any problems. It is also important to use the proper equipment when you take on this project. Here are some helpful tips for sanding hardwood floors to make them look their best. Hire or discuss the issues with a professional before doing this work as a do it yourself project.
Tips for Sanding Hardwood Floors
Check out your Floors to Make Sure Sanding is Possible
Before beginning it will be necessary to carry out a little reconnaissance to see if your floors can be sanded. You should make sure that there is at least 1/8 th of an inch of wood above the tongue before you begin. Checking this can be done by removing a grate in the floor or door threshold and inspecting the boards. If you have sufficient wood above the tongue and groove, the floor can be easily sanded with a power sander which may remove up to an eight of inch of wood. On the other hand if you are limited by the thickness of wood, then hand sanding may be appropriate to avoid replacing the entire floor. This is a lot of hard work and should not be considered lightly.
Also, some boards may require more than sanding and refinishing. If a board sags, feels spongy or soft or is warped you should consider replacing it all together. Replacing a board is not a trivial exercise, however it may be necessary if there is a lot of damage to that area of the floor.
Preparation for Your Hardwood Floor Sanding Project
Now that you have determined that your floors are suitable, you can continue the sanding hardwood floor project. You should fill all gaps at the ends of boards or any other gaps you feel should be filled without taking away room for normal expansion of the wood.
Ensure you have the proper equipment including a drum sander, edge sander, buffer, shop vacuum as well as ear protection and dust masks for the messy procedure. Next prepare the room by removing everything and cover doorways with plastic sheeting. Some people find that fixing a fan in a window sill helps to send out a lot of the dust created. Before you begin, close the door and place a wet towel along the bottom of the door.
Turn off any central fans such as on your furnace and air conditioning. These will suck air into the circulation system and disperse fine sawdust throughout your house! Set any exposed nails and you are ready to sand.
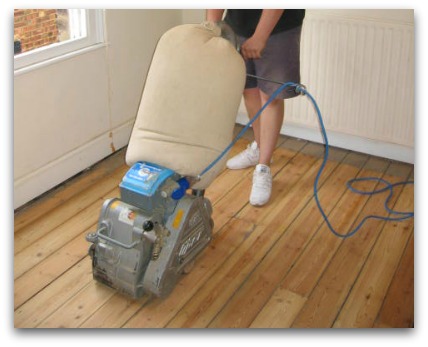
Sanding Your Hardwood Floor
Sanding hardwood floor with the drum sander will take some getting used to, so try it at first in a hidden area such as under a couch. Begin with the most course paper (20-36 grit) walking forward and backward from wall to wall with the grain of the wood, then use progressively finer paper (60, 80, and 100 grit). Finish off sanding the hardwood floor by sanding the edges followed by a final buffing and you’re done!
Never sand across the grain of the wood, otherwise you will leave marks on your floor that will show up when you apply varnish or verathane to protect your floor. Sometimes you have to sand by hand to get at those tiny areas the sander cannot get to. It takes lots of elbow grease, but it is necessary to make a nice job if your floor.
Clean Up
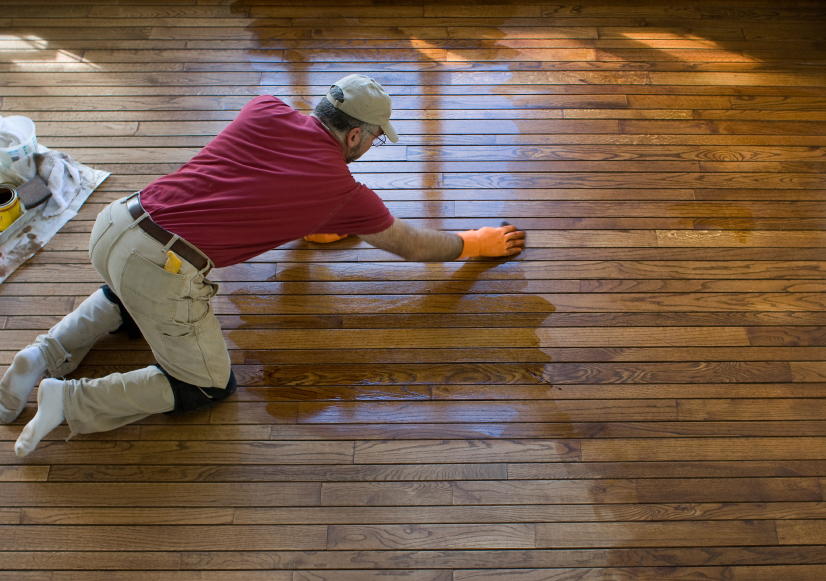
Once you have finished sanding, you will need to clean up all of the dust. Start by vacuuming everything, the floor , the walls , even the ceiling. You want to get all of the dust out of the room. Next you need to use a tack cloth to remove any last remaining particles of dust off the floor. Complete this task before you begin to apply any stain or coating. Always do this just before you are ready to apply the covering. Make sure you have lots of fresh air, since the chemical smell may bother some people.
The Finished Job
Once you are finished you will have what looks like a brand new floor! I once had to remove carpet from a hardwood floor and sand the entire floor. Why the previous owners ever covered the floor with carpet, I have no idea. Once the carpet was removed, the floor sanded and varathaned, the walls painted, the house really took on a new look and added thousands of dollars in value to our home as well.
Comments are appreciated regarding tips and tricks to finishing and sanding a hardwood floor.
 before refinishing the hardwood floor by removing everything inside including vents and grills. Remove all furniture and then cover doorways and vents with plastic sheeting.The fine dust from the sanding activity is going to go everywhere. Plugging the vents etc is a must unless you want dust everywhere. Also if you have central air conditioning or central heating, make sure it is turned off. Otherwise you will have dust in every nook and cranny of your home. You will be cleaning for months.
 the coarsest paper (36 grit) and moving to finer paper sequentially (36, 60, 80, 100). Take your time and never sand across the grain. If you sand across the grain, you may leave scratches on the wood that cannot be removed. Repeat this with the edge sander until you are satisfied with the look.
 the fine bits of dust that may be left on the floor. Apply the stain in even strokes along the grain with a brush for darker color, or rags for a lighter look. Ensure you have proper ventilation to avoid damage to your lungs.