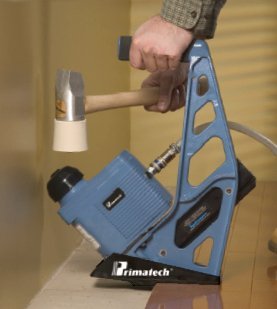
 Hardwood flooring really does add beauty to any home. Along with this, the durable surface will last a lifetime and is a great investment. Installing a hardwood floor can take a little hard work. But with some planning and tools, like hardwood floor nailers, the job can be much easier. Hardwood floor nailers are also dangerous. Make sure you follow all of the proper safety features when using them. The picture on the left is a typical hardwood floor nailer. There are many on the market. You should select one based on price and function. Take into account the amount of time you will use one. Sometimes renting a machine will be the less expensive option.
Should you Hire a Professional
Here is a little information about hardwood installation and the necessary tools to get the job done right. First, we do want to point out that if you are uncomfortable with laying a floor and do not do well-using tools or renovations, you probably should hire an expert. The job will be done well and it will be done quickly. Spouses tend to get a little frustrated if you take weeks or months to get the job done and even more so if it is not done well.
Let the Wood Acclimatize
Anyone who has worked with wood before knows that humidity and moisture cause expansion. For this reason, it is important to let your wood accustom to their new environment by storing them indoors for a few days. This will give you a little time to prepare the work area and make sure you have all the right tools.
Preparing the Work Area
When you are installing hardwood over a large area, a hardwood floor nailer is essential to save time and effort. Ensuring a level, clean and dry sub-floor area is also a must. Mark the position of floor joists, the room centerline and a line marking the edge of the first boards along your starting wall on the vapor barrier you have laid down ahead of time. About 3/4 inch of expansion space should be left between the starting wall and the first row of boards. Wood will contract and expand. This expansion space will allow the floor to expand and you will not get buckling in your floor as a result. Then you are ready to begin.
Renting Hardwood Floor Nailers
Most consumers who are doing this kind of work themselves will only need a hardwood nailer for a few days and you may need it only one time. It does not make sense to purchase one. There are many equipment rental locations that will rent out power hardwood nailers at an hourly or daily rate. Take advantage of this service and save yourself some money.
There are manual nailers and powered nailers which drive the nails into the wood along the tongue and groove. Always rent a powered nailer. You will be exhausted after a few thousand nails other wise.
Get that First Row of Boards Right
The first row of boards is the most important row. If you have done your measuring and marking correctly your floor will be lined up properly with the walls etc. Take the time to measure several times to check your work.
The first row of boards can be fixed into place by either using nails about 1 inch from the side of the starting wall or glued into place at six-inch intervals. The glue used should allow for the natural expansion of the wood. This first row is also held into place with nails driven into the tongue at 45 degree angles by the nailer. Some people prefer to do this first row by hand but you can use the hardwood floor nailer if you prefer.
Check for Proper Alignment
Subsequent boards should be fixed into place and secured using the hardwood floor nailer. Always check for proper alignment along the way. Continue this until you reach the last few boards which should be secured by hand since the hardwood floor nailer will not be able to be used that close to a wall. After all this you will now be able to enjoy your beautiful new hardwood flooring.
September 27th, 2012 on 6:01 am
we rented a hardwood floor nailer from a local company and found it to work really well, we saved a lot of money by doing the work ourselves and we did it the way we wanted to without having to pay a lot. Have to be careful with these machines, they are powerful.