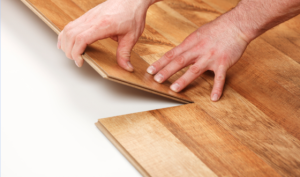
 Installing laminate flooring is something that you can easily do yourself. Why pay professionals to do it when the instructions for how to install it are printed right on the package. Also many flooring stores offer beginner courses to help the do it your self consumers. In addition, all the manufacturers of laminate flooring have the directions for installing the flooring available on their websites. These floor pieces are designed to click together and will float on the floor. There is no nailing required, which makes it suitable for direct placement on cement floors, although you may want some insulating value under the floor.
Installing Laminate Flooring vs. Hardwood Flooring
There are some differences between installing laminate floors and installing hardwood floors, but you can use the same tools for both. Tools can be purchased although most people will rent them for the time they need them. The first step in installing laminate flooring is to calculate the size of the room and purchase the flooring of your choice.
You should leave hardwood flooring open for a time so that it can become acclimatized to your home. This is not the case when installing laminate flooring. When reading the directions as to how to install laminate flooring, you will learn that you can install it as soon as you open the package. You should also check all the planks before you install them to ensure that none of them are defective.
You will get a refund for any defective planks, as long as they are not damaged by you in any way. If you have difficulty getting the laminate planks to fit together, you should not put them together and take them apart more than three times. This could damage the laminate flooring and mar the effect when you have it completed.
Installing Laminate Flooring in the Kitchen
If you are installing laminate flooring in your kitchen, you should have the cabinets in place beforehand. This means that you will have to learn how to install laminate flooring around the cabinets. This is also why you need to have a saw to cut the planks when you need smaller sizes and pieces to fit around the cabinets. Most people will opt for a tiled floor in the kitchen and also in the laundry room, however some will go for wood floors because they like the look and feel of the wood better than the tiles.
Laminate Flooring in the Laundry Room
When installing laminate flooring in the laundry room, you should make sure that you have rubber pads underneath the washer and dryer. This is to make sure that these appliances are level so that they won’t damage your flooring. Although most people do not have laminate flooring in the laundry room, there is no reason why you can’t use this room of the house to learn how to install laminate flooring. You can even practice installing hardwood flooring on this small area before you tackle more visible rooms of the house.
You might be in need of a few tips for installing laminate flooring if this is your first time. Do you have to place the laminate flooring around pipes? One tip is to drill a hole in the plank about ½ inch larger than the circumference of the pipe. Then cut the plank through the center of the hole. Fit the two pieces of laminate flooring together around the pipe and glue them together.
Installing Laminate Flooring Near Door Frames
When installing laminate flooring, the flooring should extend under the door frame. If you have a piece of scrap that you have left over. You can use this as a marker for the depth that you need to trim the door frame. If you are not changing the height of the finished floor, most doors will continue to work just fine without scraping the floor. On the other hand if the floor is being raised for whatever reason, you may need to trim the bottom of the doors.