Tag: Driveway Repair

Driveway Sealing in Cold Climates

Driveway Sealing in Cold Climates
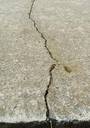
Environment plays a huge role in terms of what maintenance is required around your home. Driveway maintenance and repair is no exception. Driveway sealing in cold climates is much different than in warmer climates simply due to the freezing / thaw cycle. Anytime you have a crack in your driveway, there is an opportunity for water to penetrate. If that water freezes, it forces the cracks wider and the asphalt to further deteriorate.  Warm climates do not have these same issues and you can get away with not sealing your driveway.

Driveway Sealing in Cold Climates

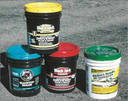
We strongly recommend that all cracks should be filled with the appropriate products for crack sealing to prevent further damage.  At the very least you will prevent further damage.

Some people prefer to also place a sealant over the entire asphalt driveway. There are several advantages. First you fill all of the miniature cracks and holes which prevents them from becoming larger. This is a long term maintenance advantage.

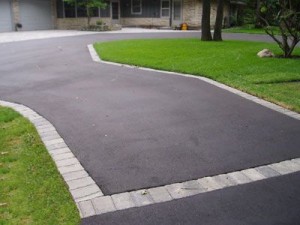
Secondly, your driveway just looks better. Esthetics are important and a great looking driveway improves your curb appeal and home value.  Our own driveway is 28 years old. We have sealed it and filled cracks several times over the years. It looks great to the point that our neighbors are amazed.

They have spent thousands of dollars to replace their own black top driveways. Instead of doing some basic maintenance every couple of years and saving this money. For more details about looking after your asphalt driveway, click here.

Save


Asphalt Driveway Repair

Asphalt Driveway RepairThe picture on the left shows the final result of a driveway repair involving patio stones as well as asphalt. Basically the old asphalt was cut out in a half-moon shape up to about 5 feet from the garage. A strip down both sides was also cut out. Then the existing base was compacted. More stone was added to fill in the gap needed to bring the top of the patio stones even with the garage floor. We also removed the old drain pipe. We installed one of these roll-out – roll-up devices that stay hidden until it rains. This was done to protect the new brick and get the water as far away from the foundation as possible.

We hope that this will prevent or at the least slow down any further sink-age near the garage entrance which is what triggered this asphalt driveway repair in the first place.

Asphalt Driveway Repair – Why Not Excavate

Most contractors will excavate the entire driveway, refill with the proper stone mix and compact it down to a minimum of 18 inches. Then the new covering is installed over top of this base using either asphalt, patio stones, or a combination of both. They do this to protect themselves from callbacks to potential problems that may or may not occur. They have no idea what the base is like and want to ensure that they replace any existing problems with new material.

In our case, we chose to not follow this approach for several reasons. One was the overall cost. We saved between $6,500 to $4,000 by taking this approach. The base is already fully compacted, the existing asphalt was in good condition with no cracks or porous locations. We added crushed stone where needed, compacted, and then added the patio stone in the design we had planned. The result is shown in the picture above.  This solution was augmented by then sealing the asphalt using a high-quality sealer, which makes it look almost new.

Asphalt Driveway Repair – How Long Will it Last

While this solution may not last as long as a new driveway with new asphalt will last, it is certainly good for another 10 years or so. This is great for us and we saved a great deal of money by taking this approach. In addition, the work was completed by the homeowner providing another huge saving. The savings in labor cost along are significant and the homeowner already had the pavers from a previous job.

The original reason for doing this job was that the asphalt had sunk about 3 inches near the garage. This may happen again over time with or without new compaction. If it does sink, all we have to do is remove the pavers, add more crushed stone, compact it, and replace the stone! A straightforward simple and inexpensive job.

Save


Sunken Asphalt Driveway Repair

Sunken Asphalt Driveway RepairOur asphalt driveway had sunk about three inches at the garage door entrance. Not only was this unsightly, but it was also awkward each time we drove the car in over it. This was also now a low spot and water ran towards the house instead of away from it creating a potential drainage problem and possible leaks into the basement. It was time to take on Sunken Asphalt Driveway Repair.

The first step was to obtain a quote for a new asphalt driveway with patio stone pavers down both sides and a half-moon near the garage entrance. The quote was for $7000 and that is with the patio stone pavers already purchased. I got a second quote for just the asphalt with me placing the patio stones after the base had been prepared. This brought the cost down to around $4000 for new asphalt and also the driveway excavated down to a minimum of 18 inches.

Sunken Asphalt Driveway Repair – Do it Yourself at less Cost

I opted for the least cost solution which was to leave the asphalt in place, cut out the half-moon, and the edges down the side. It cost me $10 for the proper blade on my skill saw and $150 for the disposal of the asphalt along with some hard work. For a total of $160, it was worth it.

Next I also added crushed stone were needed and rented a compactor to compact the base. I left the original base intact and compacted the added crush stone. The compactor cost $40 for a couple of hours. Once the base was ready it was a simple matter to lay the patio stone. I rented a stone cutter to cut the stones I needed cut. I also placed the sand that is made for patio stones in the cracks between the stones.

Compact the patio stones to level them

The compactor is run over the stones several times to ensure that all of the stones are level and of the same height. The compactor also cause the sand to go deep into the cracks. The process was repeated twice more to ensure that each joint between stones is full of the sand. It was then lightly watered to cause the sand mortar mixture to harden. This stops all water from going between the stones. Too much water and you will ruin the sand mortar mixture.

Total cost not including the patio stones which I already had, is approximately $350 vs. the cost of $4000. Note that my asphalt was in good shape. All I needed to do once the patio stones were in was to apply an asphalt sealer to it. The sealer added another $80 to the overall cost.

Save


Driveway Sealing

Driveway SealingWe recently had our driveway sealed by one of those companies that come knocking on your door offering to seal your asphalt driveway with tar. Usually we just send then away, however they had just completed the neighbors driveway and I was able to see the results of their work. I decided to let them go ahead after negotiating a good price for their services. They also gave me a $50 discount for referring my neighbor as well after he decided to have his driveway completed as well.

I have included several pictures on this post showing their work and also outlined the steps they took to complete the job which also impressed me regarding their work. I only had one complaint which is that they got a little tar on the garage door which does not look great. The door needs to be painted anyway so will add this to one of the many other jobs that I need to do.

They should have done a much better job, and I would have mentioned this to them had I noticed it in time, however it was the next day when I saw the small spray of tar on the lower part of the garage door.

Driveway Sealing Step by Step Procedure

These are the steps they followed which make a lot of sense to me and some of these pictures show these steps but not all of them. If you are going to have your driveway coated with tar, you might ask the people doing the work how they will proceed to get a feel for what kind of job they will do and how good a job it will be.

  • Brush the driveway to clear large debris away
  • Blow dust off the driveway and any remaining leaves
  • Seal cracks with asphalt sealer
  • Tape edges to protect the lawn and cement curb as well as garage floor
  • Apply sealer using a sprayer and taking steps to prevent wind blown spray to get on things like the garage door
  • Allow to dry – 24 hours( I let mine dry for 48 hours before placing my car on the driveway just to be careful)

Driveway Sealing

Driveway Sealing – Company Name

Canadian Driveway sealers is the name of the company. You need to make sure that they are using quality materials and that they take the time to place liquid asphalt in all of the cracks in the asphalt to prevent water freezing in these cracks and just getting a lot worse than they already are. When water freezes it expands and makes a crack that much larger than it already is.

These guys did a good job, however you need to be careful with whom you hire, there are a lot of shady characters using inferior products that are going door to door.

Save


  • Copyright © 1996-2010 Managing Home Maintenance Costs. All rights reserved.
    iDream theme by Templates Next | Powered by WordPress