Tag: Paver Installation

Paving Asphalt Driveway Design

paving asphalt driveway
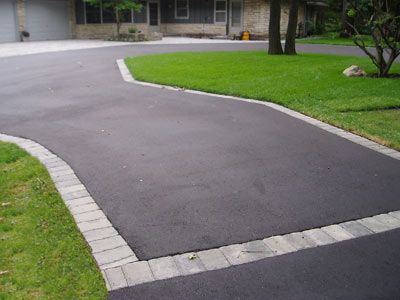
Our driveway had settled next to the garage entrance by approximately three inches and it was time to find a solution. Our choices were to replace the asphalt with a new asphalt driveway, to replace it with patio stones in its entirety,  or to keep the asphalt and apply patio stones with some sort of design that would minimize our cost and also enhance our homes view from the street. We chose the paving asphalt driveway design with a patio stone design that involved a half moon approach at the top of the driveway and borders down each side of the driveway. We considered other designs, but settled on this one as the most attractive in our opinion.

It was also the most cost-effective as well since a new driveway was going to cost over $5000, while this do it yourself project cost less than $500 not including the bricks which we already had leftover from a previous project. While it was very hard work and not something I would recommend for the casual do it yourself consumer, it is very rewarding to have completed it and saved a great deal of money at the same time.

Paving Asphalt Driveway Design – Construction

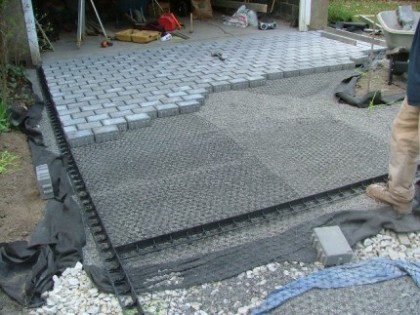
Once we had finalized the driveway design it was time to begin construction. The most difficult part was laying out the circle. basically we had to find a center point in the driveway and then scribe a circle that left a border equal distance from both sides. We also wanted to come out 5 feet from the edge of the garage to provide adequate slope for water dispersal from the home.  This also represented the point where the settling of the driveway had stopped. We then cut the asphalt using a skill saw and an appropriate blade to cut the asphalt. Once the asphalt was removed, the gravel was set to the proper level and compacted. The patio stones could then be placed as per the design.

Paving Asphalt Driveway Design – Finishing Touches

Once all of the patio stones are in place, a sand concrete mixture is placed on the patio stones. This mixture fills the joints between the stones. Then the compactor is run over the stones to settle them all in place. This process also evens out the level of the stones so that they are all the same. In addition, the vibration from the compactor causes the sand to settle to the bottom of the joints. More sand is added. The compaction process is repeated until the sand completely fills the joints between all of the stones.

This sand mixture then must be dampened. This triggers the cement mixture in the sand to harden in place and become impervious to water and plants.  The trick is to only spray the bricks with a very light mist. Too Much Water and the sand will not harden properly. We also resealed the existing asphalt to protect it. This application will return it to the like-new condition when it was when first installed.

Save


Driveway Paver Installation

driveway paver installationThis is a continuation from a previous post about installing pavers or interlocking stones on your driveway. Once you have compacted the base, leveled the base and placed the patio stones in the design that you have chosen it is time to complete the final steps. In this case the stones were placed in a half moon shape. Borders running down both sides of the driveway. It is important to install the pavers as level as possible. Before adding the sand concrete mixture to go in between the joints.

Pour the sand across the driveway starting at one side. Using a brush, push the sand across every stone so that all cracks are filled. Once this step is completed you will want to run a compactor across all of the pavers which will accomplish two goals. The first is to compact all of the pavers well into the base  and essentially make them all level with each other.

The second objective is to vibrate the pavers so that the sand concrete mixture penetrates the joints all the way to bottom. This is the way the professional do it. They make sure that the base is well compacted and level as possible following the natural slope of the driveway. Compacting the pavers and pushing the sand into the space between the stones ensures that they will not move. Also water does not easily penetrate between them.

Driveway Paver Installation – Repeat the Process

Once the first phase is completed, you find that more sand concrete mixture must be added. Again using a broom, brush the sand across all cracks so that they are completely filled. You will also want to sweep up any access at this point as well Some consumers will run the compactor over the stone one more time and refill any cracks that require more sand. Too much sand mixture on the stones will cause it to adhere to the top of the pavers. You will want to remove all excess sand mixture before completing the next step in the process. The last step is critical and must be done correctly otherwise the sand concrete mixture will not set properly.

Driveway Paver Installation – Lightly Spray Water

We really mean lightly spray some water on the sand concrete combination to harden it. If you spray too much water on it too soon, the sand concrete mixture will not harden properly. You may find it lifting in the future from these cracks. The final bond will ensure that the joints are all sealed and no water will get in between them especially in the winter which would cause cracking and lifting of the patio stones.


Asphalt Driveway Repair

Asphalt Driveway RepairThe picture on the left shows the final result of a driveway repair involving patio stones as well as asphalt. Basically the old asphalt was cut out in a half-moon shape up to about 5 feet from the garage. A strip down both sides was also cut out. Then the existing base was compacted. More stone was added to fill in the gap needed to bring the top of the patio stones even with the garage floor. We also removed the old drain pipe. We installed one of these roll-out – roll-up devices that stay hidden until it rains. This was done to protect the new brick and get the water as far away from the foundation as possible.

We hope that this will prevent or at the least slow down any further sink-age near the garage entrance which is what triggered this asphalt driveway repair in the first place.

Asphalt Driveway Repair – Why Not Excavate

Most contractors will excavate the entire driveway, refill with the proper stone mix and compact it down to a minimum of 18 inches. Then the new covering is installed over top of this base using either asphalt, patio stones, or a combination of both. They do this to protect themselves from callbacks to potential problems that may or may not occur. They have no idea what the base is like and want to ensure that they replace any existing problems with new material.

In our case, we chose to not follow this approach for several reasons. One was the overall cost. We saved between $6,500 to $4,000 by taking this approach. The base is already fully compacted, the existing asphalt was in good condition with no cracks or porous locations. We added crushed stone where needed, compacted, and then added the patio stone in the design we had planned. The result is shown in the picture above.  This solution was augmented by then sealing the asphalt using a high-quality sealer, which makes it look almost new.

Asphalt Driveway Repair – How Long Will it Last

While this solution may not last as long as a new driveway with new asphalt will last, it is certainly good for another 10 years or so. This is great for us and we saved a great deal of money by taking this approach. In addition, the work was completed by the homeowner providing another huge saving. The savings in labor cost along are significant and the homeowner already had the pavers from a previous job.

The original reason for doing this job was that the asphalt had sunk about 3 inches near the garage. This may happen again over time with or without new compaction. If it does sink, all we have to do is remove the pavers, add more crushed stone, compact it, and replace the stone! A straightforward simple and inexpensive job.

Save


  • Copyright © 1996-2010 Managing Home Maintenance Costs. All rights reserved.
    iDream theme by Templates Next | Powered by WordPress