 The walls are crooked, the floors are not flat and you are trying to install baseboards along crooked floors and ensure that they look great when they are finished! It can be quite frustrating to deal with this situation unless you know the tricks to dealing with crooked walls and floors.
Most new homes will not have this problem to the level that you have to take unusual steps to install baseboards. But make no mistake, even in new homes the walls and floors will not be perfect. However consumers who own older homes will certainly experience this problem and find that floors and walls can be very curvy and crooked. Installing a rigid baseboard can be difficult in this situation unless you take the following steps.
Install Baseboards Along Crooked Floors
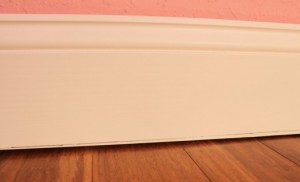
Let’s assume that your floor has a hump in it and you are installing an 8 foot long baseboard. If you place one end against the floor, the other end will not touch the floor. In fact it could be an inch or more above the floor depending on how much of a rise there is in your floor. In the picture above there is a half-inch difference and this simply would not look very good if you left it like that.
The trick is to place the baseboard in place where it will be installed and position it in such a manner that the center is located on the highest point. Next, use a level to make sure that it is level. You will probably find that both ends have a space between the bottom of the baseboard and the floor. Tack it in place so that it will not move. Next, find a piece of wood that is the same thickness of the space between the floor and the bottom of the baseboard. Use a scrap piece of wood for this purpose.
Next you will place this scrap piece of wood on the floor at one end and using a pencil scribe a line along the baseboard. When you are finished the line at the highest point of the floor should describe an arc on the baseboard. Using an appropriate saw cut out this area and place the baseboard in its place. If you cut along the arc, your baseboard should sit flat along the floor and also be level as well!
Install Baseboards Along Crooked Walls
Most baseboards will bend to the shape of the wall when they are nailed to the wall. The nails must be long enough to penetrate the drywall and hit a stud behind the drywall. Run a bead of caulking along the wall and the top of the baseboard. Use just enough to fill the gap. Smooth it out by first placing your finger in some water. Then run your finger along the gap to smooth the caulking to leave a professional finish. The water will leave it smooth and avoid the caulking sticking to your fingers. Too much water will cause it to run and smear. It is always better to add a small amount of caulking so you can add more if needed. It is more difficult when you add too much and have to remove it later.
Joints along the wall should be cut at 45-degree angles and caulking used to make the joint seamless. Corners are always more difficult in homes with crooked walls or floors. Best to use an angle finder and then cut the corners accordingly. Use caulking again to fill in any small gaps in the joints.
Save
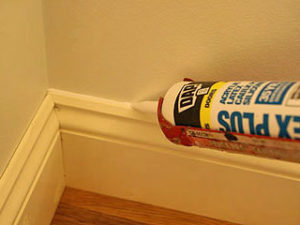 Ever wonder how professionals make their baseboards look so great? No cracks or dark lines along the wall where the baseboards meet the wall. It is actually quite easy once you know the tricks that the professionals use to caulk baseboards. Use high quality paint-able caulking to fill the cracks before you paint the walls or the baseboards. When you cut the tip off the caulking tube, keep it small so that a minimum of caulk is applied. Using continuous pressure, run the tip of the tube along the joint filling the crack as you go. Remember that less is better, You can always add more later if needed. At this point the crack is filled, but it still may look a little rough and unfinished.
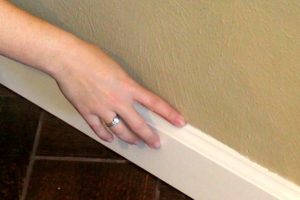 The last step is to smooth the caulking with your finger. We like to keep our finger wet with a little bit of water. Run your finger along the crack filled with caulking to leave a smooth surface that fills the crack between the wall and baseboard. If you need more caulking in some areas because the crack was too large or you did not add enough caulking in the first place, just add more and repeat the smoothing process.