Tag: Mold Damage

How to Stop Mildew Forming in Showers

how to stop mildew forming in showers
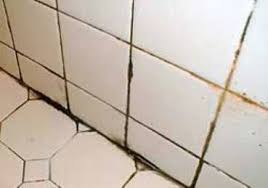
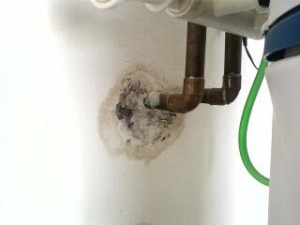
We are confident that almost all consumers have had to contend with mildew forming in showers. Mildew or mold is a common problem for many consumers and once it takes hold, it is very difficult to remove it. In our next post we will discuss how to remove it. However for our first post about we thought we would focus on how to stop mildew forming in showers in the first place. Mold or mildew needs two things to live and grow. Moisture which is obviously a problem in the shower and bathroom area. the second thing is food, such as soap, oils and skin cells from our bodies and other products we may use. There are easy methods to control mildew growth.

How to Stop Mildew Forming in Showers

Let’s first deal with the moisture issue. Consumers should always use a fan when running the shower. If you do not have a shower fan, like us, leave the shower door open when not in use. Air circulation will absorb the moisture and dry out the shower. Secondly always squeegee the tiles, door or curtain after you shower. You want to remove as much of the moisture and soap as possible from the walls etc.

Using a squeegee also removes the food that the mildew needs to live. But that is definitely not enough. At least every two weeks consumers should  clean the walls, door or curtains to remove all soap buildup and other material. Washing with vinegar is one of the best ways to clean the tiles etc.

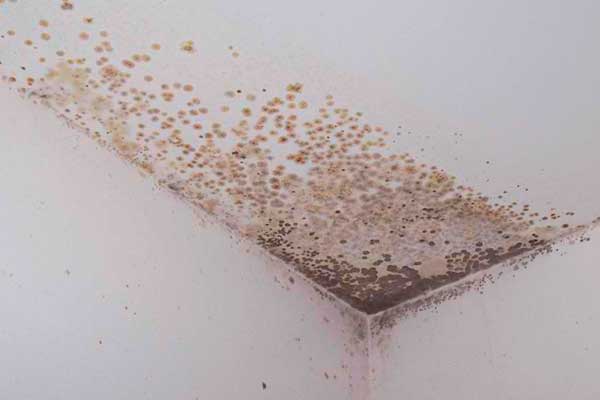
We had mildew forming on our ceiling like the one in the picture. Once we started leaving the door to the shower open it stopped forming. We then sanded the ceiling and repainted the ceiling with a mold resistance paint.  So far it has lasted a year without more mold or mildew forming. Remember moisture and food. That is what you need to control to keep mildew from forming.


Save


How to Remove Mildew From Tiles in Showers

Our last post discussed how to prevent mildew and mold forming in bathrooms on shower tiles. This focuses on how to remove mildew from tiles in showers once it has formed. The first recommendation is to keep your shower clean and dry if you want to avoid mildew and mold in the first place. Once it has formed, you will need strong cleaners to remove the stains. There are many products on the market. Some work, some do not. We are not recommending any one particular product. Vinegar works well as does bleach, however you need lots of ventilation and protective gloves. Be careful of your clothes as well to avoid stains from the bleach.

Remove Mildew From Tiles in Showers

This picture clearly shows lots of mold on the grout. Consumers need to remove all soap scum, calcium stains etc from the tiles. It is going to take some time and elbow grease to remove the stains. Using bleach or vinegar, spray the tiles, let it soak for awhile and then scrub the tiles. Wash with water. Repeat the process until the tiles are clean.

The soap scum on the grout is much more difficult to remove. Scrubbing and application of vinegar will remove the surface material. If the grout was not sealed in the first place, the soap scum will come off. A high pressure steam cleaner can be used to clean the grout as well. This works well although again your need to use a lot of elbow grease to clean the grout.

The worst case solution is to use a grout removal tool to get all of the grout material out of the joints. Re grout the joints and seal the grout joints.

Once you have your shower tiles nice and clean follow the steps outlined in the previous post to prevent further damage from mold and mildew. Keep your shower walls dry and clean your shower every two weeks.


Repairing Mold Damage from Leaking Water Pipes

Mold Damage from Leaking Water PipesMost consumers will never have to deal with mold damage from leaking water pipes. We hear of major floods and homes being totally destroyed by flood water or the subsequent mold that covers everything. These situations require professional intervention and major repairs. There are millions of other leaks such as the one shown in this picture that occur everyday and can develop into significant mold sources as well as causing significant damage to the home. If there are enough mold spores in the air, even your family can become sick and require medical attention. Any time you suspect mold developing, deal with it immediately and do not allow it to become a major expensive problem.

Mold Damage from Leaking Water Pipes

Sources of water and subsequently mold:

  • Slow leaking water pipes
  • A small leak in the roof
  • Windows are another source
  • Damp, dark and warm are the best places

Your health can be compromised if you do not deal with this problem, not to mention the damage and the cost of the repairs. The first step is to always repair the leak and eliminate the source of the water causing the mold. In other words – Fix the leak

Routine checks are good to do as well. Under sinks and around toilets are good places to check. If you smell dampness, follow your nose and check for mold.

Next you need to begin repairs and renovations. Start by removing all damaged wood and removing all drywall. If the mold is extensive, you will need to take special precautions, such as wearing protective clothing and breathing apparatus. You may want to hire professionals if it is a large job. Also ensure that the mold spores cannot spread to the rest of the home where they can cause health issues and the further spread of the mold.

If anyone has asthma in the home or is subject to allergies, you may want them to stay outside the home while this work is being competed.

Hire professionals if you are not comfortable!

Save


Mold on shower ceilings

Mold on shower ceilingsAnother maintenance project for do-it-yourself people and consumers is painting the shower ceiling whenever it becomes tired looking or worse like ours. Mold on shower ceilings. The picture that we’ve taken and included in this post is the picture that shows how bad our shower ceiling was after about two years, since the last time that we painted the shower ceiling. Before we talk about removing the mold, we want to emphasize that if you leave the bathroom door open and let the shower dry after each use, there will be far less mold to contend with.

This is a small maintenance job that anyone can perform.

Mold on shower ceilings – steps to Follow

The steps needed to repaint the shower ceiling are as follows:

Remove the light

Sand your ceiling to make sure that it is smooth and all mold is removed. If the mold is really bad you may want to wash the ceiling with a combination of water and vinegar.

Lightly brush the ceiling to remove any dust that might remain.

Paint your ceiling with semigloss or glossy paint. The paint should be able to deal with high moisture situations.

If you use regular Low sheen or flat paint that paint will not resist the moisture that routinely it is exposed to whenever someone takes a shower.

This is just a simple thing that one can do to keep your house looking great and will cost virtually nothing other than the cost of paint.

Allow the paint to dry at least 24 hours before the shower is used. You want the paint to really harden so that moisture cannot penetrate. Even if the instructions say that the paint will be dry in less time, wait for at least 24 hours.

Caution

One caution, if you’re using a step ladder in your shower always protect the feet of the ladder, so that it does not scratch the bottom of your shower. You can use a couple of old towels placed on the bottom of the shower. If there’s some concern about the stepladder slipping, you may want to have someone hold it for you.

We always use latex paint, since there is  less smell and it is easy to clean up. If you use oil based paint, make sure there is lots of ventilation to clear the air. It can become over powering if there is no ventilation. Open a window, use a fan etc to move the air from inside the shower where you are working.

Bathroom Fan

In our particular situation, there is no fan to draw the moisture out of the bathroom. It is not expelled outside when people are taking hot showers. There probably should be a fan. The builder should have put a fan in the bathroom however it was not done. There are fans in all the other bathrooms, even the one which is just a two piece.

If you happen to be a new homeowner, who’s having a home built, this is one of the things to look for. Make sure that there are exhaust fans installed in all bathrooms.


  • Copyright © 1996-2010 Managing Home Maintenance Costs. All rights reserved.
    iDream theme by Templates Next | Powered by WordPress